HP Color LaserJet 2820/2830/2840 Getting Started Guide Кратко ръководство за потребителя Vodič za početak rada Ghid de iniţiere Başlangıç Kılavuzu Priročnik za začetek
Copyright Information for you to make the necessary modifications in order to maintain uninterrupted service. If trouble is experienced with this equipment, please see the numbers in the front of this manual for repair and (or) warranty information. If the trouble is causing harm to the telephone network, the telephone company may request you remove the equipment from the network until the problem is resolved.
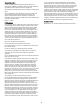
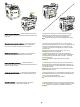
Configuraţia echipamentului Echipamentul multifuncţional HP Color LaserJet 2820 se livrează cu o tavă de alimentare pentru 125 de coli, o tavă de alimentare automată cu documente (ADF) pentru 50 de coli şi un scanner flatbed. De asemenea, include un port de interfaţă USB 2.0 Hi-Speed, o conexiune 10/100 pentru reţea locală (LAN) şi 96 megaocteţi (MO) de RAM.
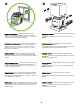
English Български Hrvatski Română Türkçe Slovenščina The HP Color LaserJet 2840 all-in-one includes the same components and offers the same functionality as the HP Color LaserJet 2830 all-in-one, and also includes a 250-sheet tray and a memory card reader. Prepare the location Place the device on a sturdy, level surface in a well-ventilated area. Make sure that enough space around the device is available so that the air vents are not blocked.
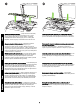
Regulate the environment Do not place the device in direct sunlight or in an area that has abrupt temperature and humidity changes. The recommended ranges are from 15° to 32.5°C (59° to 90.5°F) and from 10% to 80% relative humidity. Remove the packaging Unbox the printer and remove the package contents. Note Detailed unpacking instructions are on the inside of the top box flap.
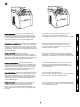
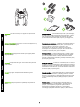
Package contents 1) Consumables kit (box with 4 print cartridges); 2) Power cord; 3) Getting started guide and support flyer; 4) Three CDs containing the device software and electronic user guide; 5) Automatic document feeder (ADF) input tray; 6) Imaging drum; ПРЕДУПРЕЖДЕНИЕ! Устройството е тежко. За повдигането му са необходими двама души.
) Phone cord (HP Color LaserJet 2830/2840 all-in-one only); 8) HP Color LaserJet all-in-one; 9) Control-panel faceplate (if one is not already installed). Note The USB cable (A/B) is not included.
English Play installation CD Insert the installation CD into a CD-ROM. Watch the animated installation guide that is provided on the CD. Note Do not begin installing the software until you have completed step 27 in this getting started guide. Български 9) Вратичка за модули памет тип DIMM; 10) порт за факс (само за HP Color LaserJet 2830/2840 “Всичко-в-едно”); 11) порт за HiSpeed USB 2.
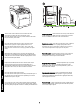
Remove the packing materials 1) Remove all of the orange tape from the printer, except the orange tape that protrudes from the rear output door. 2) Open the rear output door. 3) Pull the two pieces of orange shipping tape that are attached to the fuser shipping locks to remove the shipping locks. 4) Close the rear output door. Note The device will not operate with the shipping locks in place.
English Български Hrvatski Română Türkçe Slovenščina Remove the faceplate (optional) 1) Open the scanner-assembly lid. 2) Pull up on the top center of the shipping cover or of the control-panel faceplate that you want to replace. 3) Working outward from the center of the shipping cover or control-panel faceplate, continue to pull up until it releases from the all-in-one. Install the control-panel faceplate (if it is not already installed) 1) If it is not already open, raise the scanner-assembly lid.
3) Press the far ends of the faceplate straight down onto the device. Continue to press down while moving your hands toward the center of the faceplate until it snaps into place. Make sure that the faceplate is aligned correctly and has not captured any buttons. 4) Close the scanner assembly lid. The HP Color LaserJet 2820 all-in-one control panel includes the following controls: 1) Alphanumeric buttons; 2) Menu and cancel controls; 3) Copy controls; 4) Scan controls.
Install the ADF input tray 1) Align the two tabs on the input tray with the two grooves in the ADF lid. 2) Slide the tray into the grooves until the tray snaps into place. Панелът за управление на HP Color LaserJet 2830/2840 "Всичков-едно" включва следните бутони: 1) контроли на факса; 2) буквено-цифрови бутони; 3) контроли за менюто и отказ; 4) контроли на копирането; 5) контроли за сканирането.
Connect a printer cable to the all-in-one Note To use the all-in-one's networking functionality, go to step 13. If you are using the all-in-one as a standalone fax machine or copier, go to step 14. 1) Locate the USB cable port on the back of the device. 2) Connect the USB cable (A/B) to the correct port. Do not connect the cable to a computer or to the network at this time.
English Connect to a telephone line (HP Color LaserJet 2830/2840 only) Note If you are not using the device fax functionality, go to step 15. 1) Locate the fax interface ports on the back of the all-in-one. Български Свържете мрежов кабел към устройството. Забележка Ако не използвате функцията за свързване в мрежа, преминете към стъпка 14. 1) Свържете мрежов кабел към мрежовия порт на гърба на "Всичко-в-едно" устройството. 2) Свържете другия край на кабела към активен мрежов порт.
2) Connect the included phone cord to the device line port (the port with the jack. Note Use only the phone cord that came with the device. For more information about faxing, see the "Fax" chapter in the electronic user guide on the device CD (HP Color LaserJet 2830/2840 all-inone only). icon). 3) Connect the phone cord to a live telephone 2) Свържете предоставения телефонен кабел към порта "линия" на устройството (порта, който е означен с икона 3) Свържете телефонния кабел към телефонна розетка.
Turn on the device Turn on the device by pressing the power button that is on the side of the device next to the power socket. Български Свържете захранващия кабел 1) Свържете захранващия кабел към гнездото за захранване на гърба на устройството. 2) Свържете другия край на захранващия кабел към заземен контакт на променливотоковата електроснабдителна мрежа. Забележка Използвайте само захранващия кабел, предоставен с устройството.
Tip: If the device has no power and no lights are illuminated on the control panel, make sure that the power cord is attached securely to both the device and a power outlet. Also, make sure that the power strip is turned on and is operational, or connect the device directly to a wall outlet to test the power strip. Set the control-panel display language and location (if necessary) Note The HP Color LaserJet 2830/2840 control panel is shown. If prompted, select your language and location.
English 5) Remove the orange cover from the imaging drum. CAUTION Do not touch the surface of the green roller or expose the roller to light for an extended period of time, which could cause printquality issues. Български Инсталирайте фото барабана 1) Извадете фото барабана от неговата опаковка. 2) Поставете фото барабана върху устойчива повърхност и издърпайте оранжевите пръстени, за да извадите транспортните щифтове. 3) Свалете оранжевата транспортна блокировка от двата края на фото барабана.
6) Press the scanner-release button to open the scanner assembly. 7) Open the top-cover door. 6) Натиснете бутона за освобождаване на скенера, за да отворите сканиращия блок. 7) Отворете вратичката на горния капак. 6) Pritisnite gumb za otpuštanje skenera da biste otvorili sklop za skeniranje. 7) Otvorite vrata gornjeg poklopca. 6) Apăsaţi butonul de eliberare a scanner-ului pentru a deschide ansamblul scanner-ului. 7) Deschideţi capacul superior.
9) Lower the imaging drum into the printer, slightly rotate the imaging drum toward the front of the printer, and then press it firmly into place. 8) Подравнете зелените стрелки отстрани на фото барабана със зелените стрелки вътре в принтера. 9) Спуснете фото барабана в принтера, леко го завъртете към предната част на принтера и след това го натиснете силно на мястото му. 8) Poravnajte zelene strelice na strani bubnja za prijenos slike sa zelenim strelicama unutar pisača.
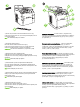
Install the print cartridge 1) Look inside the device and make sure the yellow color carriage of the print-cartridge carousel is open. If Note The print cartridges should be loaded in the device in the same order that they are removed from the print-cartridge kit: Yellow, Magenta, Cyan, and then Black. the yellow color carriage is not open then press (Rotate Carousel) until it is open. (The top door must be closed in order to rotate the carousel.
English Български Hrvatski Română Türkçe Slovenščina 2) Remove the print cartridge from its packaging, and then gently shake the cartridge five or six times. 3) Remove the orange cover and pull the sealing tape from the cartridge. 4) Holding the print cartridge with the roller facing you, squeeze the blue release levers. Align the blue arrows on the print cartridge with the blue arrows in the print-cartridge carousel. The color-coded tabs on the print cartridge and carousel should also be aligned.
5) Close the top-cover door and scanner assembly, and then press 6) Open the scanner assembly and the print-cartridge door, and then repeat steps 2 through 6 for each cartridge color until all four cartridges have been installed. 7) After all cartridges have been (Rotate Carousel). Note Do not press been installed.
English Български Hrvatski Română Türkçe Slovenščina CAUTION If toner gets on your clothing, wipe the toner off with a clean cloth, wash the items in cold water, and air dry the items. Using hot water or heat from a dryer sets the toner in the fabric. Note Hewlett-Packard Company cannot recommend using non-HP print cartridges, whether they are new, refilled, or remanufactured. Because they are not HP products, HP cannot influence their design or control their quality.
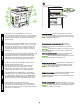
Setup tray 2 (HP Color LaserJet 2840 all-in-one) 1) Open tray 2, and remove the orange shipping lock inside the tray. 2) Move the blue width guides to match the paper size that is being loaded. 3) Extend the rear of the tray until the arrow points to the size that is being loaded. Инсталиране на тава 2 (HP Color LaserJet 2840 "Всичко-в-едно") 1) Отворете тава 2 и извадете оранжевото транспортно заключване от вътрешността на тавата.
6) Push down on the paper to lock the metal plate in the tray into place. 7) Slide the tray into the printer. 4) Заредете хартията със страната, върху която ще се печата, надолу и с горния ръб към предната част. Забележка Не разлиствайте носителите, преди да ги поставите в тавата. 5) Проверете дали хартията е подравнена и в четирите ъгъла и дали топчето е под отметките за височина, отбелязани отвътре на касетата. 6) Притиснете хартията надолу, за да застопорите металната плоча в касетата на мястото й.
Load tray 1 (Optional if tray 2 is installed) 1) Open tray 1, and then slide out the tray extender. 2) Slide the width guides until they are slightly wider than the paper that you are loading. Зареждане на тава 1 (опция, ако е инсталирана тава 2) 1) Отворете тава 1 и я изтеглете върху опората за касетата. 2) Плъзнете водачите по ширина, докато не се отворят малко повече от ширината на хартията, която ще зареждате. Uvlačenje ladice br. 1 (neobavezno ako je instalirana ladica 2) 1) Otvorite ladicu br.
English Български Hrvatski Română Türkçe Slovenščina 3) Load the paper with the side to be printed on face-up, and with the top edge toward the printer. Note Up to 125 pages can be loaded in Tray 1. 4) Slide the width guides in so that they lightly touch the paper. 5) Make sure that the paper fits under the tabs on the width guides. 3) Заредете хартията със страната за печат нагоре и с горния ръб към принтера. Забележка В тава 1 могат да се заредят до 125 страници.
Print a configuration report Note The HP Color LaserJet 2830/2840 all-in-one control panel is shown. 1) Press the Menu button. 2) Press the press or the button to select Reports, and then (Enter). 3) Press the Config report, and then press Отпечатайте отчет за конфигурацията Забележка Показан е панелът за управление на HP Color LaserJet 2830/2840 "Всичко-в-едно". 1) Натиснете бутона Menu. or the (Enter).
English Български Hrvatski Română Türkçe Slovenščina Test the copier by using the ADF input tray 1) Load the configuration report that you just printed into the ADF input tray, with the printed side face-up. 2) Adjust the media guides so that they touch the sides of the report page. 3) Verify that the report is loaded with the print-side up, and then press the Start Color button.
Self-test the copier by using the flatbed scanner 1) Open the scanner lid, place the configuration report with the print-side down on the flatbed scanner, and then close the scanner lid. 2) Press the Start Color button. Tip: If the copy job produces a blank page, make sure that the original is loaded with the print-side down on the flatbed scanner and that no jams exist in the paper path. For information about removing jams and other troubleshooting tips, see the electronic user guide on the device CD.
English Български Hrvatski Română Türkçe Slovenščina Test the memory-card reader Plug an HP-supported memory card into the appropriate slot. The display will indicate that the printer was able to read the memory card. See the "Photo" chapter in the electronic user guide on the device CD for more information about using the memory-card reader.
Complete your device setup If you are using the device as a standalone copier, the setup is complete. If you are using the device as a standalone fax (HP Color LaserJet 2830 all-in-one only), see the "Fax" chapter in the electronic user guide that is provided on the device CD. If you are connecting the device to a network, go to step 27. If you are connecting the device directly to a computer, go to step 28.
English Български Hrvatski Română Türkçe Slovenščina If you are using all of the device functionality, see the "Fax" chapter in the electronic user guide that is provided on the device CD (HP Color LaserJet 2830/2840 all-in-one only), and then go to step 27 (Network connection) or step 28 (Installing software) in this getting started guide. Connect to a network If you want to connect the device to a network, ensure that the device is connected to the network and then begin the software installation.
Installing the software Note To install the software for Macintosh, go to step 30. Note You must have administrative privileges to install the software for Windows® XP or Windows 2000. 1) Quit all of the programs that are running on the computer. 2) Follow the instructions that appeared at the end of the animated installation guide on the installation CD. If the installation program does not begin automatically, click Start, click Run, click Browse, select the HPSetup.exe file on the CD, and then click OK.
5) The software prompts you to connect the device to a computer. Connect a USB cable (A/B) from the device to the correct computer port. Note If connecting to a network, proceed to the following step without connecting a USB cable. 3) Изберете Install HP LaserJet software. 4) В съветника за свързване на принтер изберете типа връзка. 5) Софтуерът ви подканва да свържете устройството към компютър. Свържете USB кабел за устройство (A/B) от устройството към съответния порт на компютъра.
6) For Windows 2000 and Windows XP operating systems that meet all system requirements, select Typical, and then follow the instructions to install the software. For Windows 98 and Windows Millennium Edition (Me) operating systems, or any system that does not meet the system requirements, select Minimal, and then follow the instructions to install the software.
1) On the computer, click Start, and then click Programs. 2) Click HP, click HP CLJ 2820/2830/2840, and then click hp Toolbox to open the HP Toolbox. Now, go to step 32. Използване на Toolbox (Кутия с инструменти) на HP. Забележка HP Toolbox е недостъпна при минималната инсталация и не поддържа операционни системи Macintosh. След като приключи инсталирането на софтуера, можете да използвате устройството от своя компютър. 1) На компютъра щракнете върху Start, а след това върху Programs.
Install the Macintosh software (OS 9.2.2 and later) Note If you are using Macintosh OS X, go to step 31. 1) Connect the USB cable (A/B) to the computer. 2) Quit all of the programs that are running on the computer. 3) Follow the instructions that appeared at the end of the animated installation guide on the device CD. If the installation program did not begin automatically, open the CD folder and double-click the HP All-in-One Installer icon. Инсталиране на софтуера за Macintosh (OS 9.2.2 и по-нови).
English Български Hrvatski Română Türkçe Slovenščina 4) Follow the onscreen instructions, and then click Install. 5) When prompted, restart the computer. 6) When the HP all-in-one Setup Assistant starts, follow the instructions. Then, go to step 32. Install the Macintosh software (OS X 10.2 and later) 1) Connect the USB cable (A/B) to the computer. 2) Quit all of the programs that are running on the computer. 4) Следвайте инструкциите на екрана и щракнете върху Install.
3) Follow the instructions that appeared at the end of the animated installation guide on the device CD. If the installation program did not begin automatically, open the CD folder and double-click the HP All-in-One Installer icon. 4) Follow the onscreen instructions, and then click Install. 5) When prompted, restart the computer. 6) When the HP All-in-One Setup Assistant starts, follow the instructions.
Register the all-in-one Register with HP to keep your all-in-one running smoothly and to receive free information that is relevant to you, including driver or software update notifications, support alerts, and tips for using your HP product. Register your all-in-one at http://www.hp.com/go/register. Тестване на софтуерната инсталация Отпечатайте страница от произволна програма, за да се уверите, че софтуерът е инсталиран правилно. Ако инсталирането е неуспешно, инсталирайте софтуера повторно.
HP and its subsidiaries respect your privacy and are committed to protecting it. See the HP privacy statement at the Web site. Support information For customer support, see the support flyer or go to http://www.hp.com/support/clj2800series. Компанията HP и нейните дъщерни компании уважават неприкосновеността на личните ви данни и се ангажират с нейната защита. Вж. декларацията за конфиденциалност на HP на Web сайта за регистрация. Информация за поддръжка За поддръжка на клиентите вж.
English Български Hrvatski Română Türkçe Slovenščina Congratulations! The device is ready to use. Open the HP Toolbox, the online support, or the electronic user guide for additional use and troubleshooting information. Поздравления! Устройството е готово за използване. Отворете кутията HP Toolbox, онлайн поддръжката или електронното Ръководство на потребителя за допълнителна информация за използването и отстраняването на проблеми. Čestitamo! Uređaj je spreman za upotrebu.
44
45
46
© 2004 Hewlett-Packard Development Company, L.P. www.hp.