HP Color LaserJet 2820/2830/2840 Getting Started Guide Lühijuhend қосу жөніндегі нұсқаулық Darba uzsākšanas rokasgrāmata Darbo pradžios vadovas Руководство по началу работы
Copyright Information for you to make the necessary modifications in order to maintain uninterrupted service. If trouble is experienced with this equipment, please see the numbers in the front of this manual for repair and (or) warranty information. If the trouble is causing harm to the telephone network, the telephone company may request you remove the equipment from the network until the problem is resolved.
Įrenginio konfigūracijos Įrenginyje „HP Color LaserJet 2820 viskas viename“ yra 125 lapų talpos popieriaus tiekimo dėklas, 50 lapų talpos automatinio dokumentų tiektuvo dėklas ir planšetinis skaitytuvas. Taip pat yra didelio greičio USB 2.0 prievado lizdas, 10/100 vietinio tinklo (LAN) ryšys ir 96 megabaitų (MB) operatyvioji atmintis (RAM).
English Русский Eesti Lietuviškai Latviešu Казак The HP Color LaserJet 2840 all-in-one includes the same components and offers the same functionality as the HP Color LaserJet 2830 all-in-one, and also includes a 250-sheet tray and a memory card reader. Prepare the location Place the device on a sturdy, level surface in a well-ventilated area. Make sure that enough space around the device is available so that the air vents are not blocked.
Regulate the environment Do not place the device in direct sunlight or in an area that has abrupt temperature and humidity changes. The recommended ranges are from 15° to 32.5°C (59° to 90.5°F) and from 10% to 80% relative humidity. Remove the packaging Unbox the printer and remove the package contents. Note Detailed unpacking instructions are on the inside of the top box flap.
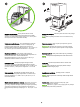
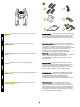
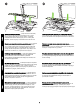
Package contents 1) Consumables kit (box with 4 print cartridges); 2) Power cord; 3) Getting started guide and support flyer; 4) Three CDs containing the device software and electronic user guide; 5) Automatic document feeder (ADF) input tray; 6) Imaging drum; ВНИМАНИЕ! Устройство достаточно тяжелое. Его нужно поднимать вдвоем. Содержимое упаковки 1) Комплект расходных материалов (коробка с 4 картриджами). 2) Шнур питания. 3) Руководство по началу работы и вкладыш со сведениями о технической поддержке.
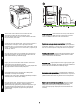
) Phone cord (HP Color LaserJet 2830/2840 all-in-one only); 8) HP Color LaserJet all-in-one; 9) Control-panel faceplate (if one is not already installed). Note The USB cable (A/B) is not included. Locate the device parts 1) Power switch; 2) Top (face-down) output bin; 3) Control panel; 4) Scanner-release button; 5) Memorycard slots (HP Color LaserJet 2840 only); 6) Top cover; 7) Tray 1; 8) Optional tray 2; 7) Телефонный шнур (только для устройства HP Color LaserJet 2830/2840 «все в одном»).
English Русский Eesti Lietuviškai Latviešu Казак 9) Dual inline memory module (DIMM) door; 10) Fax port (HP Color LaserJet 2830/2840 all-in-one only); 11) Hi-Speed USB 2.0 port; 12) Network port; 13) ADF output bin; 14) ADF input tray; 15) Flatbed scanner assembly; 16) Rear (face-up) output door; 17) Power socket. Play installation CD Insert the installation CD into a CD-ROM. Watch the animated installation guide that is provided on the CD.
Remove the packing materials 1) Remove all of the orange tape from the printer, except the orange tape that protrudes from the rear output door. 2) Open the rear output door. 3) Pull the two pieces of orange shipping tape that are attached to the fuser shipping locks to remove the shipping locks. 4) Close the rear output door. Note The device will not operate with the shipping locks in place.
English Русский Eesti Lietuviškai Latviešu Казак Remove the faceplate (optional) 1) Open the scanner-assembly lid. 2) Pull up on the top center of the shipping cover or of the control-panel faceplate that you want to replace. 3) Working outward from the center of the shipping cover or control-panel faceplate, continue to pull up until it releases from the all-in-one. Install the control-panel faceplate (if it is not already installed) 1) If it is not already open, raise the scanner-assembly lid.
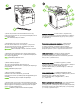
3) Press the far ends of the faceplate straight down onto the device. Continue to press down while moving your hands toward the center of the faceplate until it snaps into place. Make sure that the faceplate is aligned correctly and has not captured any buttons. 4) Close the scanner assembly lid. The HP Color LaserJet 2820 all-in-one control panel includes the following controls: 1) Alphanumeric buttons; 2) Menu and cancel controls; 3) Copy controls; 4) Scan controls.
English Русский Eesti Lietuviškai Latviešu Казак The HP Color LaserJet 2830/2840 all-in-one control panel includes the following controls: 1) Fax controls; 2) Alphanumeric buttons; 3) Menu and cancel controls; 4) Copy controls; 5) Scan and photo (HP Color LaserJet 2840 only) controls. Install the ADF input tray 1) Align the two tabs on the input tray with the two grooves in the ADF lid. 2) Slide the tray into the grooves until the tray snaps into place.
Connect a printer cable to the all-in-one Note To use the all-in-one's networking functionality, go to step 13. If you are using the all-in-one as a standalone fax machine or copier, go to step 14. 1) Locate the USB cable port on the back of the device. 2) Connect the USB cable (A/B) to the correct port. Do not connect the cable to a computer or to the network at this time.
English Русский Eesti Lietuviškai Latviešu Казак Connect a network cable to the device Note If you are not using the networking functionality, go to step 14. 1) Connect a network cable to the network port on the back of the all-in-one. 2) Connect the other end of the cable to an active network port. Connect to a telephone line (HP Color LaserJet 2830/2840 only) Note If you are not using the device fax functionality, go to step 15. 1) Locate the fax interface ports on the back of the all-in-one.
2) Connect the included phone cord to the device line port (the port with the jack. Note Use only the phone cord that came with the device. For more information about faxing, see the "Fax" chapter in the electronic user guide on the device CD (HP Color LaserJet 2830/2840 all-inone only). icon). 3) Connect the phone cord to a live telephone Примечание Используйте только телефонный шнур, поставляемый вместе с устройством. Для получения дополнительных сведений об использовании факса см.
English Русский Eesti Lietuviškai Latviešu Казак Connect the power cord 1) Connect the power cord to the power socket on the back of the device. 2) Connect the other end of the power cord to a grounded alternating current (AC) outlet. Note Use only the power cord that came with the device. Turn on the device Turn on the device by pressing the power button that is on the side of the device next to the power socket.
Tip: If the device has no power and no lights are illuminated on the control panel, make sure that the power cord is attached securely to both the device and a power outlet. Also, make sure that the power strip is turned on and is operational, or connect the device directly to a wall outlet to test the power strip. Set the control-panel display language and location (if necessary) Note The HP Color LaserJet 2830/2840 control panel is shown. If prompted, select your language and location.
English Русский Eesti Lietuviškai Latviešu Казак Install the imaging drum 1) Remove the imaging drum from its packaging. 2) Place the imaging drum on a firm surface, and then pull the orange rings to remove the shipping pins. 3) Remove the orange shipping lock on each end of the imaging drum. 4) Remove the two orange shipping spacers. 5) Remove the orange cover from the imaging drum.
6) Press the scanner-release button to open the scanner assembly. 7) Open the top-cover door. 6) Нажмите клавишу открытия сканера, чтобы открыть узел сканера. 7) Откройте верхнюю крышку. 6) Vajutage skannerisõlme avamiseks skanneri avamisnuppu. 7) Avage luuk ülemises kaanes. 6) Paspauskite skaitytuvo atleidimo mygtuką ir atidarykite skaitytuvo komplektą. 7) Atidarykite viršutinį dangtį. 6) Nospiediet skenera atbrīvošanas pogu, lai atvērtu skenera nodalījumu. 7) Atveriet augšējā vāka durtiņas.
9) Lower the imaging drum into the printer, slightly rotate the imaging drum toward the front of the printer, and then press it firmly into place. 8) Совместите зеленые стрелки сбоку барабана с зелеными стрелками внутри принтера. 9) Опустите барабан в принтер, слегка поверните его вперед к принтеру и нажмите на него до фиксации. 8) Joondage rohelised nooled kujutistrumli küljel roheliste nooltega printeri sees.
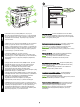
Install the print cartridge 1) Look inside the device and make sure the yellow color carriage of the print-cartridge carousel is open. If Note The print cartridges should be loaded in the device in the same order that they are removed from the print-cartridge kit: Yellow, Magenta, Cyan, and then Black. the yellow color carriage is not open then press (Rotate Carousel) until it is open. (The top door must be closed in order to rotate the carousel.
English Русский Eesti Lietuviškai Latviešu Казак 2) Remove the print cartridge from its packaging, and then gently shake the cartridge five or six times. 3) Remove the orange cover and pull the sealing tape from the cartridge. 4) Holding the print cartridge with the roller facing you, squeeze the blue release levers. Align the blue arrows on the print cartridge with the blue arrows in the print-cartridge carousel. The color-coded tabs on the print cartridge and carousel should also be aligned.
5) Close the top-cover door and scanner assembly, and then press 6) Open the scanner assembly and the print-cartridge door, and then repeat steps 2 through 6 for each cartridge color until all four cartridges have been installed. 7) After all cartridges have been (Rotate Carousel). Note Do not press been installed.
English Русский Eesti Lietuviškai Latviešu Казак CAUTION If toner gets on your clothing, wipe the toner off with a clean cloth, wash the items in cold water, and air dry the items. Using hot water or heat from a dryer sets the toner in the fabric. Note Hewlett-Packard Company cannot recommend using non-HP print cartridges, whether they are new, refilled, or remanufactured. Because they are not HP products, HP cannot influence their design or control their quality.
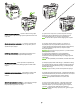
Setup tray 2 (HP Color LaserJet 2840 all-in-one) 1) Open tray 2, and remove the orange shipping lock inside the tray. 2) Move the blue width guides to match the paper size that is being loaded. 3) Extend the rear of the tray until the arrow points to the size that is being loaded. Установка лотка 2 (устройство HP Color LaserJet 2840 «все в одном») 1) Откройте лоток 2 и извлеките из него оранжевый фиксирующий блок. 2) Сдвиньте и установите синие направляющие ширины по размеру загружаемой бумаги.
English Русский Eesti Lietuviškai Latviešu Казак 4) Load the paper with the side to be printed on face-down, and with the top edge toward the front. Note Do not fan the media before placing it in the tray. 5) Make sure that the paper is flat at all four corners and that the stack is below the height marks that appear on the inside of the tray. 6) Push down on the paper to lock the metal plate in the tray into place. 7) Slide the tray into the printer.
Load tray 1 (Optional if tray 2 is installed) 1) Open tray 1, and then slide out the tray extender. 2) Slide the width guides until they are slightly wider than the paper that you are loading. Загрузка лотка 1 (не является обязательной, если установлен лоток 2) 1) Откройте лоток 1 и выдвиньте его расширитель. 2) Раздвиньте направляющие ширины так, чтобы расстояние между ними было немного больше, чем ширина загружаемой бумаги.
English Русский 4) Slide the width guides in so that they lightly touch the paper. 5) Make sure that the paper fits under the tabs on the width guides. 3) Загрузите бумагу лицевой стороной вниз и верхним краем к принтеру. Примечание В лоток 1 можно загружать до 125 листов. 4) Сдвиньте направляющие ширины, чтобы они слегка касались бумаги. 5) Убедитесь, что стопка бумаги не превышает отметок на направляющих ширины. 3) Laadige paber, prinditav pool all ja ülemine printeri pool.
Print a configuration report Note The HP Color LaserJet 2830/2840 all-in-one control panel is shown. 1) Press the Menu button. 2) Press the press or the button to select Reports, and then (Enter). 3) Press the or the Config report, and then press Печать отчета о конфигурации Примечание На рисунке показана панель управления устройства HP Color LaserJet 2830/2840 «все в одном». 1) Нажмите клавишу Меню. затем нажмите клавишу или , чтобы выбрать Отчеты, а (Ввод).
English Русский Eesti Lietuviškai Latviešu Казак Test the copier by using the ADF input tray 1) Load the configuration report that you just printed into the ADF input tray, with the printed side face-up. 2) Adjust the media guides so that they touch the sides of the report page. 3) Verify that the report is loaded with the print-side up, and then press the Start Color button.
Self-test the copier by using the flatbed scanner 1) Open the scanner lid, place the configuration report with the print-side down on the flatbed scanner, and then close the scanner lid. 2) Press the Start Color button. Tip: If the copy job produces a blank page, make sure that the original is loaded with the print-side down on the flatbed scanner and that no jams exist in the paper path. For information about removing jams and other troubleshooting tips, see the electronic user guide on the device CD.
English Русский Eesti Lietuviškai Latviešu Казак Test the memory-card reader Plug an HP-supported memory card into the appropriate slot. The display will indicate that the printer was able to read the memory card. See the "Photo" chapter in the electronic user guide on the device CD for more information about using the memory-card reader.
Complete your device setup If you are using the device as a standalone copier, the setup is complete. If you are using the device as a standalone fax (HP Color LaserJet 2830 all-in-one only), see the "Fax" chapter in the electronic user guide that is provided on the device CD. If you are connecting the device to a network, go to step 27. If you are connecting the device directly to a computer, go to step 28.
English Русский Eesti Lietuviškai Latviešu Казак If you are using all of the device functionality, see the "Fax" chapter in the electronic user guide that is provided on the device CD (HP Color LaserJet 2830/2840 all-in-one only), and then go to step 27 (Network connection) or step 28 (Installing software) in this getting started guide. Connect to a network If you want to connect the device to a network, ensure that the device is connected to the network and then begin the software installation.
Installing the software Note To install the software for Macintosh, go to step 30. Note You must have administrative privileges to install the software for Windows® XP or Windows 2000. 1) Quit all of the programs that are running on the computer. 2) Follow the instructions that appeared at the end of the animated installation guide on the installation CD. If the installation program does not begin automatically, click Start, click Run, click Browse, select the HPSetup.exe file on the CD, and then click OK.
5) The software prompts you to connect the device to a computer. Connect a USB cable (A/B) from the device to the correct computer port. Note If connecting to a network, proceed to the following step without connecting a USB cable. 3) Выберите команду Установка ПО HP LaserJet. 4) В мастере установки подключения принтера выберите тип подключения. 5) При установке будет запрошено подключение устройства к компьютеру. Подключите кабель USB (A/B) устройства к соответствующему порту компьютера.
6) For Windows 2000 and Windows XP operating systems that meet all system requirements, select Typical, and then follow the instructions to install the software. For Windows 98 and Windows Millennium Edition (Me) operating systems, or any system that does not meet the system requirements, select Minimal, and then follow the instructions to install the software.
English Русский Eesti Lietuviškai Latviešu Казак Use the HP Toolbox Note The HP Toolbox is not available from a minimal installation, and it does not support Macintosh operating systems. After the software installation is complete you can use the device from your computer. 1) On the computer, click Start, and then click Programs. 2) Click HP, click HP CLJ 2820/2830/2840, and then click hp Toolbox to open the HP Toolbox. Now, go to step 32.
Install the Macintosh software (OS 9.2.2 and later) Note If you are using Macintosh OS X, go to step 31. 1) Connect the USB cable (A/B) to the computer. 2) Quit all of the programs that are running on the computer. 3) Follow the instructions that appeared at the end of the animated installation guide on the device CD. If the installation program did not begin automatically, open the CD folder and double-click the HP All-in-One Installer icon. Установка программного обеспечения для Macintosh (OS 9.2.
English Русский Eesti Lietuviškai Latviešu Казак 4) Follow the onscreen instructions, and then click Install. 5) When prompted, restart the computer. 6) When the HP all-in-one Setup Assistant starts, follow the instructions. Then, go to step 32. Install the Macintosh software (OS X 10.2 and later) 1) Connect the USB cable (A/B) to the computer. 2) Quit all of the programs that are running on the computer. 4) Следуйте инструкциям на экране, а затем щелкните на Install.
3) Follow the instructions that appeared at the end of the animated installation guide on the device CD. If the installation program did not begin automatically, open the CD folder and double-click the HP All-in-One Installer icon. 4) Follow the onscreen instructions, and then click Install. 5) When prompted, restart the computer. 6) When the HP All-in-One Setup Assistant starts, follow the instructions.
English Русский Eesti Lietuviškai Latviešu Казак Test the software installation Print a page from any program to make sure that the software is correctly installed. If the installation failed, reinstall the software. If the reinstallation fails, see the support flyer or go to http://www.hp.com/support/clj2800series for more information.
HP and its subsidiaries respect your privacy and are committed to protecting it. See the HP privacy statement at the Web site. Support information For customer support, see the support flyer or go to http://www.hp.com/support/clj2800series. Компания HP и ее партнеры отвечают за конфиденциальность предоставленных вами сведений и гарантируют защиту этих сведений. См. положение о конфиденциальности HP на Webузле компании. Сведения о технической поддержке Сведения о поддержке клиентов см.
English Русский Eesti Lietuviškai Latviešu Казак Congratulations! The device is ready to use. Open the HP Toolbox, the online support, or the electronic user guide for additional use and troubleshooting information. Поздравляем! Устройство готово к работе. Для получения дополнительных сведений по эксплуатации и устранению неполадок откройте панель инструментов HP, обратитесь в службу интерактивной поддержки клиентов или к электронному руководству пользователя. Õnnitleme! Seade on kasutamiseks valmis.
44
45
ﺗﺤﺘﺮم ﺷﺮﻛﺔ HPواﻟﺸﺮﻛﺎت اﻟﺘﺎﺑﻌﺔ ﻟﻬﺎ ﺣﻖ اﻟﺨﺼﻮﺻﻴﺔ اﻟﺨﺎص ﺑﻚ وﺗﻠﺘﺰم ﺑﺤﻤﺎﻳﺔ ﻫﺬه اﻟﺨﺼﻮﺻﻴﺔ .ارﺟﻊ إﻟﻰ ﺑﻴﺎن اﻟﺨﺼﻮﺻﻴﺔ ﻟﺸﺮﻛﺔ HPﻋﻠﻰ ﻣﻮﻗﻊ اﻟﻮﻳﺐ. ﻋﺮﺑﻲ ﻋﺮﺑﻲ ﻣﻌﻠﻮﻣﺎت اﻟﺪﻋﻢ ﻟﻠﺤﺼﻮل ﻋﻠﻰ دﻋﻢ اﻟﻌﻤﻼء ،ارﺟﻊ إﻟﻰ ﻣﻨﺸﻮر اﻟﺪﻋﻢ أو اﻧﺘﻘﻞ إﻟﻰ اﻟﻤﻮﻗﻊ .http://www.hp.com/support/clj2800series ﺗﻬﺎﻧﻴﻨﺎ! اﻟﺠﻬﺎز ﺟﺎﻫﺰ ﻟﻼﺳﺘﺨﺪام .اﻓﺘﺢ ﻣﺮﺑﻊ أدوات HPأو اﻟﺪﻋﻢ اﻟﻔﻮري أو دﻟﻴﻞ اﻟﻤﺴﺘﺨﺪم اﻹﻟﻜﺘﺮوﻧﻲ ﻟﻠﺤﺼﻮل ﻋﻠﻰ ﻣﻌﻠﻮﻣﺎت إﺿﺎﻓﻴﺔ ﺑﺸﺄن اﺳﺘﺨﺪام اﻟﺠﻬﺎز واﺳﺘﻜﺸﺎف أﺧﻄﺎﺋﻪ وإﺻﻼﺣﻬﺎ.
(3اﺗﺒﻊ اﻹرﺷﺎدات اﻟﺘﻲ ﺗﻈﻬﺮ ﻓﻲ ﻧﻬﺎﻳﺔ دﻟﻴﻞ اﻟﺜﺘﺒﻴﺖ اﻟﻤﺼﻤﻢ ﺑﺎﻟﺼﻮر اﻟﻤﺘﺤﺮﻛﺔ اﻟﻤﻮﺟﻮد ﻋﻠﻰ اﻟﻘﺮص اﻟﻤﻀﻐﻮط اﻟﺨﺎص ﺑﺎﻟﺘﺜﺒﻴﺖ .إذا ﻟﻢ ﻳﺒﺪأ ﺑﺮﻧﺎﻣﺞ اﻟﺜﺘﺒﻴﺖ ﺗﻠﻘﺎﺋﻴًﺎ، ﻓﺎﻓﺘﺢ ﻣﺠﻠﺪ اﻟﻘﺮص اﻟﻤﻀﻐﻮط واﻧﻘﺮ ﻧﻘﺮًا ﻣﺰدوﺟًﺎ ﻓﻮق رﻣﺰ HP All-in-One .Installer (4اﺗﺒﻊ اﻹرﺷﺎدات اﻟﺘﻲ ﺗﻈﻬﺮ ﻋﻠﻰ اﻟﺸﺎﺷﺔ ﺛﻢ اﻧﻘﺮ ﻓﻮق (Install. 5ﻗﻢ ﺑﺈﻋﺎدة ﺗﺸﻐﻴﻞ ﺟﻬﺎز اﻟﻜﻤﺒﻴﻮﺗﺮ ،ﻋﻨﺪ اﻟﻄﻠﺐ (6 .
ﻋﺮﺑﻲ ﻋﺮﺑﻲ ﺗﺜﺒﻴﺖ ﺑﺮﻧﺎﻣﺞ )Macintoshاﻹﺻﺪار OS 9.2.2واﻷﺣﺪث( ﻣﻼﺣﻈﺔ إذا ﻛﻨﺖ ﺗﺴﺘﺨﺪم ﺑﺮﻧﺎﻣﺞ اﻟﺘﺸﻐﻴﻞ ،Macintosh OS Xﻓﺎﻧﺘﻘﻞ إﻟﻰ اﻟﺨﻄﻮة .31 (1ﻗﻢ ﺑﺘﻮﺻﻴﻞ ﻛﺎﺑﻞ (USB (A/Bﺑﺠﻬﺎز اﻟﻜﻤﺒﻴﻮﺗﺮ (2 .أﻏﻠﻖ ﻛﺎﻓﺔ اﻟﺒﺮاﻣﺞ اﻟﺠﺎري ﺗﺸﻐﻴﻠﻬﺎ ﻋﻠﻰ ﺟﻬﺎز اﻟﻜﻤﺒﻴﻮﺗﺮ. (3اﺗﺒﻊ اﻹرﺷﺎدات اﻟﺘﻲ ﺗﻈﻬﺮ ﻓﻲ ﻧﻬﺎﻳﺔ دﻟﻴﻞ اﻟﺜﺘﺒﻴﺖ اﻟﻤﺼﻤﻢ ﺑﺎﻟﺼﻮر اﻟﻤﺘﺤﺮﻛﺔ اﻟﻤﻮﺟﻮد ﻋﻠﻰ اﻟﻘﺮص اﻟﻤﻀﻐﻮط اﻟﺨﺎص ﺑﺎﻟﺘﺜﺒﻴﺖ .إذا ﻟﻢ ﻳﺒﺪأ ﺑﺮﻧﺎﻣﺞ اﻟﺜﺘﺒﻴﺖ ﺗﻠﻘﺎﺋﻴًﺎ، ﻓﺎﻓﺘﺢ ﻣﺠﻠﺪ اﻟﻘﺮص اﻟﻤﻀﻐﻮط واﻧﻘﺮ ﻧﻘﺮًا ﻣﺰدوﺟًﺎ ﻓﻮق رﻣﺰ HP All-in-One .
(6ﺑﺎﻟﻨﺴﺒﺔ ﻟﻨﻈﺎﻣﻲ اﻟﺘﺸﻐﻴﻞ Windows 2000و Windows XPاﻟﻠﺬﻳﻦ ﻳﺴﺘﻮﻓﻴﺎن ﻛﺎﻓﺔ ﻣﺘﻄﻠﺒﺎت اﻟﺘﺸﻐﻴﻞ ،ﺣﺪد ﻧﻮع اﻟﺘﺜﺒﻴﺖ ﻧﻤﻮذﺟﻲ ،ﺛﻢ اﺗﺒﻊ اﻹرﺷﺎدات ﻟﺘﺜﺒﻴﺖ اﻟﺒﺮﻧﺎﻣﺞ. ﺑﺎﻟﻨﺴﺒﺔ ﻟﻨﻈﺎﻣﻲ اﻟﺘﺸﻐﻴﻞ Windows 98وWindows Millennium Edition ((MEأو أي ﻧﻈﺎم ﺗﺸﻐﻴﻞ ﻻ ﻳﺴﺘﻮﻓﻲ ﻣﺘﻄﻠﺒﺎت اﻟﺘﺸﻐﻴﻞ ،ﺣﺪد ﻧﻮع اﻟﺘﺜﺒﻴﺖ اﻷدﻧﻰ، ﺛﻢ اﺗﺒﻊ اﻹرﺷﺎدات ﻟﺘﺜﺒﻴﺖ اﻟﺒﺮﻧﺎﻣﺞ. اﺳﺘﺨﺪام ﻣﺮﺑﻊ أدوات HP ﻣﻼﺣﻈﺔ ﻻ ﻳﺘﻢ ﺗﺜﺒﻴﺖ ﻣﺮﺑﻊ أدوات HPﻋﻨﺪ ﺗﺤﺪﻳﺪ اﻟﺜﺘﺒﻴﺖ اﻷدﻧﻰ ،وﻻ ﻳﺪﻋﻢ ﻫﺬا اﻟﺒﺮﻧﺎﻣﺞ أﻧﻈﻤﺔ ﺗﺸﻐﻴﻞ .
(3ﺣﺪد ﺗﺜﺒﻴﺖ ﺑﺮﻧﺎﻣﺞ (HP LaserJet. 4ﻓﻲ ﻣﻌﺎﻟﺞ Printer Connection ) Wizardﻣﻌﺎﻟﺞ اﺗﺼﺎل اﻟﻄﺎﺑﻌﺔ( ،ﺣﺪد أﺣﺪ أﻧﻮاع اﻻﺗﺼﺎل. (5ﻳﻄﺎﻟﺒﻚ اﻟﺒﺮﻧﺎﻣﺞ ﺑﺘﻮﺻﻴﻞ اﻟﺠﻬﺎز ﺑﺠﻬﺎز ﻛﻤﺒﻴﻮﺗﺮ .ﻗﻢ ﺑﺘﻮﺻﻴﻞ ﻛﺎﺑﻞ (USB (A/B ﻣﻦ اﻟﺠﻬﺎز ﺑﺎﻟﻤﻨﻔﺬ اﻟﺼﺤﻴﺢ ﺑﺎﻟﻜﻤﺒﻴﻮﺗﺮ. ﻣﻼﺣﻈﺔ إذا ﻛﻨﺖ ﺑﺼﺪد ﺗﻮﺻﻴﻞ اﻟﺠﻬﺎز ﺑﺸﺒﻜﺔ اﺗﺼﺎل ،ﻓﺘﺎﺑﻊ إﻟﻰ اﻟﺨﻄﻮة اﻟﺘﺎﻟﻴﺔ دون ﺗﻮﺻﻴﻞ ﻛﺎﺑﻞ .USB ﻋﺮﺑﻲ ﻋﺮﺑﻲ ﺗﺜﺒﻴﺖ اﻟﺒﺮﻧﺎﻣﺞ ﻣﻼﺣﻈﺔ ﻟﺘﺜﺒﻴﺖ اﻟﺒﺮﻧﺎﻣﺞ ﻓﻲ ﻧﻈﺎم ،Macintoshاﻧﺘﻘﻞ إﻟﻰ اﻟﺨﻄﻮة .
اﺳﺘﻜﻤﺎل إﻋﺪاد اﻟﺠﻬﺎز ﻓﻲ ﺣﺎﻟﺔ اﺳﺘﺨﺪام اﻟﺠﻬﺎز ﻛﻨﺎﺳﺨﺔ ﻣﺴﺘﻘﻠﺔ ،ﻳﻜﻮن ﻗﺪ ﺗﻢ اﻻﻧﺘﻬﺎء ﻣﻦ إﻋﺪاد اﻟﺠﻬﺎز .ﻓﻲ ﺣﺎﻟﺔ اﺳﺘﺨﺪام اﻟﺠﻬﺎز ﻛﻔﺎﻛﺲ ﻣﺴﺘﻘﻞ )ﺟﻬﺎز HP Color LaserJet 2830اﻟﻜﻞ ﻓﻲ واﺣﺪ ﻓﻘﻂ( ،ارﺟﻊ إﻟﻰ ﻓﺼﻞ "اﻟﻔﺎﻛﺲ" ﺑﺪﻟﻴﻞ اﻟﻤﺴﺘﺨﺪم اﻹﻟﻜﺘﺮوﻧﻲ اﻟﻤﻮﺟﻮد ﻋﻠﻰ اﻟﻘﺮص اﻟﻤﻀﻐﻮط ﻟﻠﺠﻬﺎز. إذا ﻛﺎن اﻟﺠﻬﺎز ﻣﻮﺻﻼً ﺑﺸﺒﻜﺔ اﺗﺼﺎل ،ﻓﺎﻧﺘﻘﻞ إﻟﻰ اﻟﺨﻄﻮة .27إذا ﻛﺎن اﻟﺠﻬﺎز ﻣﻮﺻﻼً ﻣﺒﺎﺷﺮة ﺑﺠﻬﺎز ﻛﻤﺒﻴﻮﺗﺮ ،ﻓﺎﻧﺘﻘﻞ إﻟﻰ اﻟﺨﻄﻮة .
ﻋﺮﺑﻲ ﻋﺮﺑﻲ إﺟﺮاء اﺧﺘﺒﺎر ذاﺗﻲ ﻟﻠﻨﺎﺳﺨﺔ ﺑﺎﺳﺘﺨﺪام اﻟﻤﺎﺳﺤﺔ اﻟﻀﻮﺋﻴﺔ اﻟﻤﺴﻄﺤﺔ (1اﻓﺘﺢ ﻏﻄﺎء اﻟﻤﺎﺳﺤﺔ اﻟﻀﻮﺋﻴﺔ وﺿﻊ ﺗﻘﺮﻳﺮ اﻟﺘﻬﻴﺌﺔ ﻋﻠﻰ اﻟﻤﺎﺳﺤﺔ اﻟﻀﻮﺋﻴﺔ ﺑﺤﻴﺚ ﻳﻜﻮن وﺟﻪ اﻟﻄﺒﺎﻋﺔ ﻷﺳﻔﻞ ﺛﻢ أﻏﻠﻖ ﻏﻄﺎء اﻟﻤﺎﺳﺤﺔ اﻟﻀﻮﺋﻴﺔ (2 .اﺿﻐﻂ ﻋﻠﻰ اﻟﺰر اﻟﺒﺪء أﻟﻮان. ﺗﻠﻤﻴﺢ :إذا ﻧﺘﺞ ﻋﻦ ﻣﻬﻤﺔ اﻟﻨﺴﺦ ﺻﻔﺤﺔ ﻓﺎرﻏﺔ ،ﺗﺄﻛﺪ ﻣﻦ أﻧﻪ ﻗﺪ ﺗﻢ ﺗﺤﻤﻴﻞ اﻟﻨﺴﺨﺔ اﻷﺻﻠﻴﺔ ﺑﺤﻴﺚ ﻳﻜﻮن وﺟﻪ اﻟﻄﺒﺎﻋﺔ ﻷﺳﻔﻞ ﻓﻲ اﻟﻤﺎﺳﺤﺔ اﻟﻀﻮﺋﻴﺔ اﻟﻤﺴﻄﺤﺔ ﺛﻢ ﺗﺄﻛﺪ ﻣﻦ ﻋﺪم وﺟﻮد اﻧﺤﺸﺎر ﻓﻲ ﻣﺴﺎر اﻟﻮرق .
ﻃﺒﺎﻋﺔ ﺗﻘﺮﻳﺮ اﻟﺘﻬﻴﺌﺔ ﻣﻼﺣﻈﺔ ﻟﻮﺣﺔ اﻟﺘﺤﻜﻢ اﻟﻤﻮﺟﻮدة ﺑﺠﻬﺎز HP Color LaserJet 2830/2840اﻟﻜﻞ ﻓﻲ واﺣﺪ ﻣﻌﺮوﺿﺔ. (1اﺿﻐﻂ ﻋﻠﻰ اﻟﺰر ﻗﺎﺋﻤﺔ. (2اﺿﻐﻂ ﻋﻠﻰ اﻟﺰر أو اﻟﺰر )إدﺧﺎل( (3 .اﺿﻐﻂ ﻋﻠﻰ اﻟﺰر اﺿﻐﻂ ﻋﻠﻰ اﻟﺰر اﺧﺘﺒﺎر اﻟﻨﺎﺳﺨﺔ ﺑﺎﺳﺘﺨﺪام درج إدﺧﺎل وﺣﺪة اﻟﺘﻐﺬﻳﺔ اﻟﺘﻠﻘﺎﺋﻴﺔ ﻟﻠﻤﺴﺘﻨﺪات )(ADF) 1 ﻗﻢ ﺑﺘﺤﻤﻴﻞ ﺗﻘﺮﻳﺮ اﻟﺘﻬﻴﺌﺔ اﻟﺬي ﺗﻤﺖ ﻃﺒﺎﻋﺘﻪ ﺗﻮًا ﻓﻲ درج إدﺧﺎل وﺣﺪة اﻟﺘﻐﺬﻳﺔ اﻟﺘﻠﻘﺎﺋﻴﺔ ﻟﻠﻤﺴﺘﻨﺪات ) (ADFﺑﺤﻴﺚ ﻳﻜﻮن وﺟﻪ اﻟﻄﺒﺎﻋﺔ ﻷﻋﻠﻰ (2 .اﺿﺒﻂ ﻣﻮﺟﻬﺎت اﻟﻮﺳﺎﺋﻂ ﺣﺘﻰ ﺗﻼﻣﺲ ﺟﻮاﻧﺐ ﺻﻔﺤﺔ اﻟﺘﻘﺮﻳﺮ (3 .
(3ﺣﻤِّﻞ اﻟﻮرق ﺑﺤﻴﺚ ﻳﻜﻮن وﺟﻪ اﻟﻄﺒﺎﻋﺔ ﻷﻋﻠﻰ ﻋﻠﻰ أن ﺗﺘﺠﻪ اﻟﺤﺎﻓﺔ اﻟﻌﻠﻮﻳﺔ ﻧﺤﻮ اﻟﻄﺎﺑﻌﺔ. ﻣﻼﺣﻈﺔ ﻳﻤﻜﻦ ﺗﺤﻤﻴﻞ ﻣﺎ ﻳﺼﻞ إﻟﻰ 125ورﻗﺔ ﺑﺎﻟﺪرج .1 (4ﺣﺮِّك ﻣﻮﺟﻬﺎت اﻟﻌﺮض ﺣﺘﻰ ﺗﻼﻣﺲ اﻟﻮرق ﺑﺮﻓﻖ (5 .ﺗﺄﻛﺪ ﻣﻦ اﺳﺘﻘﺮار اﻟﻮرق أﺳﻔﻞ اﻷﻟﺴﻨﺔ اﻟﻤﻮﺟﻮدة ﻋﻠﻰ ﻣﻮﺟﻬﺎت اﻟﻌﺮض. ﻋﺮﺑﻲ ﻋﺮﺑﻲ ﺗﺤﻤﻴﻞ اﻟﺪرج )1اﺧﺘﻴﺎري إذا ﻛﺎن اﻟﺪرج 2ﻣﺮﻛﺒًﺎ( (1اﻓﺘﺢ اﻟﺪرج ،1ﺛﻢ اﻓﺮد ﻣﻠﺤﻖ اﻟﺪرج. (2ﺣﺮِّك ﻣﻮﺟﻬﺎت اﻟﻌﺮض ﺣﺘﻰ ﺗﺼﺒﺢ أﻋﺮض ﻗﻠﻴﻼً ﻣﻦ اﻟﻮرق اﻟﺠﺎري ﺗﺤﻤﻴﻠﻪ.
ﺗﺮﻛﻴﺐ اﻟﺪرج )2ﺟﻬﺎز HP Color LaserJet 2840اﻟﻜﻞ ﻓﻲ واﺣﺪ ﻓﻘﻂ( (1اﻓﺘﺢ اﻟﺪرج ،2ﺛﻢ أزل ﻗﻔﻞ اﻟﺸﺤﻦ اﻟﺒﺮﺗﻘﺎﻟﻲ اﻟﻤﻮﺟﻮد داﺧﻞ اﻟﺪرج. (2ﺣﺮك ﻣﻮﺟﻬﺎت اﻟﻌﺮض اﻟﺰرﻗﺎء ﺣﺘﻰ ﺗﻄﺎﺑﻖ ﺣﺠﻢ اﻟﻮرق اﻟﺠﺎري ﺗﺤﻤﻴﻠﻪ(3 . اﻓﺮد اﻟﺠﺰء اﻟﺨﻠﻔﻲ ﻣﻦ اﻟﺪرج ﺣﺘﻰ ﻳﺸﻴﺮ اﻟﺴﻬﻢ إﻟﻰ اﻟﺤﺠﻢ اﻟﺠﺎري ﺗﺤﻤﻴﻠﻪ. (4ﺣﻤِّﻞ اﻟﻮرق ﺑﺤﻴﺚ ﻳﻜﻮن وﺟﻪ اﻟﻄﺒﺎﻋﺔ ﻷﺳﻔﻞ ﻋﻠﻰ أن ﺗﺘﺠﻪ اﻟﺤﺎﻓﺔ اﻟﻌﻠﻮﻳﺔ ﻧﺤﻮ اﻟﻤﻘﺪﻣﺔ. ﻣﻼﺣﻈﺔ ﻻ ﺗﻘﻢ ﺑﺘﻬﻮﻳﺔ اﻟﻮﺳﺎﺋﻂ ﻗﺒﻞ وﺿﻌﻬﺎ ﻓﻲ اﻟﺪرج.
(6اﻓﺘﺢ وﺣﺪة اﻟﻤﺎﺳﺤﺔ اﻟﻀﻮﺋﻴﺔ وﺑﺎب ﺧﺮﻃﻮﺷﺔ اﻟﻄﺒﺎﻋﺔ ﺛﻢ ﻛﺮر اﻟﺨﻄﻮات ﻣﻦ 2 إﻟﻰ 6ﻟﻜﻞ ﺧﺮﻃﻮﺷﺔ أﻟﻮان ﺣﺘﻰ ﺗﻨﺘﻬﻲ ﻣﻦ ﺗﺮﻛﻴﺐ اﻟﺨﺮاﻃﻴﺶ اﻷرﺑﻊ ﺟﻤﻴﻌﻬﺎ(7 . ﻋﺮﺑﻲ ﻋﺮﺑﻲ (5أﻏﻠﻖ ﺑﺎب اﻟﻐﻄﺎء اﻟﻌﻠﻮي ووﺣﺪة اﻟﻤﺎﺳﺤﺔ اﻟﻀﻮﺋﻴﺔ ﺛﻢ اﺿﻐﻂ ﻋﻠﻰ اﻟﺰر )اﻟﺤﺎﻣﻞ اﻟﺪاﺋﺮي(. ﻣﻼﺣﻈﺔ ﻻ ﺗﻀﻐﻂ ﻋﻠﻰ اﻟﺰر ﺑﻌﺪ اﻻﻧﺘﻬﺎء ﻣﻦ ﺗﺮﻛﻴﺐ ﻛﺎﻓﺔ اﻟﺨﺮاﻃﻴﺶ ،اﺿﻐﻂ ﻋﻠﻰ اﻟﺰر )إدﺧﺎل( ﺣﺘﻰ ﺗﻨﺘﻬﻲ ﻣﻦ ﺗﺮﻛﻴﺐ ﺧﺮاﻃﻴﺶ اﻟﻄﺒﺎﻋﺔ. ﺗﻨﺒﻴﻪ ﻓﻲ ﺣﺎﻟﺔ ﺗﻠﻄﺦ ﻣﻼﺑﺴﻚ ﺑﺎﻟﺤﺒﺮ ،اﻣﺴﺢ اﻟﺤﺒﺮ ﺑﺎﺳﺘﺨﺪام ﻗﻄﻌﺔ ﻗﻤﺎش ﻧﻈﻴﻔﺔ ﺛﻢ اﻏﺴﻠﻬﺎ ﺑﻤﺎء ﺑﺎرد وﺟﻔﻔﻬﺎ ﺑﺎﻟﻬﻮاء .
ﻣﻼﺣﻈﺔ وﻳﻨﺒﻐﻲ ﺗﺮﻛﻴﺐ ﺧﺮاﻃﻴﺶ اﻟﻄﺒﺎﻋﺔ ﺑﺎﻟﺠﻬﺎز ﺑﻨﻔﺲ اﻟﺘﺮﺗﻴﺐ اﻟﺘﻲ ﺗﻢ إزاﻟﺘﻬﺎ ﺑﻪ ﻣﻦ ﻣﺠﻤﻮﻋﺔ ﺧﺮاﻃﻴﺶ اﻟﻄﺒﺎﻋﺔ .اﻟﺼﻔﺮاء ﺛﻢ اﻷرﺟﻮاﻧﻴﺔ ﺛﻢ اﻟﺴﻤﺎوﻳﺔ ﺛﻢ اﻟﺴﻮداء. ﺗﺮﻛﻴﺐ ﺧﺮﻃﻮﺷﺔ اﻟﻄﺒﺎﻋﺔ (1أﻟﻖ ﻧﻈﺮة داﺧﻞ اﻟﺠﻬﺎز وﺗﺄﻛﺪ ﻣﻦ ﻓﺘﺢ ﺣﺎﻣﻞ ﺧﺮاﻃﻴﺶ اﻟﻄﺒﺎﻋﺔ اﻷﺻﻔﺮ .إذا ﻟﻢ ﻳﻜﻦ اﻟﺤﺎﻣﻞ اﻷﺻﻔﺮ ﻣﻔﺘﻮﺣًﺎ ،ﻓﺎﺿﻐﻂ ﻋﻠﻰ اﻟﺰر )اﻟﺤﺎﻣﻞ اﻟﺪاﺋﺮي( ﺣﺘﻰ ﻳﺘﻢ ﻓﺘﺤﻪ) .وﻳﺘﻌﻴﻦ ﻏﻠﻖ اﻟﺒﺎب اﻟﻌﻠﻮي ﺣﺘﻰ ﻳﻤﻜﻦ ﺗﺪوﻳﺮ اﻟﺤﺎﻣﻞ اﻟﺪاﺋﺮي(. (4اﻣﺴﻚ ﺧﺮﻃﻮﺷﺔ اﻟﻄﺒﺎﻋﺔ ﺑﺤﻴﺚ ﺗﻜﻮن اﻷﺳﻄﻮاﻧﺔ ﺗﺠﺎﻫﻚ ،اﺿﻐﻂ ﻋﻠﻰ أذرع اﻟﺘﺤﺮﻳﺮ اﻟﺰرﻗﺎء .
ﻗﻢ ﺑﻤﺤﺎذاة اﻷﺳﻬﻢ اﻟﺨﻀﺮاء اﻟﻤﻮﺟﻮدة ﻋﻠﻰ ﺟﺎﻧﺐ أﺳﻄﻮاﻧﺔ اﻟﺘﺼﻮﻳﺮ ﻣﻊ اﻷﺳﻬﻢ اﻟﺨﻀﺮاء اﻟﻤﻮﺟﻮدة داﺧﻞ اﻟﻄﺎﺑﻌﺔ. اﺧﻔﺾ أﺳﻄﻮاﻧﺔ اﻟﺘﺼﻮﻳﺮ إﻟﻰ داﺧﻞ اﻟﻄﺎﺑﻌﺔ ،وﻗﻢ ﺑﺘﺪوﻳﺮﻫﺎ ﺑﺮﻓﻖ ﻧﺤﻮ اﻟﺠﺰء اﻷﻣﺎﻣﻲ ﻣﻦ اﻟﻄﺎﺑﻌﺔ ﺛﻢ اﺿﻐﻂ ﻋﻠﻴﻬﺎ ﺑﻘﻮة ﺣﺘﻰ ﺗﺴﺘﻘﺮ ﻓﻲ ﻣﻜﺎﻧﻬﺎ. ﻋﺮﺑﻲ ﻋﺮﺑﻲ اﺿﻐﻂ ﻋﻠﻰ زر ﺗﺤﺮﻳﺮ اﻟﻤﺎﺳﺤﺔ اﻟﻀﻮﺋﻴﺔ ﻟﻔﺘﺢ وﺣﺪة اﻟﻤﺎﺳﺤﺔ اﻟﻀﻮﺋﻴﺔ. اﻓﺘﺢ ﺑﺎب اﻟﻐﻄﺎء اﻟﻌﻠﻮي.
ﺗﻠﻤﻴﺢ :إذا ﻛﺎن اﻟﺠﻬﺎز ﻏﻴﺮ ﻣﻮﺻﻞ ﺑﺎﻟﺘﻴﺎر وﻻ ﺗﻮﺟﺪ ﻣﺼﺎﺑﻴﺢ ﻣﻀﺎءة ﻋﻠﻰ ﻟﻮﺣﺔ اﻟﺘﺤﻜﻢ ،ﻓﺘﺄﻛﺪ ﻣﻦ ﺗﻮﺻﻴﻞ ﺳﻠﻚ اﻟﺘﻴﺎر ﺑﻜﻞ ﻣﻦ اﻟﺠﻬﺎز وﻣﺄﺧﺬ اﻟﺘﻴﺎر ﺑﺈﺣﻜﺎم .ﺗﺄﻛﺪ أﻳﻀًﺎ ﻣﻦ ﺗﺸﻐﻴﻞ وﺻﻠﺔ اﻟﻄﺎﻗﺔ وﻣﻦ ﻋﻤﻠﻬﺎ أو ﻗﻢ ﺑﺘﻮﺻﻴﻞ اﻟﺠﻬﺎز ﻣﺒﺎﺷﺮةً ﺑﻤﺄﺧﺬ ﺗﻴﺎر ﻣﻮﺟﻮد ﺑﺎﻟﺤﺎﺋﻂ ﻻﺧﺘﺒﺎر وﺻﻠﺔ اﻟﻄﺎﻗﺔ. ﺗﻌﻴﻴﻦ اﻟﻠﻐﺔ واﻟﻤﻜﺎن ﻋﻠﻰ ﺷﺎﺷﺔ ﻋﺮض ﻟﻮﺣﺔ اﻟﺘﺤﻜﻢ )إذا ﻟﺰم اﻷﻣﺮ( ﻣﻼﺣﻈﺔ ﻟﻮﺣﺔ اﻟﺘﺤﻜﻢ اﻟﻤﻮﺟﻮدة ﺑﺠﻬﺎز HP Color LaserJet 2830/2840 ﻣﻌﺮوﺿﺔ. إذا ﻣﺎ ﺗﻤﺖ ﻣﻄﺎﻟﺒﺘﻚ ﺑﺘﺤﺪﻳﺪ اﻟﻠﻐﺔ واﻟﻤﻜﺎن ،ﻓﻘﻢ ﺑﺘﺤﺪﻳﺪﻫﻤﺎ .
ﻋﺮﺑﻲ ﻋﺮﺑﻲ (2ﻗﻢ ﺑﺘﻮﺻﻴﻞ ﺳﻠﻚ اﻟﻬﺎﺗﻒ اﻟﻤﺮﻓﻖ ﺑﻤﻨﻔﺬ اﻟﺨﻂ اﻟﻤﻮﺟﻮد ﺑﺎﻟﺠﻬﺎز )اﻟﻤﻨﻔﺬ اﻟﻤﻤﻴﺰ ﻣﻼﺣﻈﺔ اﺳﺘﺨﺪم ﺳﻠﻚ اﻟﻔﺎﻛﺲ اﻟﻤﺮﻓﻖ ﻣﻊ اﻟﺠﻬﺎز ﻓﻘﻂ .ﻟﻠﺤﺼﻮل ﻋﻠﻰ اﻟﻤﺰﻳﺪ ﻣﻦ اﻟﻤﻌﻠﻮﻣﺎت ﺣﻮل وﻇﻴﻔﺔ اﻹرﺳﺎل ﺑﺎﻟﻔﺎﻛﺲ ،اﻧﻈﺮ ﻓﺼﻞ "اﻟﻔﺎﻛﺲ" ﺑﺪﻟﻴﻞ اﻟﻤﺴﺘﺨﺪم اﻹﻟﻜﺘﺮوﻧﻲ اﻟﻤﻮﺟﻮد ﻋﻠﻰ اﻟﻘﺮص اﻟﻤﻀﻐﻮط اﻟﺨﺎص ﺑﺎﻟﺠﻬﺎز) .اﻟﺠﻬﺎز HP Color LaserJet 2830/2840اﻟﻜﻞ ﻓﻲ واﺣﺪ ﻓﻘﻂ(. ﺗﻮﺻﻴﻞ ﺳﻠﻚ اﻟﺘﻴﺎر (1ﻗﻢ ﺑﺘﻮﺻﻴﻞ ﺳﻠﻚ اﻟﺘﻴﺎر ﺑﻤﻘﺒﺲ اﻟﺘﻴﺎر اﻟﻤﻮﺟﻮد ﺑﺎﻟﺠﺰء اﻟﺨﻠﻔﻲ ﻟﻠﺠﻬﺎز (2 .
ﺗﻮﺻﻴﻞ ﻛﺎﺑﻞ ﻃﺎﺑﻌﺔ ﺑﺠﻬﺎز اﻟﻜﻞ ﻓﻲ واﺣﺪ ﻣﻼﺣﻈﺔ ﻻﺳﺘﺨﺪام وﻇﻴﻔﺔ ﺷﺒﻜﺔ اﻻﺗﺼﺎل ﺑﺠﻬﺎز اﻟﻜﻞ ﻓﻲ واﺣﺪ ،اﻧﺘﻘﻞ إﻟﻰ اﻟﺨﻄﻮة .13إذا ﻛﻨﺖ ﺗﺴﺘﺨﺪم ﺟﻬﺎز اﻟﻜﻞ ﻓﻲ واﺣﺪ ﻛﻜﺠﻬﺎز ﻓﺎﻛﺲ ﻣﻨﻔﺼﻞ أو ﻛﻨﺎﺳﺨﺔ ﻣﻨﻔﺼﻠﺔ ،ﻓﺎﻧﺘﻘﻞ إﻟﻰ اﻟﺨﻄﻮة .14 (1ﺣﺪد ﻣﻮﻗﻊ ﻣﻨﻔﺬ ﻛﺎﺑﻞ اﻟﻔﺎﻛﺲ ﻋﻠﻰ اﻟﺠﺰء اﻟﺨﻠﻔﻲ ﻟﻠﺠﻬﺎز (2 .ﻗﻢ ﺑﺘﻮﺻﻴﻞ ﻛﺎﺑﻞ (USB (A/Bﺑﺎﻟﻤﻨﻔﺬ اﻟﺼﺤﻴﺢ .ﻻ ﺗﻘﻢ ﺑﺘﻮﺻﻴﻞ اﻟﻜﺎﺑﻞ ﺑﺠﻬﺎز ﻛﻤﺒﻴﻮﺗﺮ أو ﺑﺸﺒﻜﺔ اﺗﺼﺎل ﻓﻲ ﻫﺬا اﻟﻮﻗﺖ. ﺗﻮﺻﻴﻞ ﻛﺎﺑﻞ ﺷﺒﻜﺔ اﺗﺼﺎل ﺑﺎﻟﺠﻬﺎز ﻣﻼﺣﻈﺔ إذا ﻟﻢ ﺗﻜﻦ ﺗﺴﺘﺨﺪم وﻇﻴﻔﺔ ﺷﺒﻜﺔ اﻻﺗﺼﺎل ،ﻓﺎﻧﺘﻘﻞ إﻟﻰ اﻟﺨﻄﻮة .
ﻋﺮﺑﻲ ﻋﺮﺑﻲ (3اﺿﻐﻂ ﻋﻠﻰ اﻷﻃﺮاف اﻟﺒﻌﻴﺪة ﻟﻠﻐﻄﺎء اﻟﻮاﻗﻲ ﻷﺳﻔﻞ ﺑﺸﻜﻞ ﻣﺴﺘﻘﻴﻢ ﻧﺤﻮ اﻟﺠﻬﺎز .اﺳﺘﻤﺮ ﻓﻲ اﻟﻀﻐﻂ ﻷﺳﻔﻞ ﻣﻊ ﺗﺤﺮﻳﻚ ﻳﺪﻳﻚ ﺑﺎﺗﺠﺎه ﻣﻨﺘﺼﻒ اﻟﻐﻄﺎء اﻟﻮاﻗﻲ ﺣﺘﻰ ﻳﺴﺘﻘﺮ ﻓﻲ ﻣﻜﺎﻧﻪ .ﺗﺄﻛﺪ ﻣﻦ ﺿﺒﻂ اﻟﻐﻄﺎء اﻟﻮاﻗﻲ ﺑﻄﺮﻳﻘﺔ ﺻﺤﻴﺤﺔ ،وأﻧﻪ ﻻ ﻳﻀﻐﻂ ﻋﻠﻰ أي ﻣﻦ اﻷزرار (4 .أﻏﻠﻖ ﻏﻄﺎء وﺣﺪة اﻟﻤﺎﺳﺤﺔ اﻟﻀﻮﺋﻴﺔ.
إﺧﺮاج ﻣﻮاد اﻟﺘﻌﺒﺌﺔ (1أزل ﻛﺎﻓﺔ اﻟﺸﺮاﺋﻂ ﺑﺮﺗﻘﺎﻟﻴﺔ اﻟﻠﻮن ﻣﻦ اﻟﻄﺎﺑﻌﺔ ،ﻋﺪا اﻟﺸﺮﻳﻂ اﻟﺒﺮﺗﻘﺎﻟﻲ اﻟﺒﺎرز ﻣﻦ ﺑﺎب اﻹﺧﺮاج اﻟﺨﻠﻔﻲ. (2اﻓﺘﺢ ﺑﺎب اﻹﺧﺮاج اﻟﺨﻠﻔﻲ (3 .اﺟﺬب ﻗﻄﻌﺘﻲ ﺷﺮﻳﻂ اﻟﺸﺤﻦ ﺑﺮﺗﻘﺎﻟﻴﺘﻲ اﻟﻠﻮن واﻟﻤﺜﺒﺘﺘﺎن ﺑﺄﻗﻔﺎل ﺷﺤﻦ اﻟﻤﺼﻬﺮ ﺣﺘﻰ ﻳﻤﻜﻨﻚ إزاﻟﺔ أﻗﻔﺎل اﻟﺸﺤﻦ (4.أﻏﻠﻖ ﺑﺎب اﻹﺧﺮاج اﻟﺨﻠﻔﻲ. ﻣﻼﺣﻈﺔ ﻟﻦ ﻳﻌﻤﻞ اﻟﺠﻬﺎز ﻓﻲ ﺣﺎﻟﺔ وﺟﻮد أﻗﻔﺎل اﻟﺸﺤﻦ ﻓﻲ ﻣﻜﺎﻧﻬﺎ. إزاﻟﺔ اﻟﻐﻄﺎء اﻟﻮاﻗﻲ ﻟﻠﻮﺣﺔ اﻟﺘﺤﻜﻢ )اﺧﺘﻴﺎري( (1اﻓﺘﺢ ﻏﻄﺎء وﺣﺪة اﻟﻤﺎﺳﺤﺔ اﻟﻀﻮﺋﻴﺔ (2.
ﻋﺮﺑﻲ ﻋﺮﺑﻲ (7ﺳﻠﻚ اﻟﻬﺎﺗﻒ )ﺟﻬﺎز HP LaserJet 2830/2840اﻟﻜﻞ ﻓﻲ واﺣﺪ ﻓﻘﻂ((8 ، ﺟﻬﺎز HP LaserJetاﻟﻜﻞ ﻓﻲ واﺣﺪ (9 ،ﻏﻄﺎء واقٍ ﻟﻠﻮﺣﺔ اﻟﺘﺤﻜﻢ )ﻓﻲ ﺣﺎﻟﺔ ﻋﺪم ﺗﺮﻛﻴﺒﻪ ﺑﺎﻟﻔﻌﻞ(. ﻣﻼﺣﻈﺔ ﻻ ﻳﺮﻓﻖ ﻛﺎﺑﻞ .
ﺗﻬﻴﺌﺔ اﻟﺒﻴﺌﺔ اﻟﻤﺤﻴﻄﺔ ﺑﺎﻟﺠﻬﺎز ﻻ ﺗﻀﻊ اﻟﺠﻬﺎز ﻓﻲ ﻣﻨﻄﻘﺔ ﺗﺘﻌﺮض ﻷﺷﻌﺔ اﻟﺸﻤﺲ اﻟﻤﺒﺎﺷﺮة أو ﻣﻨﻄﻘﺔ ﺑﻬﺎ ﺗﻐﻴﺮات ﻣﻔﺎﺟﺌﺔ ﻓﻲ درﺟﺔ اﻟﺤﺮارة أو اﻟﺮﻃﻮﺑﺔ .ﻳﺘﺮاوح اﻟﻨﻄﺎق اﻟﻤﻮﺻﻰ ﺑﻪ ﻟﺪرﺟﺔ اﻟﺤﺮارة ﻣﻦ 15إﻟﻰ 32.5درﺟﺔ ﻣﺌﻮﻳﺔ ) 59إﻟﻰ 90.5 ﻓﻬﺮﻧﻬﺎﻳﺖ( ﻓﻲ ﺣﻴﻦ ﻳﺘﺮاوح ﻧﻄﺎق اﻟﺮﻃﻮﺑﺔ اﻟﻨﺴﺒﻴﺔ اﻟﻤﻮﺻﻰ ﺑﻪ ﻣﻦ %10إﻟﻰ .%80 إﺧﺮاج اﻟﺠﻬﺎز ﻣﻦ اﻟﻌﺒﻮة ﻗﻢ ﺑﺈﺧﺮاج اﻟﻄﺎﺑﻌﺔ ﻣﻦ اﻟﺼﻨﺪوق وأﺧﺮج ﻣﺤﺘﻮﻳﺎت اﻟﻌﺒﻮة. ﻣﻼﺣﻈﺔ ﺗﻮﺟﺪ إرﺷﺎدات ﺗﻔﺼﻴﻠﻴﺔ ﺑﺸﺄن ﻓﺘﺢ اﻟﻌﺒﻮة ﺑﺎﻟﺠﺰء اﻟﺪاﺧﻠﻲ ﻣﻦ اﻟﻠﺴﺎن اﻟﻌﻠﻮي ﻟﻠﺼﻨﺪوق. ﺗﺤﺬﻳﺮ! اﻟﺠﻬﺎز ﺛﻘﻴﻞ .
ﻋﺮﺑﻲ ﻋﺮﺑﻲ ﺗﻬﻴﺌﺔ اﻟﺠﻬﺎز ﻳُﺮﻓﻖ ﺑﺠﻬﺎز " HP Color Laser Jet 2820اﻟﻜﻞ ﻓﻲ واﺣﺪ" درج إدﺧﺎل وﺳﺎﺋﻂ ﺳﻌﺔ 125ورﻗﺔ ودرج إدﺧﺎل وﺣﺪة اﻟﺘﻐﺬﻳﺔ اﻟﺘﻠﻘﺎﺋﻴﺔ ﻟﻠﻤﺴﺘﻨﺪات ) (ADFﺳﻌﺔ 50ﺻﻔﺤﺔ وﻣﺎﺳﺤﺔ ﺿﻮﺋﻴﺔ ﻣﺴﻄﺤﺔ .ﻛﻤﺎ أﻧﻪ ﻳﺤﺘﻮي ﻋﻠﻰ ﻣﻨﻔﺬ واﺟﻬﺔ ﺗﻮﺻﻴﻞ Hi-Speed USB 2.0وﻳﺪﻋﻢ ﺗﻮﺻﻴﻞ ﺷﺒﻜﺔ اﺗﺼﺎل ﻣﺤﻠﻴﺔ )(LAN ﻣﻦ ﻧﻮع 100/10ﺑﺎﻹﺿﺎﻓﺔ إﻟﻰ 96ﻣﻴﺠﺎﺑﺎﻳﺖ ﻣﻦ ذاﻛﺮة اﻟﻮﺻﻮل اﻟﻌﺸﻮاﺋﻲ .
© 2004 Hewlett-Packard Development Company, L.P. www.hp.