HP Color LaserJet 2820/2830/2840
Copyright Information for you to make the necessary modifications in order to maintain uninterrupted service. If trouble is experienced with this equipment, please see the numbers in the front of this manual for repair and (or) warranty information. If the trouble is causing harm to the telephone network, the telephone company may request you remove the equipment from the network until the problem is resolved.
HP Color LaserJet 2830 복합기는 HP Color LaserJet 2820 복합기 와 같은 구성 요소와 같은 기능을 갖추고 있으며, 그외 팩스 기능을 포 함하고 있습国다. การตั้งคาคอนฟกเครื่องพิมพ เครื่องพิมพ HP Color LaserJet 2820 ออลลอิน-วัน มาพรอมกับถาดปอนกระดาษ 125 แผน ถาดปอนกระดาษของอุปกรณ ปอนกระดาษอัตโนมัติ (ADF) สําหรับกระดาษ 50 แผน และเครื่องสแกนแบบ แทน เครื่องพิมพรุนนี้ยังมีพอรตการเชื่อมตอ USB 2.
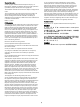
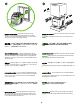
English 简体中文 Bahasa Indonesia 한국어 ภาษาไทย 繁體中文 Tiếng Việt The HP Color LaserJet 2840 all-in-one includes the same components and offers the same functionality as the HP Color LaserJet 2830 all-in-one, and also includes a 250-sheet tray and a memory card reader. Prepare the location Place the device on a sturdy, level surface in a well-ventilated area. Make sure that enough space around the device is available so that the air vents are not blocked.
Regulate the environment Do not place the device in direct sunlight or in an area that has abrupt temperature and humidity changes. The recommended ranges are from 15° to 32.5°C (59° to 90.5°F) and from 10% to 80% relative humidity. Remove the packaging Unbox the printer and remove the package contents. Note Detailed unpacking instructions are on the inside of the top box flap. 控制环境 请勿将设备放在阳光直射或温度和湿度变化 剧烈的地方。 建议的温度为 15°C 至 32.5°C(59°F 至 90.
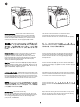
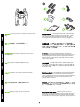
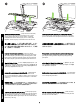
Package contents 1) Consumables kit (box with 4 print cartridges); 2) Power cord; 3) Getting started guide and support flyer; 4) Three CDs containing the device software and electronic user guide; 5) Automatic document feeder (ADF) input tray; 6) Imaging drum; 警告! 设备较重, 抬起时需要两个人。 包装箱物品 1) 消耗品(箱中包含 4 个打印碳粉盒); 2) 电源线;3) 入门指南和支持说明;4) 包含设备软件 和 电 子 版 用 户 指 南 的 三 张 CD ; 5) 自 动 文 档 进 纸 器 (ADF) 进纸盘;6) 成像鼓; PERINGATAN! Piranti ini berat. Diperlukan dua orang untuk mengangkatnya.
) Phone cord (HP Color LaserJet 2830/2840 all-in-one only); 8) HP Color LaserJet all-in-one; 9) Control-panel faceplate (if one is not already installed). Note The USB cable (A/B) is not included.
English Play installation CD Insert the installation CD into a CD-ROM. Watch the animated installation guide that is provided on the CD. Note Do not begin installing the software until you have completed step 27 in this getting started guide. 简体中文 9) 双列直插内存模块 (DIMM) 盖;10) 传真端口(仅 HP Color LaserJet 2830/2840 一 体 机 ) ; 11) 高 速 USB 2.
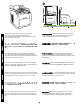
Remove the packing materials 1) Remove all of the orange tape from the printer, except the orange tape that protrudes from the rear output door. 2) Open the rear output door. 3) Pull the two pieces of orange shipping tape that are attached to the fuser shipping locks to remove the shipping locks. 4) Close the rear output door. Note The device will not operate with the shipping locks in place.
English 简体中文 Bahasa Indonesia 한국어 ภาษาไทย 繁體中文 Tiếng Việt Remove the faceplate (optional) 1) Open the scanner-assembly lid. 2) Pull up on the top center of the shipping cover or of the control-panel faceplate that you want to replace. 3) Working outward from the center of the shipping cover or control-panel faceplate, continue to pull up until it releases from the all-in-one. Install the control-panel faceplate (if it is not already installed) 1) If it is not already open, raise the scanner-assembly lid.
3) Press the far ends of the faceplate straight down onto the device. Continue to press down while moving your hands toward the center of the faceplate until it snaps into place. Make sure that the faceplate is aligned correctly and has not captured any buttons. 4) Close the scanner assembly lid. The HP Color LaserJet 2820 all-in-one control panel includes the following controls: 1) Alphanumeric buttons; 2) Menu and cancel controls; 3) Copy controls; 4) Scan controls.
English 简体中文 Bahasa Indonesia 한국어 ภาษาไทย 繁體中文 Tiếng Việt The HP Color LaserJet 2830/2840 all-in-one control panel includes the following controls: 1) Fax controls; 2) Alphanumeric buttons; 3) Menu and cancel controls; 4) Copy controls; 5) Scan and photo (HP Color LaserJet 2840 only) controls. Install the ADF input tray 1) Align the two tabs on the input tray with the two grooves in the ADF lid. 2) Slide the tray into the grooves until the tray snaps into place.
Connect a printer cable to the all-in-one Note To use the all-in-one's networking functionality, go to step 13. If you are using the all-in-one as a standalone fax machine or copier, go to step 14. 1) Locate the USB cable port on the back of the device. 2) Connect the USB cable (A/B) to the correct port. Do not connect the cable to a computer or to the network at this time.
English 简体中文 Bahasa Indonesia 한국어 ภาษาไทย 繁體中文 Tiếng Việt Connect a network cable to the device Note If you are not using the networking functionality, go to step 14. 1) Connect a network cable to the network port on the back of the all-in-one. 2) Connect the other end of the cable to an active network port. Connect to a telephone line (HP Color LaserJet 2830/2840 only) Note If you are not using the device fax functionality, go to step 15. 1) Locate the fax interface ports on the back of the all-in-one.
2) Connect the included phone cord to the device line port (the port with the jack. Note Use only the phone cord that came with the device. For more information about faxing, see the "Fax" chapter in the electronic user guide on the device CD (HP Color LaserJet 2830/2840 all-inone only). icon).
English 简体中文 Bahasa Indonesia 한국어 ภาษาไทย 繁體中文 Tiếng Việt Connect the power cord 1) Connect the power cord to the power socket on the back of the device. 2) Connect the other end of the power cord to a grounded alternating current (AC) outlet. Note Use only the power cord that came with the device. Turn on the device Turn on the device by pressing the power button that is on the side of the device next to the power socket.
Tip: If the device has no power and no lights are illuminated on the control panel, make sure that the power cord is attached securely to both the device and a power outlet. Also, make sure that the power strip is turned on and is operational, or connect the device directly to a wall outlet to test the power strip. Set the control-panel display language and location (if necessary) Note The HP Color LaserJet 2830/2840 control panel is shown. If prompted, select your language and location.
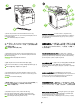
English 简体中文 Bahasa Indonesia 한국어 ภาษาไทย 繁體中文 Tiếng Việt Install the imaging drum 1) Remove the imaging drum from its packaging. 2) Place the imaging drum on a firm surface, and then pull the orange rings to remove the shipping pins. 3) Remove the orange shipping lock on each end of the imaging drum. 4) Remove the two orange shipping spacers. 5) Remove the orange cover from the imaging drum.
6) Press the scanner-release button to open the scanner assembly. 7) Open the top-cover door. 6) 按扫描仪释放按钮以打开扫描仪组件。 7) 打开顶盖挡门。 6) Tekan tombol pelepas-pemindai untuk membuka rakitan pemindai (scanner). 7) Buka pintu penutup-atas. 6) 스캐너 배출 버튼을 눌러 스캐너 조已체를 模십시오. 7) 상단 덮개 도어를 模십시오. 6)กดปุมล็อคเครื่องสแกนเพื่อเปดชุดประกอบเครื่องสแกน 7)เปดฝาครอบดานบนของเครื่องพิมพ 6) 按下掃描器釋放按鈕以打開掃描器組件。 7) 開啟頂蓋擋門。 6) Nhấn nút bấm quét để mở bộ phận quét. 7) Mở cửa nắp trên.
9) Lower the imaging drum into the printer, slightly rotate the imaging drum toward the front of the printer, and then press it firmly into place. 8) 使成像鼓两侧的绿色箭头与打印机内的绿色箭头对 齐。 9) 将成像鼓放入打印机并轻微旋转,使其朝向打印机前 端,然后用力将其压入到位。 8) Atur anak panah hijau di samping drum gambar tepat pada anak panah hijau di dalam printer. 9) Turunkan drum gambar ke dalam printer, putar sedikit drum gambar ke arah depan printer, kemudian tekan dengan kuat ke tempatnya. 8) 이미지 드럼의 초록색 화살표를 프린터 안의 초록색 화살표에 맞추 십시오.
Install the print cartridge 1) Look inside the device and make sure the yellow color carriage of the print-cartridge carousel is open. If Note The print cartridges should be loaded in the device in the same order that they are removed from the print-cartridge kit: Yellow, Magenta, Cyan, and then Black. the yellow color carriage is not open then press (Rotate Carousel) until it is open. (The top door must be closed in order to rotate the carousel.
English 简体中文 Bahasa Indonesia 4) Holding the print cartridge with the roller facing you, squeeze the blue release levers. Align the blue arrows on the print cartridge with the blue arrows in the print-cartridge carousel. The color-coded tabs on the print cartridge and carousel should also be aligned. Lower the cartridge strait down into the carousel until it is firmly in place and release the levers.
5) Close the top-cover door and scanner assembly, and then press 6) Open the scanner assembly and the print-cartridge door, and then repeat steps 2 through 6 for each cartridge color until all four cartridges have been installed. 7) After all cartridges have been (Rotate Carousel). Note Do not press been installed.
English 简体中文 Bahasa Indonesia 한국어 ภาษาไทย Note Hewlett-Packard Company cannot recommend using non-HP print cartridges, whether they are new, refilled, or remanufactured. Because they are not HP products, HP cannot influence their design or control their quality. Also, non-HP print cartridges do not report toner level or status.
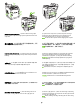
Setup tray 2 (HP Color LaserJet 2840 all-in-one) 1) Open tray 2, and remove the orange shipping lock inside the tray. 2) Move the blue width guides to match the paper size that is being loaded. 3) Extend the rear of the tray until the arrow points to the size that is being loaded.
6) Push down on the paper to lock the metal plate in the tray into place. 7) Slide the tray into the printer. 4) 装入纸张,使其打印面朝下,顶缘朝向前部。 注意 将介质放入进纸盘之前,请勿展开介质。 5) 确保纸张的四角平展,并且纸叠位于纸盘内的高度标 记之下。 6) 向下推动纸张,将纸盘中的金属板锁定到位。 7) 将 纸盘滑入打印机。 Bahasa Indonesia 4) Isikan kertas dengan sisi yang akan dicetak menghadap ke bawah, dan tepi atasnya ke arah depan. Perhatikan Jangan mengipaskan media sebelum memasukkannya ke baki.
Load tray 1 (Optional if tray 2 is installed) 1) Open tray 1, and then slide out the tray extender. 2) Slide the width guides until they are slightly wider than the paper that you are loading. 装入纸盘 1(可选,如果安装了纸盘 2) 1) 打开纸盘 1,然后滑出纸盘延伸板。 2) 滑动宽度导板,直至导板间的宽度略宽于要装入的纸 张。 Mengisi baki 1 (Opsional jika baki 2 terpasang) 1) Buka baki 1, kemudian geser perpanjangan baki keluar. 2) Geser pemandu lebar sampai sedikit lebih lebar dari kertas yang Anda isikan.
English 4) Slide the width guides in so that they lightly touch the paper. 5) Make sure that the paper fits under the tabs on the width guides. 3) 装入纸张,使其打印面朝上,顶缘朝向打印机。 注意 纸盘 1 最多可装入 125 张纸。 4) 向里滑动宽度导板,以使其稍稍接触纸张。 5) 确保 宽度导板的压片恰好压住纸张。 3) Isikan kertas dengan sisi yang akan dicetak menghadap ke atas, dan tepi atasnya ke arah depan. Perhatikan Sampai 125 halaman dapat diisikan ke dalam Baki 1. 4) Geser pemandu lebar sampai tepat menempel pada kertas.
Print a configuration report Note The HP Color LaserJet 2830/2840 all-in-one control panel is shown. 1) Press the Menu button. 2) Press the press or the button to select Reports, and then (Enter). 3) Press the Config report, and then press 打印配置报告 注意 该图显示 HP Color LaserJet 2830/2840 一体机的 控制面板。 1) 按 菜单按钮。 2) 按 或 2) Tekan tombol tekan (Enter). atau untuk memilih Reports, kemudian (Enter).
Tip: If the copy job produces a blank page, make sure that the original is loaded with the print-side up and that no jams exist in the ADF and paper path. For information about removing jams and other troubleshooting tips, see the electronic user guide on the device CDs.
Self-test the copier by using the flatbed scanner 1) Open the scanner lid, place the configuration report with the print-side down on the flatbed scanner, and then close the scanner lid. 2) Press the Start Color button. Tip: If the copy job produces a blank page, make sure that the original is loaded with the print-side down on the flatbed scanner and that no jams exist in the paper path. For information about removing jams and other troubleshooting tips, see the electronic user guide on the device CD.
English 简体中文 Bahasa Indonesia 한국어 ภาษาไทย 繁體中文 Tiếng Việt Test the memory-card reader Plug an HP-supported memory card into the appropriate slot. The display will indicate that the printer was able to read the memory card. See the "Photo" chapter in the electronic user guide on the device CD for more information about using the memory-card reader.
Complete your device setup If you are using the device as a standalone copier, the setup is complete. If you are using the device as a standalone fax (HP Color LaserJet 2830 all-in-one only), see the "Fax" chapter in the electronic user guide that is provided on the device CD. If you are connecting the device to a network, go to step 27. If you are connecting the device directly to a computer, go to step 28.
English Connect to a network If you want to connect the device to a network, ensure that the device is connected to the network and then begin the software installation. When you are prompted in the installer for the connection type, select the network option.
Installing the software Note To install the software for Macintosh, go to step 30. Note You must have administrative privileges to install the software for Windows® XP or Windows 2000. 1) Quit all of the programs that are running on the computer. 2) Follow the instructions that appeared at the end of the animated installation guide on the installation CD. If the installation program does not begin automatically, click Start, click Run, click Browse, select the HPSetup.exe file on the CD, and then click OK.
5) The software prompts you to connect the device to a computer. Connect a USB cable (A/B) from the device to the correct computer port. Note If connecting to a network, proceed to the following step without connecting a USB cable. 3) 选择安装 HP LaserJet 软件。 4) 在“打印机连接向 导”中,选择一种连接类型。 5) 软件会提示您将设备连接至计算机。 将 USB 电缆 (A/B) 从设备连接到正确的计算机端口。 注意 如果连接至网络,则继续执行以下步骤而无需连 接 USB 电缆。 3) Pilih Install HP LaserJet software. 4) Dari Printer Connection Wizard, pilih jenis koneksi Anda.
6) For Windows 2000 and Windows XP operating systems that meet all system requirements, select Typical, and then follow the instructions to install the software. For Windows 98 and Windows Millennium Edition (Me) operating systems, or any system that does not meet the system requirements, select Minimal, and then follow the instructions to install the software.
1) On the computer, click Start, and then click Programs. 2) Click HP, click HP CLJ 2820/2830/2840, and then click hp Toolbox to open the HP Toolbox. Now, go to step 32. 使用 HP 工具箱 注意 最小安装无法使用 HP 工具箱,HP 工具箱也不支 持 Macintosh 操作系统。 软件安装完成后,即可通过计算机使用设备。 1) 在计算机上,单击开始,然后单击程序。 2) 依次单 击 HP、HP CLJ 2820/2830/2840 和 hp 工具箱以打开 HP 工具箱。 现在,转至步骤 32。 Menggunakan Toolbox HP Perhatikan Toolbox HP tidak tersedia pada instalasi minimal, dan toolbox ini tidak mendukung sistem operasi Macintosh.
Install the Macintosh software (OS 9.2.2 and later) Note If you are using Macintosh OS X, go to step 31. 1) Connect the USB cable (A/B) to the computer. 2) Quit all of the programs that are running on the computer. 3) Follow the instructions that appeared at the end of the animated installation guide on the device CD. If the installation program did not begin automatically, open the CD folder and double-click the HP All-in-One Installer icon. 安装 Macintosh 软件(OS 9.2.
English 简体中文 Bahasa Indonesia 한국어 ภาษาไทย 繁體中文 Tiếng Việt 4) Follow the onscreen instructions, and then click Install. 5) When prompted, restart the computer. 6) When the HP all-in-one Setup Assistant starts, follow the instructions. Then, go to step 32. Install the Macintosh software (OS X 10.2 and later) 1) Connect the USB cable (A/B) to the computer. 2) Quit all of the programs that are running on the computer.
3) Follow the instructions that appeared at the end of the animated installation guide on the device CD. If the installation program did not begin automatically, open the CD folder and double-click the HP All-in-One Installer icon. 4) Follow the onscreen instructions, and then click Install. 5) When prompted, restart the computer. 6) When the HP All-in-One Setup Assistant starts, follow the instructions.
Register the all-in-one Register with HP to keep your all-in-one running smoothly and to receive free information that is relevant to you, including driver or software update notifications, support alerts, and tips for using your HP product. Register your all-in-one at http://www.hp.com/go/register. 测试软件安装 从任意程序打印一张页面以确保软件安 装正确。如果安装失败,则重新安装软件。 如果重新安 装失败,请参阅支持说明,或访问 http://www.hp.
HP and its subsidiaries respect your privacy and are committed to protecting it. See the HP privacy statement at the Web site. Support information For customer support, see the support flyer or go to http://www.hp.com/support/clj2800series. HP 及其附属公司尊重您的隐私并承诺保护您的隐私。 请参阅网站上的 HP 保密声明。 支持信息 有关客户支持的信息,请参阅支持说明或访 问 http://www.hp.com/support/clj2800series。 HP dan seluruh anak perusahaannya menghormati kerahasiaan pribadi Anda dan bertekad untuk melindunginya.
English 简体中文 Bahasa Indonesia 한국어 ภาษาไทย Congratulations! The device is ready to use. Open the HP Toolbox, the online support, or the electronic user guide for additional use and troubleshooting information. 恭喜! 设备已准备就绪,可以使用。 打开 HP 工具 栏、在线支持或电子版用户指南,获取其它使用和故障 排除信息。 Selamat! Piranti siap untuk digunakan. Buka Toolbox HP, dukungan online, atau pedoman penggunaan elektronik untuk informasi lebih lanjut tentang penggunaan dan pemecahan masalah. 축하합国다! 이제 장치를 사용할 수 있습国다.
44
45
46
© 2004 Hewlett-Packard Development Company, L.P. www.hp.com Pendaftaran Petunjuk Penggunaan (Manual) dan Kartu Jaminan/Garansi dalam Bahasa Indonesia No : 0089/1.824.