HP Color LaserJet 2820/2830/2840 Getting Started Guide Opsætningsvejledning Aloitusopas Εγχειρίδιο "Γρήγορα αποτελέσματα" Installasjonsveiledning Starthandbok
Copyright Information for you to make the necessary modifications in order to maintain uninterrupted service. If trouble is experienced with this equipment, please see the numbers in the front of this manual for repair and (or) warranty information. If the trouble is causing harm to the telephone network, the telephone company may request you remove the equipment from the network until the problem is resolved.
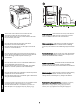
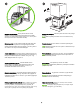
Laitteen kokoonpano HP Color LaserJet 2820 all-in-one -monitoimilaitteessa on 125 arkin materiaalinsyöttölokero, automaattisen asiakirjansyöttölaitteen (ADF) 50 arkin syöttölokero ja tasoskanneri. Lisäksi laitteessa on Hi-Speed USB 2.0 -infrapunaportti, 10/100-paikallisverkkoliitäntä sekä 96 megatavua RAM-muistia.
English Svenska Norsk Suomi Dansk Ελληνικά The HP Color LaserJet 2840 all-in-one includes the same components and offers the same functionality as the HP Color LaserJet 2830 all-in-one, and also includes a 250-sheet tray and a memory card reader. Prepare the location Place the device on a sturdy, level surface in a well-ventilated area. Make sure that enough space around the device is available so that the air vents are not blocked.
Regulate the environment Do not place the device in direct sunlight or in an area that has abrupt temperature and humidity changes. The recommended ranges are from 15° to 32.5°C (59° to 90.5°F) and from 10% to 80% relative humidity. Remove the packaging Unbox the printer and remove the package contents. Note Detailed unpacking instructions are on the inside of the top box flap.
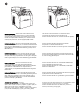
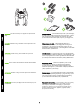
Package contents 1) Consumables kit (box with 4 print cartridges); 2) Power cord; 3) Getting started guide and support flyer; 4) Three CDs containing the device software and electronic user guide; 5) Automatic document feeder (ADF) input tray; 6) Imaging drum; VARNING! Enheten är tung. Ni behöver vara två personer för att lyfta den.
) Phone cord (HP Color LaserJet 2830/2840 all-in-one only); 8) HP Color LaserJet all-in-one; 9) Control-panel faceplate (if one is not already installed). Note The USB cable (A/B) is not included.
Play installation CD Insert the installation CD into a CD-ROM. Watch the animated installation guide that is provided on the CD. Note Do not begin installing the software until you have completed step 27 in this getting started guide. 9) Lucka för minnesmodulen (DIMM), 10) Faxport (endast HP Color LaserJet 2830/2840 allt-i-ett), 11) Hi-Speed USB 2.
Remove the packing materials 1) Remove all of the orange tape from the printer, except the orange tape that protrudes from the rear output door. 2) Open the rear output door. 3) Pull the two pieces of orange shipping tape that are attached to the fuser shipping locks to remove the shipping locks. 4) Close the rear output door. Note The device will not operate with the shipping locks in place.
English Install the control-panel faceplate (if it is not already installed) 1) If it is not already open, raise the scanner-assembly lid. 2) Align the posts on the backside of the faceplate with the holes on the device. Svenska Ta bort överstycket (valfritt) 1) Öppna skannerlocket. 2) Dra uppåt på den övre mittersta delen på transportluckan eller på kontrollpanelens överstycke som du vill byta ut.
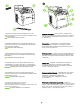
3) Press the far ends of the faceplate straight down onto the device. Continue to press down while moving your hands toward the center of the faceplate until it snaps into place. Make sure that the faceplate is aligned correctly and has not captured any buttons. 4) Close the scanner assembly lid. The HP Color LaserJet 2820 all-in-one control panel includes the following controls: 1) Alphanumeric buttons; 2) Menu and cancel controls; 3) Copy controls; 4) Scan controls.
English Svenska Norsk Suomi Dansk Ελληνικά The HP Color LaserJet 2830/2840 all-in-one control panel includes the following controls: 1) Fax controls; 2) Alphanumeric buttons; 3) Menu and cancel controls; 4) Copy controls; 5) Scan and photo (HP Color LaserJet 2840 only) controls. Install the ADF input tray 1) Align the two tabs on the input tray with the two grooves in the ADF lid. 2) Slide the tray into the grooves until the tray snaps into place.
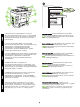
Connect a printer cable to the all-in-one Note To use the all-in-one's networking functionality, go to step 13. If you are using the all-in-one as a standalone fax machine or copier, go to step 14. 1) Locate the USB cable port on the back of the device. 2) Connect the USB cable (A/B) to the correct port. Do not connect the cable to a computer or to the network at this time. Anslut en skrivarkabel till allt-i-ett-skrivaren OBS! Om du vill använda allt-i-ett-nätverksfunktionen går du till steg 13.
English Connect to a telephone line (HP Color LaserJet 2830/2840 only) Note If you are not using the device fax functionality, go to step 15. 1) Locate the fax interface ports on the back of the all-in-one. Svenska Anslut en nätverkssladd till enheten OBS! Om du inte använder nätverksfunktionen går du till steg 14. 1) Anslut en nätverkskabel till nätverksporten på baksidan av allt-iett-skrivaren. 2) Anslut den andra änden av kabeln till en aktiv nätverksport.
2) Connect the included phone cord to the device line port (the port with the jack. Note Use only the phone cord that came with the device. For more information about faxing, see the "Fax" chapter in the electronic user guide on the device CD (HP Color LaserJet 2830/2840 all-inone only). icon). 3) Connect the phone cord to a live telephone OBS! Anslut endast den telefonsladd som levererades med enheten.
English Svenska Norsk Suomi Dansk Ελληνικά Connect the power cord 1) Connect the power cord to the power socket on the back of the device. 2) Connect the other end of the power cord to a grounded alternating current (AC) outlet. Note Use only the power cord that came with the device. Turn on the device Turn on the device by pressing the power button that is on the side of the device next to the power socket. Anslut nätsladden 1) Anslut nätsladden till uttaget på baksidan av enheten.
Tip: If the device has no power and no lights are illuminated on the control panel, make sure that the power cord is attached securely to both the device and a power outlet. Also, make sure that the power strip is turned on and is operational, or connect the device directly to a wall outlet to test the power strip. Set the control-panel display language and location (if necessary) Note The HP Color LaserJet 2830/2840 control panel is shown. If prompted, select your language and location.
English 5) Remove the orange cover from the imaging drum. CAUTION Do not touch the surface of the green roller or expose the roller to light for an extended period of time, which could cause printquality issues. Svenska Montera bildtrumman 1) Ta ut bildtrumman ur emballaget. 2) Placera bildtrumman på en stadig yta och ta bort transportstiften genom att dra i de orange ringarna. 3) Ta bort de orange transportlåsen i båda ändarna av bildtrumman. 4) Ta bort de två orange transportmellanläggen.
6) Press the scanner-release button to open the scanner assembly. 7) Open the top-cover door. 6) Öppna skannern genom att trycka på spärrknappen. 7) Öppna den övre luckan. 6) Trykk på utløserknappen på skanneren for å åpne den. 7) Åpne det øvre dekselet. 6) Avaa skanneri painamalla skannerin vapautuspainiketta. 7) Avaa yläkansi. 6) Tryk på scannerens udløserknap for at åbne scanneren. 7) Åbn topdækslet. 6) Πιέστε το κουμπί απελευθέρωσης του σαρωτή για να ανοίξει ο σαρωτής.
9) Lower the imaging drum into the printer, slightly rotate the imaging drum toward the front of the printer, and then press it firmly into place. 8) Ställ in de gröna pilarna på sidan av bildtrumman mot de gröna pilarna inne i skrivaren. 9) Sänk bildtrumman in i skrivaren, rotera bildtrumman en aning mot skrivarens framsida och tryck den ordentligt på plats. 8) Juster de grønne pilene på siden av bildetrommelen med de grønne pilene inne i skriveren.
Install the print cartridge 1) Look inside the device and make sure the yellow color carriage of the print-cartridge carousel is open. If Note The print cartridges should be loaded in the device in the same order that they are removed from the print-cartridge kit: Yellow, Magenta, Cyan, and then Black. the yellow color carriage is not open then press (Rotate Carousel) until it is open. (The top door must be closed in order to rotate the carousel.
English Svenska Norsk Suomi Dansk Ελληνικά 2) Remove the print cartridge from its packaging, and then gently shake the cartridge five or six times. 3) Remove the orange cover and pull the sealing tape from the cartridge. 4) Holding the print cartridge with the roller facing you, squeeze the blue release levers. Align the blue arrows on the print cartridge with the blue arrows in the print-cartridge carousel. The color-coded tabs on the print cartridge and carousel should also be aligned.
5) Close the top-cover door and scanner assembly, and then press 6) Open the scanner assembly and the print-cartridge door, and then repeat steps 2 through 6 for each cartridge color until all four cartridges have been installed. 7) After all cartridges have been (Rotate Carousel). Note Do not press been installed.
English Svenska Norsk Suomi Dansk Ελληνικά CAUTION If toner gets on your clothing, wipe the toner off with a clean cloth, wash the items in cold water, and air dry the items. Using hot water or heat from a dryer sets the toner in the fabric. Note Hewlett-Packard Company cannot recommend using non-HP print cartridges, whether they are new, refilled, or remanufactured. Because they are not HP products, HP cannot influence their design or control their quality.
Setup tray 2 (HP Color LaserJet 2840 all-in-one) 1) Open tray 2, and remove the orange shipping lock inside the tray. 2) Move the blue width guides to match the paper size that is being loaded. 3) Extend the rear of the tray until the arrow points to the size that is being loaded. Installera fack 2 (HP Color LaserJet 2840 allt-i-ett) 1) Öppna fack 2 och ta bort det orange transportlåset inuti facket. 2) Flytta de blå breddstyrskenorna så att de överensstämmer med papperet som skall läggas in.
6) Push down on the paper to lock the metal plate in the tray into place. 7) Slide the tray into the printer. English 6) Tryck ned papperet så att metallplattan låses på plats i magasinet. 7) Skjut in facket i skrivaren igen. Svenska 4) Lägg i papperen med utskriftssidan nedåt och överkanten framåt. OBS! Bläddra inte igenom pappersbunten innan du lägger i den i facket. 5) Kontrollera att papperet ligger plant i facket mot alla fyra hörn, och låt inte bunten överstiga höjdflikarna inuti facket.
Load tray 1 (Optional if tray 2 is installed) 1) Open tray 1, and then slide out the tray extender. 2) Slide the width guides until they are slightly wider than the paper that you are loading. Fyll på fack 1 (valfritt om fack 2 är installerat) 1) Öppna fack 1 och skjut ut fackförlängaren. 2) Skjut breddstyrskenorna tills de är något bredare än papperet. Legg papir i skuff 1 (Valgfritt hvis skuff 2 er installert) 1) Åpne skuff 1, og trekk skufforlengeren helt ut.
English 4) Slide the width guides in so that they lightly touch the paper. 5) Make sure that the paper fits under the tabs on the width guides. 3) Lägg i papperen med utskriftssidan uppåt och överkanten framåt. OBS! Det går att fylla på upp till 125 sidor i fack 1. 4) Skjut in breddstyrskenorna så att de berör papperen lätt. 5) Kontrollera att papperen passar under flikarna på breddstyrskenorna. 3) Legg papiret med utskriftssiden opp og øvre kant vendt mot fronten.
Print a configuration report Note The HP Color LaserJet 2830/2840 all-in-one control panel is shown. 1) Press the Menu button. 2) Press the press or the button to select Reports, and then (Enter). 3) Press the Config report, and then press Skriv ut en konfigurationsrapport OBS! Kontrollpanelen för HP Color LaserJet 2830/2840 allt-i-ett visas. 1) Tryck på Meny. 2) Tryck på eller Skriv ut en konfigurasjonsrapport Merk Kontrollpanelet på HP Color LaserJet 2830/2840 alt-i-ett vises.
English Svenska Norsk Suomi Dansk Ελληνικά Test the copier by using the ADF input tray 1) Load the configuration report that you just printed into the ADF input tray, with the printed side face-up. 2) Adjust the media guides so that they touch the sides of the report page. 3) Verify that the report is loaded with the print-side up, and then press the Start Color button.
Self-test the copier by using the flatbed scanner 1) Open the scanner lid, place the configuration report with the print-side down on the flatbed scanner, and then close the scanner lid. 2) Press the Start Color button. Tip: If the copy job produces a blank page, make sure that the original is loaded with the print-side down on the flatbed scanner and that no jams exist in the paper path. For information about removing jams and other troubleshooting tips, see the electronic user guide on the device CD.
English Note The HP Color LaserJet 2840 all-in-one can read the following memory-card types: 1) xD and SmartMedia; 2) MultiMedia, Memory Stick, and Memory Stick PRO; 3) CompactFlash; 4) Secure Digital. Svenska Testa minneskortläsaren Anslut ett minneskort från HP i minneskortplatsen. Ett meddelande om att det gick att läsa minneskortet visas på skärmen. Mer information om hur du använder minneskortläsaren finns i fotokapitlet i den elektroniska användarhandboken på enhets-cd:n.
Complete your device setup If you are using the device as a standalone copier, the setup is complete. If you are using the device as a standalone fax (HP Color LaserJet 2830 all-in-one only), see the "Fax" chapter in the electronic user guide that is provided on the device CD. If you are connecting the device to a network, go to step 27. If you are connecting the device directly to a computer, go to step 28.
Connect to a network If you want to connect the device to a network, ensure that the device is connected to the network and then begin the software installation. When you are prompted in the installer for the connection type, select the network option. Mer information om hur du använder hela enhetsfunktionen finns i faxkapitlet i den elektroniska användarhandboken på enhets-cd:n (endast HP Color LaserJet 2830/2840 allt-i-ett). Gå till steg 27 eller steg 28 i den här starthandboken.
Installing the software Note To install the software for Macintosh, go to step 30. Note You must have administrative privileges to install the software for Windows® XP or Windows 2000. 1) Quit all of the programs that are running on the computer. 2) Follow the instructions that appeared at the end of the animated installation guide on the installation CD. If the installation program does not begin automatically, click Start, click Run, click Browse, select the HPSetup.exe file on the CD, and then click OK.
5) The software prompts you to connect the device to a computer. Connect a USB cable (A/B) from the device to the correct computer port. Note If connecting to a network, proceed to the following step without connecting a USB cable. 3) Välj Installera HP LaserJet-programvara. 4) Välj en anslutningstyp i guiden till skrivaranslutning. 5) Du ombeds ansluta enheten till en dator. Anslut en USB-kabel (A/ B) som går från enheten till rätt port på datorn.
6) For Windows 2000 and Windows XP operating systems that meet all system requirements, select Typical, and then follow the instructions to install the software. For Windows 98 and Windows Millennium Edition (Me) operating systems, or any system that does not meet the system requirements, select Minimal, and then follow the instructions to install the software. 6) I Windows 2000- och Windows XP-operativsystem som uppfyller alla systemkrav väljer du Standard och följer installationsinstruktionerna.
English 1) On the computer, click Start, and then click Programs. 2) Click HP, click HP CLJ 2820/2830/2840, and then click hp Toolbox to open the HP Toolbox. Now, go to step 32. Svenska Använda verktygslådan OBS! Det går inte att få åtkomst till verktygslådan från en minimal installation, och den stöder inte Macintosh-operativsystem. När programvaruinstallationen är klar kan du använda enheten från datorn. 1) På datorn klickar du på Start och sedan på Program.
Install the Macintosh software (OS 9.2.2 and later) Note If you are using Macintosh OS X, go to step 31. 1) Connect the USB cable (A/B) to the computer. 2) Quit all of the programs that are running on the computer. 3) Follow the instructions that appeared at the end of the animated installation guide on the device CD. If the installation program did not begin automatically, open the CD folder and double-click the HP All-in-One Installer icon. Installera Macintosh-programmet (OS 9.2.
English Svenska Norsk Suomi Dansk Ελληνικά 4) Follow the onscreen instructions, and then click Install. 5) When prompted, restart the computer. 6) When the HP all-in-one Setup Assistant starts, follow the instructions. Then, go to step 32. Install the Macintosh software (OS X 10.2 and later) 1) Connect the USB cable (A/B) to the computer. 2) Quit all of the programs that are running on the computer. 4) Följ instruktionerna på skärmen och klicka på Installera. 5) Starta om datorn när du ombeds göra det.
3) Follow the instructions that appeared at the end of the animated installation guide on the device CD. If the installation program did not begin automatically, open the CD folder and double-click the HP All-in-One Installer icon. 4) Follow the onscreen instructions, and then click Install. 5) When prompted, restart the computer. 6) When the HP All-in-One Setup Assistant starts, follow the instructions. 3) Följ instruktionerna i slutet på den animerade installationshandboken på enhets-cd:n.
English Svenska Norsk Suomi Dansk Ελληνικά Test the software installation Print a page from any program to make sure that the software is correctly installed. If the installation failed, reinstall the software. If the reinstallation fails, see the support flyer or go to http://www.hp.com/support/clj2800series for more information.
HP and its subsidiaries respect your privacy and are committed to protecting it. See the HP privacy statement at the Web site. Support information For customer support, see the support flyer or go to http://www.hp.com/support/clj2800series. HP och dess dotterbolag respekterar ditt privatliv och är angelägna att slå vakt om det. Se HP:s riktlinjer för sekretess och integritet på webbplatsen. Information om support Information om support finns på supportbladet eller på http://www.hp.
English Svenska Norsk Suomi Dansk Ελληνικά Congratulations! The device is ready to use. Open the HP Toolbox, the online support, or the electronic user guide for additional use and troubleshooting information. Grattis! Enheten är klar att användas. Öppna verktygslådan, onlinesupporten eller den elektroniska användarhandboken om du vill ha mer information om användning och felsökning. Gratulerer! Enheten er klar til bruk.
44
45
חברת HPוחברות הבת שלה מכבדות את פרטיותך ומחויבות לשמור עליה. באפשרותך לעיין בהצהרת הפרטיות של HPבאתר האינטרנט. עברית עברית מידע אודות תמיכה לתמיכת לקוחות ,עיין בעלון התמיכה או עבור לאתר .http://www.hp.com/support/clj2800series ברכות! המכשיר מוכן לשימוש .פתח את ) HP Toolboxארגז הכלים של ,(HPהתמיכה המקוונת ,או את המדריך האלקטרוני למשתמש לקבלת מידע נוסף אודות השימוש במכשיר ופתרון בעיות.
(3פעל על-פי ההוראות המופיעות בסוף מדריך ההתקנה המונפש הנמצא על- גבי תקליטור המכשיר .אם תוכנית ההפעלה לא התחילה באופן אוטומטי, פתח את תיקיית התקליטור ולחץ פעמיים על הסמל HP All-in-One Installer )מתקין מכשיר All-in-Oneשל .(HP (4פעל על פי ההוראות שעל המסך ולאחר מכן לחץ על ) Installהתקן(. (5כאשר תתבקש ,הפעל מחדש את המחשב (6 .כאשר HP All-in-One ) Setup Assistantעוזר ההתקנה( מתחיל ,פעל על פי ההוראות.
עברית עברית התקנת תוכנת OS 9.2.2) Macintoshאו גרסה מתקדמת יותר( הערה אם הנך משתמש ב ,Macintosh OS X -עבור לשלב .31 (1חבר את כבל ה (A/B) USB -למחשב (2 .סגור את כל התוכניות הפועלות במחשב. (3פעל על-פי ההוראות המופיעות בסוף מדריך ההתקנה המונפש הנמצא על- גבי תקליטור המכשיר .אם תוכנית ההפעלה לא התחילה באופן אוטומטי, פתח את תיקיית התקליטור ולחץ פעמיים על הסמל HP All-in-One Installer )מתקין מכשיר All-in-Oneשל .
(6עבור מערכות ההפעלה Windows 2000ו Windows XP -העונות על כל דרישות המערכת ,בחר באפשרות ) Typicalרגילה( ופעל על פי ההוראות להתקנת התוכנה. עבור מערכות ההפעלה Windows 98וWindows Millennium Edition - ) ,(Meאו כל מערכת הפעלה אחרת אשר אינה עונה על דרישות המערכת, בחר באפשרות ) Minimalמינימלית( ופעל על פי ההוראות להתקנת התוכנה.
(3בחר (4 .Install HP LaserJet softwareבPrinter Connection Wizard - )אשף התקנת המדפסת( ,בחר את סוג החיבור. (5התוכנה תנחה אותך לחבר את המכשיר למחשב .חבר את כבל הA/) USB- (Bמהמכשיר ליציאה הנכונה במחשב. הערה אם ישנו חיבור לרשת ,המשך לשלב הבא מבלי לחבר כבל .USB עברית עברית התקנת התוכנה הערה להתקנת התוכנה עבור ,Macintoshעבור לשלב .30 הערה אתה זקוק להרשאות של מנהל מערכת כדי להתקין את התוכנה עבור Windows® XPאו .
השלמת התקנת המכשיר אם אתה משתמש במכשיר כמעתיק עצמאי ,שלבי ההתקנה נשלמו .אם אתה משתמש במכשיר כמכונת פקס עצמאית ) HP Color LaserJet 2830 all-in-oneבלבד( ,עיין בפרק ") "Faxפקס( במדריך האלקטרוני למשתמש שעל-גבי תקליטור המכשיר. אם בכוונתך לחבר את המכשיר לרשת ,עבור לשלב .27אם בכוונתך לחבר את המכשיר ישירות למחשב ,עבור לשלב .
עברית עברית בדיקה-עצמית של המעתיק באמצעות הסורק השטוח (1פתח את מכסה הסורק ,הנח את דוח התצורה על הסורק השטוח כשצידו המודפס כלפי מטה וסגור את מכסה הסורק (2 .לחץ על הלחצן התחל צבע. עצה :אם עבודת ההעתקה הפיקה דף לבן ,עליך לוודא שהדף המקורי אכן מונח כשצדו המודפס כלפי מטה על גבי הסורק השטוח ושאין כל חסימה בנתיב הנייר .לקבלת מידע אודות שחרור חסימות ועצות אחרות לפתרון בעיות ,עיין במדריך האלקטרוני למשתמש שעל-גבי תקליטור המכשיר.
הדפסת דוח תצורה הערה לוח הבקרה של HP Color LaserJet 2830/2840 all-in-oneמוצג. (1לחץ על הלחצן תפריט. (2לחץ על הלחצן או ) (3 .(Enterלחץ על הלחצן reportולאחר מכן לחץ על בדיקה של המעתיק באמצעות מגש הקלט של מזין המסמכים האוטומטי ) (1 (ADFטען את דוח התצורה שהדפסת זה עתה במגש הקלט של מזין המסמכים האוטומטי ) ,(ADFכשצידו המודפס כלפי מעלה (2 .התאם את מכווני חומרי ההדפסה כך שייגעו בצידיו של דף הדוח (3 .ודא שהדוח מונח כשצידו המודפס כלפי מעלה ולחץ על הלחצן התחל צבע.
(3טען את הנייר כאשר הצד המיועד להדפסה פונה כלפי מעלה והצד העליון כלפי המדפסת. הערה ניתן לטעון עד 125דפים במגש .1 (4החלק את מכווני הרוחב כך שייגעו קלות בנייר (5 .ודא שהנייר מונח כשהוא מותאם תחת הלשוניות שעל מכווני הרוחב. עברית עברית טעינת מגש )1אופציונלי במידה שמגש 2מותקן( (1פתח את מגש 1והחלק כלפי חוץ את מאריך המגש. (2החלק את מכווני הרוחב עד שיהיו רחבים במעט מהנייר שהינך טוען.
התקנת מגש (1 (HP Color LaserJet 2840 all-in-one)2פתח את מגש 2 והוצא את תפס האריזה הכתום שבתוך המגש. (2הזז את מכווני הרוחב הכחולים כך שיתאימו לגודל הנייר הנטען (3 .הרחב את חלקו האחורי של המגש עד שהחץ יצביע על גודל הנייר הנטען. (4טען את הנייר כאשר הצד המיועד להדפסה פונה כלפי מטה והצד העליון כלפי החזית. הערה אין לנפנף בחומרי ההדפסה לפני שמניחים אותם במגש. (5ודא שהנייר מונח שטוח בארבע הפינות וכן שערימת הדפים הינה מתחת לסימני הגובה המופיעים בתוך המגש.
עברית עברית (5סגור את דלת המכסה העליון ואת מכלול הסורק ולחץ על סיבוב(. הערה אין ללחוץ על (6פתח את מכלול הסורק ואת דלת מחסנית ההדפסה וחזור על שלבים 2-6 עבור כל מחסנית צבע עד להתקנת ארבע המחסניות (7 .לאחר התקנת כל )קרוסלת המחסניות ,לחץ על ) (Enterעד להתקנת כל מחסניות ההדפסה. זהירות אם נשפך טונר על בגדיך ,נגב את הטונר במטלית בד נקיה ,כבס את הפריטים במים קרים ותלה אותם לייבוש .שימוש במים חמים או ייבוש במכונת ייבוש ,ייקבע את החומר בתוך הבד.
הערה יש לטעון את מחסניות ההדפסה במכשיר בהתאם לסדר הוצאתן מערכת מחסניות ההדפסה :צהוב ,אדום-ארגמן ,ציאן ולאחר מכן שחור. התקנת מחסנית ההדפסה (1התבונן בתוך המכשיר וודא שהגררה הצהובה של קרוסלת מחסנית ההדפסה פתוחה .במידה שהגררה הצהובה אינה פתוחה ,לחץ על )קרוסלת סיבוב( עד שתיפתח) .על הדלת העליונה להיות סגורה כדי לסובב את הקרוסלה(. (4בעודך מחזיק את מחסנית ההדפסה כשהגלגלת מופנית כלפיך ,לחץ על ידיות ההנפה הכחולות לשחרור .
(8יישר את החיצים הירוקים שבצידו של תוף ההדמיה בהתאם לחיצים הירוקים שבתוך המדפסת. (9הורד את תוף ההדמיה לתוך המדפסת ,סובב במקצת את תוף ההדמיה בכיוון קידמת המדפסת ולאחר מכן לחץ עליו בחוזקה למקומו. עברית עברית (6לחץ על לחצן שחרור הסורק על-מנת לפתוח את מכלול הסורק. (7פתח את דלת המכסה העליון.
עצה :אם המכשיר אינו פועל ואף נורה לא מאירה בלוח הבקרה ,ודא שכבל החשמל אכן מחובר היטב למכשיר ומצדו השני -לשקע החשמל .כמו כן ,ודא שלוח השקעים אכן מופעל ומוכן לשימוש .לחלופין ,חבר את המכשיר ישירות לשקע חשמל בקיר כדי לבדוק את תקינותו של לוח השקעים. הגדרת השפה והמיקום בתצוגת לוח הבקרה )במקרה הצורך( הערה לוח הבקרה של HP Color LaserJet 2830/2840מוצג. אם תתבקש ,בחר את השפה והמיקום שלך .פעל לפי ההוראות המופיעות בלוח הבקרה .
עברית עברית (2חבר את כבל הטלפון המצורף ליציאת lineשל המכשיר )היציאה עם הסמל הערה השתמש אך רק בכבל הטלפון המצורף למכשיר .לקבלת מידע נוסף אודות שליחת פקסים ,עיין בפרק ") "Faxפקס( במדריך האלקטרוני למשתמש שעל-גבי תקליטור המכשיר )HP Color LaserJet 2830/2840 all-in-one בלבד(. חיבור כבל החשמל (1חבר את כבל החשמל לשקע החשמל שבגב המכשיר. (2חבר את הקצה השני של כבל החשמל לשקע של זרם חלופין ) (ACמוארק. הערה השתמש אך רק בכבל החשמל המצורף למכשיר.
חיבור כבל המדפסת למכשיר הall-in-one - הערה לשימוש בכל תפקודי הרשת של מכשיר ה ,all-in-one -עבור לשלב .13 אם אתה משתמש במכשיר ה all-in-one -כמכשיר פקס או מעתיק עצמאי, עבור לשלב .14 (1מצא את יציאת כבל ה USB -שבגב המכשיר (2 .חבר את כבל הA/) USB - (Bליציאה הנכונה .אין לחבר את הכבל למחשב או לרשת כעת. חיבור כבל רשת למכשיר הערה אם אינך משתמש בתפקודי הרשת ,עבור לשלב .14 (1חבר כבל רשת ליציאת הרשת שבגב מכשיר ה (2 .
עברית עברית (3לחץ על שני קצוות התבנית כלפי מטה אל המכשיר .המשך ללחוץ מטה בעודך מזיז את ידיך אל מרכז התבנית ,עד שהיא תיכנס למקומה בנקישה. ודא שהתבנית מיושרת כהלכה ואינה מכסה את הלחצנים (4 .סגור את מכסה מכלול הסורק. לוח הבקרה של מכשיר HP Color LaserJet 2820 all-in-oneכולל את לחצני הבקרה הבאים (1 :לחצנים אלפאנומריים; (2לחצני בקרה לתפריט וביטול; (3לחצני בקרה לעתקה; (4לחצני בקרה לסריקה.
הוצאת חומרי האריזה (1הסר את כל הסרטים הכתומים מהמדפסת ,פרט לסרט הכתום המבצבץ מדלת הפלט האחורית. (2פתח את דלת הפלט האחורית (3 .משוך את 2חלקיו של סרט האריזה הכתום המחוברים לתפסי האריזה של ה fuser-על-מנת להוציא את תפסי האריזה (4 .סגור את סל הפלט האחורי. הערה המכשיר לא יפעל אם תפסי האריזה ישארו במקומם. הוצאת התבנית )אופציונלי( (1פתח את מכסה מכלול הסורק (2 .משוך כלפי מעלה את מרכזו העליון של מכסה האריזה או של תבנית לוח הבקרה שברצונך להחליף (3 .
עברית עברית (7כבל טלפון ) HP Color LaserJet 2830/2840 all-in-oneבלבד(; (9 ;HP Color LaserJet all-in-one (8תבנית לוח הבקרה )אם טרם הותקנה(. הערה כבל (A/B) USBאינו כלול.
הקפדה על סביבת עבודה מבוקרת אין להציב את המכשיר באור שמש ישיר, או בסביבה המתאפיינת בשינויים חדים בטמפרטורה ובלחות .הטווחים המומלצים הם 15°עד 59°) 32.5°Cעד (90.5°Fו 10% -עד 80%של לחות יחסית. הסרת האריזה הוצא את המדפסת מאריזתה וכן את יתר תכולת האריזה. הערה הוראות מפורטות לפירוק האריזה נמצאות בחלק הפנימי העליון של הקופסה. אזהרה! המכשיר כבד .נדרשים שני אנשים להרימו.
עברית עברית תצורות המכשיר המכשיר HP Color LaserJet 2820 all-in-oneכולל מגש הזנת חומרי הדפסה ל 125 -גליונות ,מגש הזנה ל 50 -גליונות של מזין המסמכים האוטומטי ) (ADFוסורק שטוח .בנוסף ,המכשיר כולל יציאת ממשק ,Hi-Speed USB 2.0חיבור לרשת מקומית ,(LAN) 10/100ו 96 -מגה- בתים ) (MBשל .RAM המכשיר HP Color LaserJet 2830 all-in-oneכולל את אותם הרכיבים ומציע את אותם התפקודים של מכשיר HP Color LaserJet 2820 all-in- ,oneוכן יכולת שליחת/קבלת פקס.
© 2004 Hewlett-Packard Development Company, L.P. www.hp.