
HP LaserJet 4250/4350 Series - (Multiple Language) Printer Maintenance Kit Install Guide

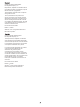

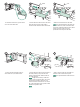


Release the roller by sliding apart the two
latches located on each side at the top of the
pickup roller (callout 1). Lift the roller out of
the opening (callout 2).
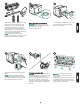
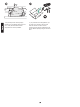
To replace the tray 2 feed and separation
rollers: Remove any media in tray 2. Pull
the tray out and slightly lift the front of the
tray up to remove it from the printer. Find the
cover that is located on the tray, next to the
feed roller. Open the cover by rotating it
upward.
Place the new pickup roller onto the shaft
(callout 1). Align the pin that is located on
each side at the bottom of the roller with the
slot in the bracket located on each side of
the opening (callout 2). Slide the roller into
the printer until the roller snaps into place
(callout 3).
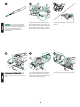
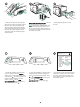
Push the blue latch that is on the left side of
the feed roller away from the roller shaft to
unlock the roller. Slide the roller off the shaft.
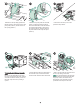
Insert the front accessory cover
or
the
optional envelope feeder.
Slide a new feed roller onto the shaft. Close
the cover by rotating it downward.
NOTE It is important that this roller locks into
place. If it does not, make sure that the roller
is properly oriented, and that the round,
black spacer next to the roller is properly
positioned around the pin in the shaft.
5