HP Color LaserJet 3550 series printer Start Start Aloitus ᡗᡗ䵨ᡚᡔᡟᡔ Innføring Inledning
Copyright and License © 2004 Copyright Hewlett-Packard Development Company, L.P. Reproduction, adaptation, or translation without prior written permission is prohibited, except as allowed under the copyright laws. The information contained herein is subject to change without notice. The only warranties for HP products and services are set forth in the express warranty statements accompanying such products and services. Nothing herein should be construed as constituting an additional warranty.
HP Color LaserJet 3550n: includes the features of the 3550, plus an HP Jetdirect en3700 external print server Modeller. HP Color LaserJet 3550: basismodel, indeholder 64 MB SDRAM HP Color LaserJet 3550n: indeholder de samme funktioner som 3550 samt en ekstern HP Jetdirect en3700-printerserver Mallit. HP Color LaserJet 3550: perusmalli, sisältää 64 MB SDRAM-muistia HP Color LaserJet 3550n: sisältää 3550-kirjoittimen ominaisuuksien lisäksi ulkoisen HP Jetdirect en3700 -tulostuspalvelimen Μοντέλα.
English Prepare the location. Select a sturdy, level surface in a wellventilated, dust-free area. Space requirements for the area around the printer: front, 635 mm (25 inches); rear, 203 mm (8 inches); sides, 229 mm (9 inches); top, 254 mm (10 inches) Minimumsystemkrav. Se på ydersiden af den kasse, printeren blev leveret i, eller se installationsbemærkningerne på cd-rom'en. Klargør pladsen. Vælg en solid og plan overflade i et ventileret og støvfrit område.
Measurements. HP Color LaserJet 3550 series printer: height, 467 mm (18.4 inches); depth, 447 mm (17.6 inches); width, 483 mm (19 inches); weight, 32.5 kg (71.5 lbs) Regulate the environment. Do not place the printer in direct sunlight or an area that has abrupt temperature and humidity changes. Recommended ranges: 17° to 25° C (62.6° to 77° F) and 20 to 60 percent relative humidity Mål.
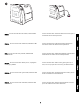
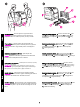
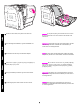
English Dansk Suomi Ελληνικά Norsk Svenska Set up the printer. Place the printer in a prepared location. WARNING! Two people must lift and move the printer to the prepared location. Do not lift the printer by the Tray 2 handle. Check the package contents. 1) HP Color LaserJet 3550 2) USB cable 3) power cable 4) four print cartridges 5) CD-ROM (the CDROM contains the user guide) 6) control panel overlay 7) getting started guide Placer printeren. Anbring printeren på det forberedte sted.
6 5 4 3 3 2 2 1 1 Additional contents shipped with the HP Color LaserJet 3550n. 1) HP Jetdirect en3700 external print server 2) power supply 3) network install guide Note The items listed here are for the external print server connection. Locate the printer parts (front view). 1) on/off switch 2) Tray 2 3) Tray 1 4) front door 5) printer control panel 6) output bin extender 7) output bin Supplerende indhold leveres sammen med HP Color LaserJet 3550n.
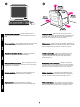
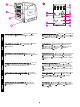
Understand the control panel. 1) help button 2) back arrow button 3) ready light 4) menu button 5) data light 6) attention light 7) stop button 8) down arrow button 9) select button 10) up arrow button 11) print cartridge level indicators 12) display Find printerdelene (set bagfra). 1) Øverste bagdæksel, 2) nederste bagdæksel (bageste udskriftsbakke), 3) USB-tilslutning, 4) strømtilslutning. Om kontrolpanelet.
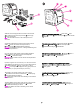
Remove the packing materials. 1) Remove all external orange tape, orange protectors, and other packaging material. 2) Open Tray 2, and remove the orange shipping lock and any other packing material inside the tray. Fjern emballagen. 1) Fjern den udvendige orange tape, de orange beskyttelsesdele og anden emballage. 2) Åbn bakke 2, og fjern den orange leveringslås og al emballagemateriale inde i bakken. Poista pakkausmateriaali.
CAUTION Do not place anything on the transfer unit. Do not touch the top of the transfer unit or the contacts on the left side of the transfer unit. 3) Løft i håndtaget til frontdækslet, og træk frontdækslet ned. FORSIGTIG! Anbring ikke noget på overføringsenheden. Rør ikke ved overføringsenhedens overflade eller ved kontakterne på venstre side af overføringsenheden. 3) Nosta etukannen kahvaa ja vedä etukantta alaspäin. VARO Älä aseta mitään esineitä siirtoyksikön päälle.
4) Remove the orange tape from the back, right and left sides of the transfer unit. Install the print cartridges. 1) Remove a new print cartridge from the bag. 4) Fjern den orange tape fra bagsiden, højre og venstre side af overførselsenheden. Installer tonerkassetterne. 1) Tag en ny tonerkassette ud af posen. 4) Poista oranssi teippi siirtoyksikön taustapuolelta sekä vasemmasta ja oikeasta kyljestä. Asenna värikasetit. 1) Poista uusi värikasetti pussistaan.
3) Remove and discard the orange shipping tape and shipping locks from the new print cartridge. Note Discard the shipping tape and shipping locks according to local regulations. 2) Tag fat i begge ender af tonerkassetten, og ryst den forsigtigt fra side til side for at fordele toneren. 3) Fjern den orange transporttape og de orange transportlåse fra den nye tonerkassette. Bemærk! Bortskaf transporttapen og transportlåsene i henhold til de gældende bestemmelser.
4) Locate the color slot for the print cartridge. 5) Align the print cartridge with the tracks inside the printer and, using the handle, insert the cartridge. 6) Repeat this procedure for the remaining three print cartridges. 4) Find farvestikket til tonerkassetten. 5) Juster tonerkassetten efter sporene inde i printeren, og indsæt kassetten ved hjælp af håndtaget. 6) Gentag denne procedure for de tre øvrige tonerkassetter. 4) Etsi värikasetin aukko.
Load paper into Tray 2. 1) Pull Tray 2 out of the printer. 7) Luk frontdækslet korrekt. Læg papir i bakke 2. 1) Træk bakke 2 ud af printeren. 7) Sulje etuluukku kunnolla. Lataa paperia lokeroon 2. 1) Vedä lokero 2 ulos kirjoittimesta. 7) Κλείστε καλά την μπροστινή θύρα. Τοποθετήστε χαρτί στο Δίσκο 2. 1) Τραβήξτε το Δίσκο 2 έξω από τον εκτυπωτή. 7) Lukk frontdøren ordentlig. Legg inn papir i skuff 2. 1) Trekk skuff 2 ut av skriveren. 7) Stäng den främre luckan ordentligt. Fylla på papper i fack 2.
2) Move the side width guides until the blue arrows on the width guides point to the size of paper you are loading. 3) On the back of the tray, press the blue ridges and slide the length guides until the arrow symbol points to the paper size you are loading. 2) Flyt sidebreddestyrene, indtil de blå pile på breddestyrene peger på størrelsen på det papir, du ilægger. 3) Tryk på de blå riller bag på bakken, og skub længdestyrene, indtil pilesymbolet peger på den størrelse, du ilægger.
English Dansk Suomi Ελληνικά Norsk Svenska 4) Load the paper into the tray. If this is special paper, such as letterhead, load it with the side to be printed down and the top edge toward the front of the tray. Note Do not fan the paper before loading. 5) Push down on the stack of paper to lock the metal lift plate into place. Make sure that the stack of paper is flat and that the paper is below the height tabs. 4) Læg papiret i bakken. Hvis det er specialpapir, f.eks.
6) Slide the tray back into the printer. Load paper into Tray 1 (optional procedure). 1) Open Tray 1. Note If printing special media, such as envelopes, use Tray 1. 6) Skub bakken ind i printeren igen. Læg papir i bakke 1 (valgfrit). 1) Åbn bakke 1. Bemærk! Hvis du udskriver på specialmedie, f.eks. konvolutter, skal du bruge bakke 1. 6) Työnnä lokero takaisin kirjoittimeen. Lataa paperia lokeroon 1 (valinnainen toimenpide). 1) Avaa lokero 1.
3) Slide the width guides slightly wider than the print media. 4) Remove any unused print media, and close the tray when finished printing. 2) Skub bakkeforlængeren ud, og åbn evt. den ekstra bakkeforlænger. 3) Skub breddestyrene lidt længere ud end udskriftsmediet. 4) Fjern ubrugt udskriftsmedie, og luk bakken, når du er færdig med at udskrive. 2) Vedä lokeron jatke ulos ja avaa lokeron jatkoalusta tarvittaessa. 3) Aseta leveysohjaimet hieman paperia leveämmäksi.
Connect the power cable and turn the printer on. After a minimum of two minutes, the green ready light turns on. CAUTION Do not connect the printer to the computer or to the network at this time. If prompted to select a control panel language, press highlight the desired language. Press to select it. Tilslut strømkablet, og tænd printeren. Efter mindst to minutter tændes den grønne Klar-indikator. FORSIGTIG! Undgå at tilslutte printeren til computeren eller netværket på nuværende tidspunkt.
English Dansk Suomi Ελληνικά Norsk Svenska Print a demo page. 1) Press MENU to enter the menus. 2) Press to highlight INFORMATION, and then press to select it. 3) Press to highlight PRINT DEMO, and then press to select it. After printing the demo page, the printer control panel displays the READY message. Udskriv en demoside. 1) Tryk på MENU for at åbne menuerne. 2) Tryk på for at markere INFORMATION, og tryk derefter på for at vælge indstillingen.
Choose ONE installation method. To connect the printer directly to a Windows® PC, go to step 16. To connect the printer directly to a Macintosh computer, go to step 18. To connect the HP Color LaserJet 3550n to a network, go to step 19. Connect the printer to a Windows PC. 1) Place the CD-ROM in the CD-ROM drive. Note Install the software from the CD-ROM before connecting the cable to the printer. If you have already connected the cable and the New Hardware Found message appears, go to step 17.
English 3) Follow the on-screen instructions. When prompted, connect a USB cable (recommended to optimize performance) between the printer and the computer. Dansk 2) Klik på Installer printer på velkomstskærmen. Guiden Installation vises. Bemærk! Hvis velkomstskærmen ikke vises, skal du klikke på Start og derefter klikke på Kør. Skriv X:SETUP, erstat X med bogstavet for cd-rom-drevet, og klik derefter på OK. 3) Følg instruktionerne på skærmen.
4) Click Finish. If prompted, restart the PC. 5) Go to step 21. Plug and Play. If the New Hardware Found message appears, insert the CD-ROM. Follow the on-screen instructions, accept the default selections, and then go to step 21. 4) Klik på Udfør. Hvis du bliver bedt om det, skal du genstarte pc'en. 5) Gå til trin 21. Plug and Play. Hvis du får vist meddelelsen Der er fundet ny hardware, skal du indsætte cd-rom'en.
English 2) Place the CD-ROM in the CD-ROM drive. For OS 9.1 to 9.2x, go to step A. For OS X, go to step B. Tilslut printeren til en Macintosh-computer. 1) Sæt et USB-kabel i USB-porten på printeren og i USB-porten på computeren. 2) Læg cd-rom'en i cd-rom-drevet. Hvis du kører OS 9.1-9.2x, skal du gå til trin A. Hvis du kører OS X, skal du gå til trin B. Kirjoittimen kytkeminen Macintosh-tietokoneeseen. 1) Liitä USBkaapeli kirjoittimen ja tietokoneen USB-portteihin. 2) Aseta CD-levy CD-ROM-asemaan.
OS 9.1 to 9.2x: 1) Run the Installer. Complete a custom install. 2) For the custom install, select all options, including USB Components (Classic). 3) When prompted, restart the computer. 4) Run the Apple Desktop Printer Utility from HD/Applications/ Utilities. 5) Double-click HP Printer (USB), and then click OK. 6) Next to USB Printer Selection, click Change. OS 9.1-9.2x: 1) Kør installationsprogrammet. Fuldfør en specialinstallation.
English Dansk Suomi Ελληνικά Norsk Svenska 7) Select the printer, and then click OK. 8) Next to PostScript® Printer Description (PPD) File, click Auto Setup, and then click Create. 9) Save the printer setup. 10) On the desktop, highlight the printer. 11) Click the Printing menu, and then click Set Default Printer. 12) Go to step 21. 7) Marker printeren, og klik derefter på OK. 8) Klik på Automatisk ud for PostScript® printerbeskrivelsesarkiv (PPD), og klik derefter på Opret. 9) Gem printeropsætningen.
OS X: 1) Run the Installer. Complete an easy install. Note If OS X and OS 9.1 (Classic) to 9.2x (Classic) are installed on the same computer, the installer will show both the Classic and the OS X installation options. 2) From HD/Applications/Utilities/Print Center, start the Print Center. 3) If the printer appears in the Printer List, delete the printer. Click Add. 4) On the next page, click the drop-down menu, and then select USB. OS X: 1) Kør installationsprogrammet. Fuldfør en almindelig installation.
HP Color LaserJet 3550n only: Connect to the network. 1) Attach the HP Jetdirect en3700 external print server to a 10Base-T or to a 100Base-T local network by plugging the network cable into the network port on the rear panel. 5) Vælg HP på rullelisten Printertype. 6) Marker printeren under Modelnavn, og klik derefter på Tilføj. 7) Gå til trin 21. Kun HP Color LaserJet 3550n: Opret forbindelse til netværket.
2) Attach the print server to the printer using the USB cable. 3) Insert the DC power cord from the power module into the power connector on the rear panel, and then insert into a power outlet. The 10 or the 100 LED turns on, indicating a network connection, and the power/status LED blinks. After 15 seconds, the power/ status LED light and the USB printer LED light appear green. The power/status LED will blink if there is network activity. 2) Tilslut printerserveren til printeren ved hjælp af USB-kablet.
English Dansk Suomi Ελληνικά Norsk Svenska 4) Press the test button on the back of the external print server to print an HP Jetdirect configuration page. 5) Note the IP address for reference. This may take a few minutes depending on the network connection. 6) For a Windows PC network printer software install, see the HP Network Install Guide that is included with the printer. For a Macintosh computer network printer software install, go to step 20.
Install the printer software (Macintosh). For OS 9.1 to 9.2x, go to step A. For OS X, go to step B. OS 9.1 to 9.2x: 1) Run the Installer. Complete an easy install, and then restart the computer. 2) From HD/Applications/Utilities, use the Apple Desktop Printer Utility to select the printer. Installer printersoftwaren (Macintosh). Hvis du kører OS 9.1-9.2x, skal du gå til trin A. Hvis du kører OS X, skal du gå til trin B. OS 9.1-9.2x: 1) Kør installationsprogrammet.
OS X: 1) Run the Installer. Complete an easy install. Note If OS X and OS 9.1 (Classic) to 9.2x (Classic) are installed on the same computer, the installer will show both the Classic and the OS X installation options. 3) Fuldfør printerinstallationen enten ved hjælp af indstillingen Printer (AppleTalk) eller indstillingen Printer (LPR). 4) Gå til trin 21. OS X: 1) Kør installationsprogrammet. Fuldfør en almindelig installation. Bemærk! Hvis OS X og OS 9.1 (Classic)-9.
2) From HD/Applications/Utilities/Print Center, start the Print Center. 3) If the printer appears in the Printer List, delete the printer. Click Add. 4) On the next page, click the drop-down menu, and then select either the AppleTalk option or the IP Printing option. 5) From the Printer Model drop-down list, select HP. 6) Under Model Name, select the printer, and click Add. 7) Go to step 21. 2) Start Udskriftskø fra HD\Programmer\Hjælpeprogrammer \Udskriftskø.
English Dansk Suomi Ελληνικά Norsk Svenska Test the software installation. Print a page from any program to make sure the software is correctly installed. Note If installation fails, reinstall the software. Congratulations! The printer is ready to use. The user guide is located on the CD-ROM and in the HP toolbox software. Note Save the boxes and the packing materials in case you need to transport the printer. Test softwareinstallationen.
For additional help for the HP Color LaserJet 3550 series printer, go to http://www.hp.com/support/clj3550. Register your printer. Register at http://www.register.hp.com. This is the quickest and easiest way for you to register to receive the following information: technical support updates, enhanced support options, ideas and ways to use your new HP printer, and news on emerging technologies. Yderligere hjælp til HP Color LaserJet 3550 series-printeren finder du på http://www.hp.com/support/clj3550.
© 2004 Hewlett-Packard Development Company, L.P. www.hp.