HP Color LaserJet 3550 series printer Start Početak Start Kezdés Start Pornire Štart Začetek Başlangıç
Copyright and License © 2004 Copyright Hewlett-Packard Development Company, L.P. Reproduction, adaptation, or translation without prior written permission is prohibited, except as allowed under the copyright laws. The information contained herein is subject to change without notice. The only warranties for HP products and services are set forth in the express warranty statements accompanying such products and services. Nothing herein should be construed as constituting an additional warranty.
HP Color LaserJet 3550n: includes the features of the 3550, plus an HP Jetdirect en3700 external print server Modeli. HP Color LaserJet 3550: osnovni model, uključuje 64 MB SDRAM-a HP Color LaserJet 3550: uključuje značajke modela 3550, te HP Jetdirect en3700 vanjski poslužitelj ispisa Modely. HP Color LaserJet 3550: základní model, 64 MB paměti SDRAM. HP Color LaserJet 3550n: stejné vlastnosti jako model 3550, navíc obsahuje externí tiskový server HP Jetdirect en3700.
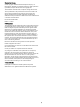
English Hrvatski Čeština Magyar Polski Română Slovenčina Minimum system requirements. See the outside of the box in which the printer was shipped, or see the Install Notes on the CDROM. Prepare the location. Select a sturdy, level surface in a wellventilated, dust-free area. Space requirements for the area around the printer: front, 635 mm (25 inches); rear, 203 mm (8 inches); sides, 229 mm (9 inches); top, 254 mm (10 inches) Najmanji zahtjevi za sustav.
Measurements. HP Color LaserJet 3550 series printer: height, 467 mm (18.4 inches); depth, 447 mm (17.6 inches); width, 483 mm (19 inches); weight, 32.5 kg (71.5 lbs) Regulate the environment. Do not place the printer in direct sunlight or an area that has abrupt temperature and humidity changes. Recommended ranges: 17° to 25° C (62.6° to 77° F) and 20 to 60 percent relative humidity Mjere.
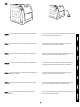
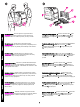
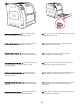
English Hrvatski Čeština Magyar Polski Română Slovenčina Set up the printer. Place the printer in a prepared location. WARNING! Two people must lift and move the printer to the prepared location. Do not lift the printer by the Tray 2 handle. Check the package contents. 1) HP Color LaserJet 3550 2) USB cable 3) power cable 4) four print cartridges 5) CD-ROM (the CDROM contains the user guide) 6) control panel overlay 7) getting started guide Namjestite pisač. Stavite pisač na pripremljeno mjesto.
6 5 4 3 3 2 2 1 1 Additional contents shipped with the HP Color LaserJet 3550n. 1) HP Jetdirect en3700 external print server 2) power supply 3) network install guide Note The items listed here are for the external print server connection. Locate the printer parts (front view). 1) on/off switch 2) Tray 2 3) Tray 1 4) front door 5) printer control panel 6) output bin extender 7) output bin Dodatni sadržaj koji se isporučuje uz HP Color LaserJet 3550n.
Understand the control panel. 1) help button 2) back arrow button 3) ready light 4) menu button 5) data light 6) attention light 7) stop button 8) down arrow button 9) select button 10) up arrow button 11) print cartridge level indicators 12) display Pronađite dijelove pisača (pogled straga). 1) gornja stražnja vrata 2) donja stražnja vrata (stražnja izlazna ladica) 3) USB priključak 4) priključak za napajanje Upoznajte se s kontrolnom pločom.
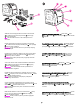
Remove the packing materials. 1) Remove all external orange tape, orange protectors, and other packaging material. 2) Open Tray 2, and remove the orange shipping lock and any other packing material inside the tray. Izvadite ambalažni materijal. 1) Izvadite sve vanjske narančaste trake, narančaste zaštitnike i ostali ambalažni materijal. 2) Otvorite Ladicu 2 i uklonite narančasti zapor za prijevoz i bilo kakav materijal za pakiranje iz ladice. Odstranění balicího materiálu.
CAUTION Do not place anything on the transfer unit. Do not touch the top of the transfer unit or the contacts on the left side of the transfer unit. 3) Podignite ručku prednjih vrata i povucite vrata prema dolje. OPREZ Ništa ne stavljajte na prijenosni mehanizam. Ne dirajte gornju stranu prijenosnog mehanizma ili kontakte na lijevoj strani prijenosnog mehanizma. 3) Nadzvedněte rukojeť předních dvířek a stáhněte je dolů. UPOZORNĚNÍ Nepokládejte na přenášecí jednotku žádné předměty.
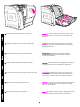
4) Remove the orange tape from the back, right and left sides of the transfer unit. Install the print cartridges. 1) Remove a new print cartridge from the bag. 4) Skinite narančastu vrpcu sa stražnje, desne i lijeve strane prijenosnog mehanizma. Umetnite uloške s tonerom. 1) Izvadite nove uloške s tonerom iz vrećice. 4) Odstraňte oranžovou pásku na zadní, levé a pravé straně přenášecí jednotky. Instalace tiskových kazet. 1) Vyjměte novou tiskovou kazetu z obalu.
3) Remove and discard the orange shipping tape and shipping locks from the new print cartridge. Note Discard the shipping tape and shipping locks according to local regulations. 2) Uhvatite obje strane uloška i lagano ga protresite kako bi se toner u ulošku ravnomjerno rasporedio. 3) Izvadite i bacite narančaste trake i zapore za prijevoz s novog uloška s tonerom. Napomena Bacite trake i zapore za prijevoz sukladno mjesnim propisima.
4) Locate the color slot for the print cartridge. 5) Align the print cartridge with the tracks inside the printer and, using the handle, insert the cartridge. 6) Repeat this procedure for the remaining three print cartridges. 4) Pronađite obojani utor za uložak s tonerom. 5) Poravnajte uložak s tonerom sa šinama unutar pisača i, koristeći ručke, umetnite uložak. 6) Ponovite ovaj postupak za ostala tri uloška s tonerom. 4) Najděte barevnou zásuvku pro tiskovou kazetu.
Load paper into Tray 2. 1) Pull Tray 2 out of the printer. 7) Čvrsto zatvorite prednja vrata. Uložite papir u Ladicu 2. 1) Izvucite Ladicu 2 iz pisača. 7) Pevně uzavřete přední dvířka. Vložení papíru do zásobníku 2. 1) Vyjměte zásobník 2 z tiskárny. 7) Határozott mozdulattal zárja be az elülső ajtót. Papír töltése a 2. tálcába. 1) Húzza ki a 2. tálcát a nyomtatóból. 7) Dokładnie zamknij przednią osłonę. Ładowanie papieru do podajnika 2. 1) Wyciągnij podajnik 2 z drukarki.
2) Move the side width guides until the blue arrows on the width guides point to the size of paper you are loading. 3) On the back of the tray, press the blue ridges and slide the length guides until the arrow symbol points to the paper size you are loading. 2) Povucite bočne vodilice za širinu dok plave strelice na vodilicama za širinu ne pokažu na veličinu papira koji ulažete.
English Hrvatski Čeština Magyar Polski Română Slovenčina 4) Load the paper into the tray. If this is special paper, such as letterhead, load it with the side to be printed down and the top edge toward the front of the tray. Note Do not fan the paper before loading. 5) Push down on the stack of paper to lock the metal lift plate into place. Make sure that the stack of paper is flat and that the paper is below the height tabs. 4) Uložite papir u ladicu.
6) Slide the tray back into the printer. Load paper into Tray 1 (optional procedure). 1) Open Tray 1. Note If printing special media, such as envelopes, use Tray 1. 6) Gurnite ladicu u pisač. Uložite papir u Ladicu 1 (dodatni postupak). 1) Otvorite Ladicu 1. Napomena Ako ispisujete na poseban medij, kao što su omotnice, koristite Ladicu 1. 6) Zasuňte zásobník zpátky do tiskárny. Vložení papíru do zásobníku 1 (volitelný postup). 1) Otevřete zásobník 1.
3) Slide the width guides slightly wider than the print media. 4) Remove any unused print media, and close the tray when finished printing. 2) Izvucite produživač ladice te ako je potrebno, otvorite dodatni produživač ladice. 3) Povucite vodilice za širinu malo šire od širine medija za ispis. 4) Izvadite neupotrijebljeni medij za ispis i zatvorite ladicu nakon završetka ispisa. 2) Vysuňte nástavec zásobníku a v případě potřeby otevřete i přídavný nástavec zásobníku.
Connect the power cable and turn the printer on. After a minimum of two minutes, the green ready light turns on. CAUTION Do not connect the printer to the computer or to the network at this time. If prompted to select a control panel language, press highlight the desired language. Press to select it. Spojite kabel za napajanje i uključite pisač. Nakon najmanje dvije minute, pali se zelena žaruljica spremnosti. OPREZ U ovom trenutku ne spajajte pisač na računalo ili na mrežu.
After printing the demo page, the printer control panel displays the READY message. Nakon ispisa demonstracijske stranice, kontrolna ploča pisača prikazuje poruku READY (Spreman). Hrvatski Ispišite demonstracijsku stranicu. 1) Pritisnite MENU (Izbornik) kako biste ušli u izbornike. 2) Pritisnite za označavanje INFORMATION (Informacije) i pritisnite kako biste ih odabrali. 3) Pritisnite za označavanje PRINT DEMO (Ispis demonstracijske stranice) i pritisnite kako biste ih odabrali.
Choose ONE installation method. To connect the printer directly to a Windows® PC, go to step 16. To connect the printer directly to a Macintosh computer, go to step 18. To connect the HP Color LaserJet 3550n to a network, go to step 19. Connect the printer to a Windows PC. 1) Place the CD-ROM in the CD-ROM drive. Note Install the software from the CD-ROM before connecting the cable to the printer. If you have already connected the cable and the New Hardware Found message appears, go to step 17.
English 3) Follow the on-screen instructions. When prompted, connect a USB cable (recommended to optimize performance) between the printer and the computer. Hrvatski 2) Na pozdravnom zaslonu, pritisnite Install Printer (Instaliraj pisač). Pojavljuje se Setup Wizard (Čarobnjak za postavu). Napomena Ako se pozdravni zaslon ne pojavi, pritisnite Start i onda pritisnite Run (Pokreni). Upišite X:SETUP, zamijenite X sa slovom CD-ROM pogona i pritisnite OK. 3) Slijedite upute na zaslonu računala.
4) Click Finish. If prompted, restart the PC. 5) Go to step 21. Plug and Play. If the New Hardware Found message appears, insert the CD-ROM. Follow the on-screen instructions, accept the default selections, and then go to step 21. 4) Pritisnite Finish (Završetak). Ako se zatraži, ponovno pokrenite računalo. 5) Idite na korak 21. Plug and Play (Uključi i radi). Ako se pojavi poruka New Hardware Found (Pronađen novi hardver), umetnite CD-ROM.
English 2) Place the CD-ROM in the CD-ROM drive. For OS 9.1 to 9.2x, go to step A. For OS X, go to step B. Spajanje pisača izravno na Macintosh računalo. 1) Spojite USB kabel na USB priključnicu na pisaču i na računalu. 2) Umetnite CD-ROM u CD-ROM pogon. Za OS 9.1 do 9.2x, idite na korak A. Za OS X, idite na korak B. Připojení tiskárny k počítači Macintosh. 1) Připojte kabel USB k portu USB tiskárny a k portu USB na počítači. 2) Vložte CD-ROM do jednotky CD-ROM. V případě systémů OS 9.1 až 9.
OS 9.1 to 9.2x: 1) Run the Installer. Complete a custom install. 2) For the custom install, select all options, including USB Components (Classic). 3) When prompted, restart the computer. 4) Run the Apple Desktop Printer Utility from HD/Applications/ Utilities. 5) Double-click HP Printer (USB), and then click OK. 6) Next to USB Printer Selection, click Change. OS 9.1 do 9.2x: 1) Pokrenite Installer. Dovršite korisničku instalaciju.
English Hrvatski Čeština Magyar Polski Română Slovenčina 7) Select the printer, and then click OK. 8) Next to PostScript® Printer Description (PPD) File, click Auto Setup, and then click Create. 9) Save the printer setup. 10) On the desktop, highlight the printer. 11) Click the Printing menu, and then click Set Default Printer. 12) Go to step 21. 7) Označite pisač i pritisnite OK. 8) Pored PostScript® Printer Description (PPD) File, pritisnite Auto Setup i pritisnite Create. 9) Spremite postavu pisača.
OS X: 1) Run the Installer. Complete an easy install. Note If OS X and OS 9.1 (Classic) to 9.2x (Classic) are installed on the same computer, the installer will show both the Classic and the OS X installation options. 2) From HD/Applications/Utilities/Print Center, start the Print Center. 3) If the printer appears in the Printer List, delete the printer. Click Add. 4) On the next page, click the drop-down menu, and then select USB. OS X: 1) Pokrenite Installer. Dovršite jednostavnu instalaciju.
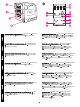
HP Color LaserJet 3550n only: Connect to the network. 1) Attach the HP Jetdirect en3700 external print server to a 10Base-T or to a 100Base-T local network by plugging the network cable into the network port on the rear panel. 5) Na padajućem popisu Printer Model označite HP. 6) Pod Model Name označite pisač i pritisnite Add. 7) Idite na korak 21. HP Color LaserJet 3550 samo: Spajanje na mrežu.
2) Attach the print server to the printer using the USB cable. 3) Insert the DC power cord from the power module into the power connector on the rear panel, and then insert into a power outlet. The 10 or the 100 LED turns on, indicating a network connection, and the power/status LED blinks. After 15 seconds, the power/ status LED light and the USB printer LED light appear green. The power/status LED will blink if there is network activity. 2) Spojite poslužitelj ispisa na pisač koristeći USB kabel.
English Hrvatski Čeština Magyar Polski Română Slovenčina 4) Press the test button on the back of the external print server to print an HP Jetdirect configuration page. 5) Note the IP address for reference. This may take a few minutes depending on the network connection. 6) For a Windows PC network printer software install, see the HP Network Install Guide that is included with the printer. For a Macintosh computer network printer software install, go to step 20.
Install the printer software (Macintosh). For OS 9.1 to 9.2x, go to step A. For OS X, go to step B. OS 9.1 to 9.2x: 1) Run the Installer. Complete an easy install, and then restart the computer. 2) From HD/Applications/Utilities, use the Apple Desktop Printer Utility to select the printer. Instalirajte softver za pisač (Macintosh). Za OS 9.1 do 9.2x, idite na korak A. Za OS X, idite na korak B. OS 9.1 do 9.2x: 1) Pokrenite Installer. Dovršite jednostavnu instalaciju i ponovno pokrenite računalo.
OS X: 1) Run the Installer. Complete an easy install. Note If OS X and OS 9.1 (Classic) to 9.2x (Classic) are installed on the same computer, the installer will show both the Classic and the OS X installation options. 3) Dovršite postavu pisača koristeći mogućnost Printer (AppleTalk) ili mogućnost Printer (LPR). 4) Idite na korak 21. OS X: 1) Pokrenite Installer. Dovršite jednostavnu instalaciju. Napomena Ako su OS X i OS 9.1 (Classic) do 9.
2) From HD/Applications/Utilities/Print Center, start the Print Center. 3) If the printer appears in the Printer List, delete the printer. Click Add. 4) On the next page, click the drop-down menu, and then select either the AppleTalk option or the IP Printing option. 5) From the Printer Model drop-down list, select HP. 6) Under Model Name, select the printer, and click Add. 7) Go to step 21. 2) Iz HD/Applications/Utilities/Print Center, pokrenite Print Center.
English Hrvatski Čeština Magyar Polski Română Slovenčina Test the software installation. Print a page from any program to make sure the software is correctly installed. Note If installation fails, reinstall the software. Congratulations! The printer is ready to use. The user guide is located on the CD-ROM and in the HP toolbox software. Note Save the boxes and the packing materials in case you need to transport the printer. Isprobajte softversku instalaciju.
For additional help for the HP Color LaserJet 3550 series printer, go to http://www.hp.com/support/clj3550. Register your printer. Register at http://www.register.hp.com. This is the quickest and easiest way for you to register to receive the following information: technical support updates, enhanced support options, ideas and ways to use your new HP printer, and news on emerging technologies. Za dodatnu pomoć o pisaču serije HP Color LaserJet 3550 idite na http://www.hp.com/support/clj3550.
Slovenščina HP Color LaserJet 3550n: ima vse funkcije modela 3550 in zunanji tiskalniški strežnik HP Jetdirect en3700 Modeller. HP Color LaserJet 3550: temel model, 64 MB SDRAM içerir HP Color LaserJet 3550: 3550 modelinin özelliklerinin yanı sıra, bir HP Jetdirect en3700 harici baskı sunucusu içerir Minimalne sistemske zahteve. Oglejte si zunanjo stran škatle, v kateri ste dobili tiskalnik, ali pa preberite opombe za namestitev na CD-ROM-u. Pripravite mesto, kjer bo tiskalnik nameščen.
Mere. tiskalnik HP Color LaserJet 3550 series: višina, 467 mm; globina, 447 mm; širina, 483 mm; teža, 32,5 kg Pripravite okolje. Tiskalnika ne izpostavljajte neposredni sončni svetlobi in ga ne postavljajte v prostore, kjer se temperatura ali vlažnost utegne nenadoma spremeniti. Priporočena temperatura je od 17° do 25° C, relativna vlažnost pa od 20 do 60 odstotkov Ölçüler. HP Color LaserJet 3550 series yazıcı: yükseklik, 467 mm; derinlik, 447 mm; genişlik, 483 mm; ağırlık, 32,5 kg Ortamı düzenleyin.
7 6 5 4 3 3 2 2 Türkçe Slovenščina Türkçe Slovenščina 1 1 Dodatna vsebina v embalaži modela HP Color LaserJet 3550n. 1) zunanji tiskalni strežnik HP Jetdirect en3700 2) napajalnik 3) priročnik za omrežno nastavitev Pripomba Predmeti, navedeni tukaj, so za povezavo zunanjega tiskalnega strežnika. Deli tiskalnika (pogled od spredaj).
Odstranite zaščitni material. 1) Odstranite oranžni lepilni trak in ščitnike ter drug zaščitni material na zunanji strani tiskalnika. 2) Odprite pladenj 2 in odstranite oranžno transportno varovalo ter morebitno drugo zaščitno embalažo znotraj pladnja. Ambalaj malzemelerini çıkarın. 1) Tüm harici turuncu ambalaj bantlarını, turuncu koruyucuları ve diğer ambalaj malzemelerini çıkarın. 2) Tepsi 2’yi açın ve tepsinin içindeki turuncu nakliye kilidini ve diğer paketleme malzemelerini çıkarın.
Slovenščina Namestite tiskalna vložka. 1) Vzemite nov tiskalni vložek iz embalaže. 4) Aktarma biriminin arkasında, sağ ve sol yanlarında bulunan turuncu bantı çıkarın. Yazıcı kartuşlarını takın. 1) Yeni yazıcı kartuşunu poşetinden çıkartın. 2) Vložek primite na obeh straneh in ga previdno večkrat nagnite navzgor in navzdol, da se barvilo enakomerno porazdeli. 3) Z novega tiskalnega vložka odstranite oranžni lepilni trak in transportni varovali ter jih zavrzite.
4) Poiščite režo, ki ustreza barvi tiskalnega vložka. 5) Poravnajte tiskalni vložek z vodiloma v tiskalniku in ga vstavite. 6) Ponovite postopek za preostale tri tiskalne vložke. 4) Yazıcı kartuşunun renk yuvasını bulun. 5) Yazdırma kartuşunu yazıcının içindeki çizgilere hizalayın ve tutamacı kullanarak kartuşu takın. 6) Kalan üç kartuş için bu yordamı tekrarlayın. 7) Zaprite sprednja vratca. Vstavite papir v pladenj 2. 1) Izvlecite pladenj 2 iz tiskalnika. 7) Ön kapağı sıkıca kapatın.
Slovenščina 3) Pritisnite modra, grebenasta dela na zadnji strani pladnja in premaknite vodili širine, dokler puščica ne kaže na oznako za velikost papirja, ki ga vstavljate. 2) Genişlik kılavuzundaki mavi oklar yerleştirdiğiniz kağıdın boyutunu gösterecek şekilde yan genişlik kılavuzlarını hareket ettirin. 3) Tepsinin arka tarafında, ok simgesi yerleştirdiğiniz kağıt boyutunu gösterinceye kadar mavi tırtıklara basarak uzunluk kılavuzlarını kaydırın. 4) Vstavite papir v pladenj.
6) Potisnite pladenj nazaj v tiskalnik. Vstavite papir v pladenj 1 (postopek ni obvezen). 1) Odprite pladenj 1. Pripomba Pri tiskanju na posebne tiskalne medije, kot so ovojnice, uporabite pladenj 1. 6) Tepsiyi yazıcıya yerleştirin. Tepsi 1’e kağıt yükleyin (isteğe bağlı yordam). 1) Tepsi 1’i açın. Not Zarf gibi özel ortamlar üzerine yazdırırken Tepsi 1’i kullanın. 2) Izvlecite podaljšek pladnja in po potrebi še dodatni podaljšek.
Slovenščina Türkçe Slovenščina Türkçe Priključite napajalni kabel in vklopite tiskalnik. Po dveh ali več minutah zasveti zelena lučka. OPOZORILO Tiskalnika zaenkrat še ne priključujte na računalnik ali v omrežje. Če se prikaže poziv, da izberete jezik nadzorne plošče, pritiskajte ali , dokler ne označite želenega jezika. Pritisnite , da ga izberete. Güç kablosunu takın ve yazıcıyı açın. En az iki dakika sonra yeşil hazır ışığı yanar. DİKKAT Yazıcınızı henüz bilgisayara veya ağa bağlamayın.
Izberite ENEGA od teh načinov namestitve: Če želite tiskalnik priključiti neposredno na računalnik z operacijskim sistemom Windows®, nadaljujte s 16. korakom. Če želite tiskalnik priključiti neposredno na računalnik Macintosh, nadaljujte z 18. korakom. Če želite tiskalnik HP Color LaserJet 3550n priključiti v omrežje, nadaljujte z 19. korakom. Priključitev tiskalnika na računalnik z operacijskim sistemom Windows. 1) Vstavite CD-ROM v pogon CD-ROM.
Slovenščina Plug and Play. Če se prikaže sporočilo New Hardware Found (Najdena je bila nova strojna oprema), vstavite CD-ROM. Sledite navodilom na zaslonu, sprejmite privzete možnosti in nadaljujte z 21. korakom. 4) Son’u tıklatın. İstenirse, bilgisayarınızı yeniden başlatın. 5) Adım 21’e gidin. Tak ve Çalıştır. Yeni Donanım Bulundu iletisi görüntülenirse CD-ROM’u takın. Ekrandaki yönergeleri uygulayın, varsayılan seçimleri kabul edin ve ardından da adım 21’e gidin.
OS 9.1 do 9.2x: 1) Zaženite program Installer. Izvedite namestitev po meri. 2) Za namestitev po meri (custom install) izberite vse možnosti, vključno z USB Components (Classic). 3) Če je treba, znova zaženite računalnik. 4) Zaženite orodje Apple Desktop Printer Utility v HD/Applications/ Utilities. 5) Dvokliknite Printer (USB) in nato kliknite OK. 6) Zraven možnosti USB Printer Selection kliknite Change. OS 9.1 - 9.2x: 1) Installer’ı (Yükleyici) çalıştırın. Özel kurulum gerçekleştirin.
Slovenščina Türkçe Slovenščina Türkçe OS X: 1) Zaženite program Installer. Izvedite preprosto namestitev. Pripomba Če je v istem računalniku nameščen tako OS X kot OS 9.1 (Classic) do 9.2x (Classic), boste lahko v namestitvenem programu izbrali možnost namestitve v enem ali drugem. 2) Zaženite Print Center iz HD/Applications/Utilities/Print Center. 3) Če je tiskalnik že na seznamu tiskalnikov (Printer List), ga izbrišite. Kliknite Add. 4) Na naslednji strani kliknite spustni meni in nato izberite USB.
2) Povežite tiskalniški strežnik in tiskalnik s kablom USB. 3) Vstavite izhodni napajalni kabel iz napajalnika v ustrezen priključek na hrbtni strani tiskalnika, vhodnega pa na električno vtičnico. Lučka 10 ali 100 zasveti, kar označuje omrežno povezavo, in lučka za napajanje/stanje začne utripati. Po 15 sekundah začneta lučka za napajanje/stanje in lučka vrat USB na tiskalniku svetiti zeleno. Lučka za napajanje/stanje bo utripala pri omrežni dejavnosti.
Slovenščina OS 9.1 do 9.2x: 1) Zaženite program Installer. Izvedite preprosto namestitev in nato znova zaženite računalnik. 2) Izberite tiskalnik z orodjem Apple Desktop Printer Utility v HD/Applications/Utilities. Yazıcı yazılımını yükleyin (Macintosh). OS 9.1 - 9.2x arası için adım A’ya gidin. OS X için adım B’ye gidin. OS 9.1 - 9.2x: 1) Installer’ı (Yükleyici) çalıştırın. Kolay kurulum gerçekleştirin ve bilgisayarı yeniden başlatın.
2) Zaženite Print Center iz HD/Applications/Utilities/Print Center. 3) Če je tiskalnik že na seznamu tiskalnikov (Printer List), ga izbrišite. Kliknite Add. 4) Na naslednji strani kliknite spustni meni in izberite bodisi možnost AppleTalk bodisi IP Printing. 5) Na spustnem seznamu Printer Model izberite HP. 6) V polju Model Name izberite tiskalnik in kliknite Add. 7) Nadaljujte z 21. korakom. 2) HD/Applications/Utilities/Print Center konumundan Print Center’ı (Yazdırma Merkezi) çalıştırın.
Slovenščina Registrirajte tiskalnik. Tiskalnik lahko registrirate na mestu http://www.register.hp.com. To je najhitrejši in najlažji način, da registrirate tiskalnik in začnete prejemati informacije o posodobitvah tehnične podpore, izboljšanih možnostih za podporo, zamislih in načinih uporabe tiskalnika HP ter novice o novih tehnologijah. HP Color LaserJet 3550 series yazıcı hakkında daha fazla yardım için http://www.hp.com/support/clj3550 adresine gidin. Yazıcınızı kaydettirin. http://www.register.hp.
52
53
54
© 2004 Hewlett-Packard Development Company, L.P. *Q5990-90904* *Q5990-90904* www.hp.