HP Color LaserJet 3550 series printer Start Démarrage Iñêå ºîñó O
Copyright and License Marques citées © 2004 Copyright Hewlett-Packard Development Company, L.P. PostScript® est une marque d’Adobe Systems Incorporated. Reproduction, adaptation, or translation without prior written permission is prohibited, except as allowed under the copyright laws. Windows® est une marque déposée aux Etats-Unis de Microsoft Corp. The information contained herein is subject to change without notice.
HP Color LaserJet 3550n: includes the features of the 3550, plus an HP Jetdirect en3700 external print server Modèles. HP Color LaserJet 3550 : modèle de base, inclut 64 Mo de mémoire SDRAM HP Color LaserJet 3550n : inclut les caractéristiques du modèle 3550, ainsi qu’un serveur d’impression externe HP Jetdirect en3700 Модели. HP Color LaserJet 3550: базов модел, включва 64 MB SDRAM HP Color LaserJet 3550n: включва функциите на модела 3550, както и външен принтерен сървър HP Jetdirect en3700 Үлгілер.
English Français Български Казак Русский Українська Minimum system requirements. See the outside of the box in which the printer was shipped, or see the Install Notes on the CDROM. Prepare the location. Select a sturdy, level surface in a wellventilated, dust-free area. Space requirements for the area around the printer: front, 635 mm (25 inches); rear, 203 mm (8 inches); sides, 229 mm (9 inches); top, 254 mm (10 inches) Configuration minimum du système.
Measurements. HP Color LaserJet 3550 series printer: height, 467 mm (18.4 inches); depth, 447 mm (17.6 inches); width, 483 mm (19 inches); weight, 32.5 kg (71.5 lbs) Regulate the environment. Do not place the printer in direct sunlight or an area that has abrupt temperature and humidity changes. Recommended ranges: 17° to 25° C (62.6° to 77° F) and 20 to 60 percent relative humidity Dimensions.
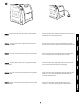
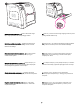
Check the package contents. 1) HP Color LaserJet 3550 2) USB cable 3) power cable 4) four print cartridges 5) CD-ROM (the CDROM contains the user guide) 6) control panel overlay 7) getting started guide Installation de l’imprimante. Placez l’imprimante à un emplacement préparé. AVERTISSEMENT Le soulèvement et le déplacement de l’imprimante vers l’emplacement préparé requièrent deux personnes. Ne soulevez pas l’imprimante par la poignée du bac 2. Examen du contenu du coffret.
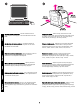
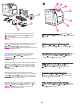
6 5 4 3 3 2 2 1 1 Additional contents shipped with the HP Color LaserJet 3550n. 1) HP Jetdirect en3700 external print server 2) power supply 3) network install guide Note The items listed here are for the external print server connection. Locate the printer parts (front view). 1) on/off switch 2) Tray 2 3) Tray 1 4) front door 5) printer control panel 6) output bin extender 7) output bin Matériel supplémentaire livré avec l’imprimante HP Color LaserJet 3550n.
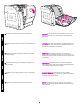
Understand the control panel. 1) help button 2) back arrow button 3) ready light 4) menu button 5) data light 6) attention light 7) stop button 8) down arrow button 9) select button 10) up arrow button 11) print cartridge level indicators 12) display Repérage des composants de l’imprimante (vue arrière). 1) porte arrière supérieure 2) porte arrière inférieure (bac de sortie arrière) 3) connexion USB 4) connexion d’alimentation Présentation du panneau de commande.
Remove the packing materials. 1) Remove all external orange tape, orange protectors, and other packaging material. 2) Open Tray 2, and remove the orange shipping lock and any other packing material inside the tray. Retrait des matériaux d’emballage. 1) Retirez la bande orange externe, les éléments de protection oranges et tous les autres matériaux d’emballage. 2) Ouvrez le bac 2, puis retirez le dispositif de sécurité d’expédition orange dans le bac ainsi que tout autre matériel d’emballage.
CAUTION Do not place anything on the transfer unit. Do not touch the top of the transfer unit or the contacts on the left side of the transfer unit. 3) Soulevez la poignée de la porte avant, puis abaissez la porte avant. ATTENTION Ne placez aucun objet sur le module de transfert. Ne touchez pas à la partie supérieure du module de transfert ou aux contacts sur le côté gauche de ce dernier. 3) Повдигнете дръжката на предната вратичка и дръпнете вратичката надолу.
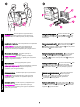
4) Remove the orange tape from the back, right and left sides of the transfer unit. Install the print cartridges. 1) Remove a new print cartridge from the bag. 4) Retirez le ruban adhésif orange de l’arrière et des côtés droit et gauche du module de transfert. Installation des cartouches d’impression. 1) Retirez une cartouche d’impression neuve de son emballage. 4) Отстранете оранжевата лента от гърба, лявата и дясната страна на устройството за прехвърляне. Инсталиране на касетите за печат.
3) Remove and discard the orange shipping tape and shipping locks from the new print cartridge. Note Discard the shipping tape and shipping locks according to local regulations. 2) Saisissez les deux côtés de la cartouche et distribuez le toner en secouant délicatement la cartouche latéralement. 3) Retirez la bande et les dispositifs de sécurité d’expédition oranges de la nouvelle cartouche d’impression.
4) Locate the color slot for the print cartridge. 5) Align the print cartridge with the tracks inside the printer and, using the handle, insert the cartridge. 6) Repeat this procedure for the remaining three print cartridges. 4) Repérez le logement couleur de la cartouche d’impression. 5) Alignez la cartouche d’impression sur les repères dans l’imprimante puis, à l’aide de la poignée, introduisez la cartouche. 6) Répétez cette procédure pour les trois autres cartouches d’impression.
Load paper into Tray 2. 1) Pull Tray 2 out of the printer. 7) Fermez la porte avant. Chargement de papier dans le bac 2. 1) Sortez le bac 2 de l’imprimante. 7) Затворете добре предната вратичка. Заредете хартия в Тава 2. 1) Издърпайте Тава 2 от принтера. 7) Алдыңғы есікшені мықтап жабыңыз. 2- науаға қағаз жүктеңіз. 1) 2- науаны принтерден тартып шығарыңыз. 7. Плотно закройте переднюю дверцу. Загрузка бумаги в лоток 2. 1. Выдвиньте лоток 2 из принтера. 7) Надійно закрийте передню кришку.
2) Move the side width guides until the blue arrows on the width guides point to the size of paper you are loading. 3) On the back of the tray, press the blue ridges and slide the length guides until the arrow symbol points to the paper size you are loading. 2) Déplacez les guides de largeur latéraux jusqu’à ce que les flèches bleues sur ceux-ci pointent vers le format de papier chargé.
5) Push down on the stack of paper to lock the metal lift plate into place. Make sure that the stack of paper is flat and that the paper is below the height tabs. 4) Chargez du papier dans le bac. S’il s’agit d’un papier spécial, tel que du papier à en-tête, chargez-le la face imprimée vers le bas et le bord supérieur vers l’avant du bac. Remarque N’aérez pas le papier avant de le charger. 5) Appuyez sur la pile de papier afin de verrouiller en place la plaque métallique de soulèvement du papier.
6) Slide the tray back into the printer. Load paper into Tray 1 (optional procedure). 1) Open Tray 1. Note If printing special media, such as envelopes, use Tray 1. 6) Faites glisser le bac dans l’imprimante. Chargement de papier dans le bac 1 (procédure facultative). 1) Ouvrez le bac 1. Remarque En cas d’impression sur un support spécial tel que des enveloppes, utilisez le bac 1. 6) Плъзнете тавата обратно в принтера. Заредете хартия в Тава 1 (допълнителна процедура). 1) Отворете Тава 1.
3) Slide the width guides slightly wider than the print media. 4) Remove any unused print media, and close the tray when finished printing. 2) Etirez la rallonge du bac et, au besoin, ouvrez la rallonge supplémentaire. 3) Faites glisser les guides de largeur un peu au-delà du support d’impression. 4) Retirez tout support inutilisé, puis fermez le bac une fois l’impression terminée. 2) Изтеглете удължителя на изходната тава и, ако е необходимо, отворете допълнителния удължител на тавата.
Connect the power cable and turn the printer on. After a minimum of two minutes, the green ready light turns on. CAUTION Do not connect the printer to the computer or to the network at this time. If prompted to select a control panel language, press highlight the desired language. Press to select it. Connexion du cordon d’alimentation et mise sous tension de l’imprimante. Après deux minutes au minimum, le voyant d’état prêt vert s’allume.
English Français Български Казак Русский Українська Print a demo page. 1) Press MENU to enter the menus. 2) Press to highlight INFORMATION, and then press to select it. 3) Press to highlight PRINT DEMO, and then press to select it. After printing the demo page, the printer control panel displays the READY message. Impression d’une page de démonstration. 1) Appuyez sur MENU pour accéder aux menus. 2) Appuyez sur pour mettre en surbrillance INFORMATIONS, puis appuyez sur pour sélectionner l’option.
Choose ONE installation method. To connect the printer directly to a Windows® PC, go to step 16. To connect the printer directly to a Macintosh computer, go to step 18. To connect the HP Color LaserJet 3550n to a network, go to step 19. Connect the printer to a Windows PC. 1) Place the CD-ROM in the CD-ROM drive. Note Install the software from the CD-ROM before connecting the cable to the printer. If you have already connected the cable and the New Hardware Found message appears, go to step 17.
English 3) Follow the on-screen instructions. When prompted, connect a USB cable (recommended to optimize performance) between the printer and the computer. Français 2) Dans l’écran de bienvenue, cliquez sur Installer une imprimante. L’assistant d’installation s’affiche. Remarque Si l’écran de bienvenue ne s’affiche pas, cliquez sur Démarrer, puis sur Exécuter. Entrez X:SETUP, remplacez X par la lettre du lecteur de CD-ROM, puis cliquez sur OK. 3) Suivez les instructions affichées à l’écran.
4) Click Finish. If prompted, restart the PC. 5) Go to step 21. Plug and Play. If the New Hardware Found message appears, insert the CD-ROM. Follow the on-screen instructions, accept the default selections, and then go to step 21. 4) Cliquez sur Terminer. Si vous y êtes invité, redémarrez l’ordinateur. 5) Passez à l’étape 21. Plug-and-Play. Si le message Nouveau matériel détecté s’affiche, introduisez le CD-ROM.
English Français Български Казак Русский Українська Connect the printer to a Macintosh computer. 1) Connect a USB cable between the USB port on the printer and the USB port on the computer. 2) Place the CD-ROM in the CD-ROM drive. For OS 9.1 to 9.2x, go to step A. For OS X, go to step B. Connexion directe de l’imprimante à un Macintosh. 1) Connectez un câble USB entre le port USB de l’imprimante et celui de l’ordinateur. 2) Placez le CD-ROM dans le lecteur de CD-ROM. Pour OS 9.1 à 9.
OS 9.1 to 9.2x: 1) Run the Installer. Complete a custom install. 2) For the custom install, select all options, including USB Components (Classic). 3) When prompted, restart the computer. 4) Run the Apple Desktop Printer Utility from HD/Applications/ Utilities. 5) Double-click HP Printer (USB), and then click OK. 6) Next to USB Printer Selection, click Change. OS 9.1 à 9.2x : 1) Exécutez le programme d’installation. Effectuez une installation personnalisée.
English Français Български Казак Русский Українська 7) Select the printer, and then click OK. 8) Next to PostScript® Printer Description (PPD) File, click Auto Setup, and then click Create. 9) Save the printer setup. 10) On the desktop, highlight the printer. 11) Click the Printing menu, and then click Set Default Printer. 12) Go to step 21. 7) Sélectionnez l’imprimante, puis cliquez sur OK. 8) En regard de Fichier PPD (PostScript® Printer Description), cliquez sur Réglage auto, puis cliquez sur Créer.
OS X: 1) Run the Installer. Complete an easy install. Note If OS X and OS 9.1 (Classic) to 9.2x (Classic) are installed on the same computer, the installer will show both the Classic and the OS X installation options. 2) From HD/Applications/Utilities/Print Center, start the Print Center. 3) If the printer appears in the Printer List, delete the printer. Click Add. 4) On the next page, click the drop-down menu, and then select USB. OS X : 1) Exécutez le programme d’installation.
HP Color LaserJet 3550n only: Connect to the network. 1) Attach the HP Jetdirect en3700 external print server to a 10Base-T or to a 100Base-T local network by plugging the network cable into the network port on the rear panel. 5) Dans la liste locale Modèle d’imprimante, sélectionnez HP. 6) Sous Nom du modèle, sélectionnez l’imprimante, puis cliquez sur Ajouter. 7) Passez à l’étape 21. HP Color LaserJet 3550n uniquement : Connexion au réseau.
2) Attach the print server to the printer using the USB cable. 3) Insert the DC power cord from the power module into the power connector on the rear panel, and then insert into a power outlet. The 10 or the 100 LED turns on, indicating a network connection, and the power/status LED blinks. After 15 seconds, the power/ status LED light and the USB printer LED light appear green. The power/status LED will blink if there is network activity.
English Français Български Казак Русский Українська 4) Press the test button on the back of the external print server to print an HP Jetdirect configuration page. 5) Note the IP address for reference. This may take a few minutes depending on the network connection. 6) For a Windows PC network printer software install, see the HP Network Install Guide that is included with the printer. For a Macintosh computer network printer software install, go to step 20.
Install the printer software (Macintosh). For OS 9.1 to 9.2x, go to step A. For OS X, go to step B. OS 9.1 to 9.2x: 1) Run the Installer. Complete an easy install, and then restart the computer. 2) From HD/Applications/Utilities, use the Apple Desktop Printer Utility to select the printer. Installation du logiciel d’imprimante (Macintosh). Pour OS 9.1 à 9.2x, passez à l’étape A. Pour OS X, passez à l’étape B. OS 9.1 à 9.2x : 1) Exécutez le programme d’installation.
OS X: 1) Run the Installer. Complete an easy install. Note If OS X and OS 9.1 (Classic) to 9.2x (Classic) are installed on the same computer, the installer will show both the Classic and the OS X installation options. 3) Exécutez la configuration de l’imprimante en utilisant l’option Imprimante (AppleTalk) ou Imprimante (LPR). 4) Passez à l’étape 21. OS X : 1) Exécutez le programme d’installation. Effectuez une installation standard. Remarque Si OS X et OS 9.1 (Classic) à 9.
2) From HD/Applications/Utilities/Print Center, start the Print Center. 3) If the printer appears in the Printer List, delete the printer. Click Add. 4) On the next page, click the drop-down menu, and then select either the AppleTalk option or the IP Printing option. 5) From the Printer Model drop-down list, select HP. 6) Under Model Name, select the printer, and click Add. 7) Go to step 21. 2) Démarrez le Centre d’impression à partir du dossier HD/ Applications/Utilitaires/Centre d’impression.
Congratulations! The printer is ready to use. The user guide is located on the CD-ROM and in the HP toolbox software. Note Save the boxes and the packing materials in case you need to transport the printer. Test de l’installation du logiciel. Imprimez une page à partir d’un programme quelconque pour vérifier que le logiciel est correctement installé. Remarque En cas d’échec de l’installation, réinstallez le logiciel. Félicitations ! L’imprimante est prête à l’emploi.
For additional help for the HP Color LaserJet 3550 series printer, go to http://www.hp.com/support/clj3550. Register your printer. Register at http://www.register.hp.com. This is the quickest and easiest way for you to register to receive the following information: technical support updates, enhanced support options, ideas and ways to use your new HP printer, and news on emerging technologies. Pour obtenir une aide supplémentaire sur l’imprimante HP Color LaserJet 3550 series, visitez le site http://www.
35
36
37
ﻟﻤﺰﻳﺪ ﻣﻦ اﻟﺘﻌﻠﻴﻤﺎت ﺣﻮل ﻃﺎﺑﻌﺔ ،HP Color LaserJet 3550اﻧﺘﻘﻞ إﻟﻰ .http://www.hp.com/support/clj3550 ﻋﺮﺑﻲ ﺗﺴﺠﻴﻞ اﻟﻄﺎﺑﻌﺔ .ﻳﻤﻜﻨﻚ ﺗﺴﺠﻴﻞ اﻟﻄﺎﺑﻌﺔ ﻋﻠﻰ .http://www.register.hp.com ﺗﻠﻚ ﻫﻲ أﺳﺮع وأﺳﻬﻞ ﻃﺮﻳﻘﺔ ﻟﺘﺴﺠﻴﻞ ﻃﺎﺑﻌﺘﻚ اﻟﺠﺪﻳﺪة ﻟﻜﻲ ﺗﻀﻤﻦ ﺣﺼﻮﻟﻚ ﻋﻠﻰ اﻟﻤﻌﻠﻮﻣﺎت اﻟﺘﺎﻟﻴﺔ :ﺗﺤﺪﻳﺜﺎت اﻟﺪﻋﻢ اﻟﻔﻨﻲ وﺧﻴﺎرات اﻟﺪﻋﻢ اﻟﻤﺘﻘﺪم وأﻓﻜﺎر وﻃﺮق ﻣﺨﺘﻠﻔﺔ ﻻﺳﺘﺨﺪام ﻃﺎﺑﻌﺘﻚ HPاﻟﺠﺪﻳﺪة وأﺧﺒﺎر ﺣﻮل اﻟﺘﻘﻨﻴﺎت اﻟﺠﺪﻳﺪة واﻟﻤﺴﺘﺤﺪﺛﺔ.
(2اﺑﺪأ ﺗﺸﻐﻴﻞ "ﻣﺮﻛﺰ اﻟﻄﺒﺎﻋﺔ" ﻣﻦ HD/Applications/Utilities/Print Center. (3إذا ﻇﻬﺮت اﻟﻄﺎﺑﻌﺔ ﻓﻲ ﻗﺎﺋﻤﺔ اﻟﻄﺎﺑﻌﺎت ،اﺣﺬف اﻟﻄﺎﺑﻌﺔ .اﻧﻘﺮ ﻓﻮق إﺿﺎﻓﺔ. (4ﻋﻠﻰ اﻟﺼﻔﺤﺔ اﻟﺘﺎﻟﻴﺔ ،اﻧﻘﺮ ﻓﻮق اﻟﻘﺎﺋﻤﺔ اﻟﻤﻨﺴﺪﻟﺔ ﺛﻢ ﺣﺪد إﻣﺎ ﺧﻴﺎر AppleTalk أو ﺧﻴﺎر ) IP Printingﻃﺒﺎﻋﺔ (5 .(IPﻣﻦ اﻟﻘﺎﺋﻤﺔ اﻟﻤﻨﺴﺪﻟﺔ ) Printer Modelﻃﺮاز اﻟﻄﺎﺑﻌﺔ( ،ﺣﺪد (6 .HPﺗﺤﺖ ) Model Nameاﺳﻢ اﻟﻄﺮاز( ،ﺣﺪد اﻟﻄﺎﺑﻌﺔ ،ﺛﻢ اﻧﻘﺮ ﻓﻮق ) Addإﺿﺎﻓﺔ( (7 .اﻧﺘﻘﻞ إﻟﻰ ﺧﻄﻮة رﻗﻢ .21 اﺧﺘﺒﺎر ﺗﺜﺒﻴﺖ اﻟﺒﺮﻧﺎﻣﺞ .
(3اﺳﺘﻜﻤﻞ ﺗﺜﺒﻴﺖ إﻋﺪاد اﻟﻄﺎﺑﻌﺔ ﺑﺎﺳﺘﺨﺪام إﻣﺎ ﺧﻴﺎر ) Printer (AppleTalkﻃﺎﺑﻌﺔ ) (AppleTalkأو ﺧﻴﺎر ) (4 .(LPRاﻧﺘﻘﻞ إﻟﻰ ﺧﻄﻮة رﻗﻢ .21 ﻧﻈﺎم اﻟﺘﺸﻐﻴﻞ (1 :OS Xﺗﺸﻐﻴﻞ ﺑﺮﻧﺎﻣﺞ اﻟﺘﺜﺒﻴﺖ .اﺳﺘﻜﻤﺎل ﻋﻤﻠﻴﺔ ﺗﺜﺒﻴﺖ ﺳﻬﻠﺔ. ﻣﻼﺣﻈﺔ إذا ﻛﺎن ﻛﻼ ﻧﻈﺎﻣﻲ اﻟﺘﺸﻐﻴﻞ OS Xو ) 9.1 (Classicﺣﺘﻰ 9.2x ) (Classicﻣﺜﺒﺘﻴﻦ ﻋﻠﻰ ﻧﻔﺲ ﺟﻬﺎز اﻟﻜﻤﺒﻴﻮﺗﺮ ،ﺳﻴُﻈﻬﺮ ﺑﺮﻧﺎﻣﺞ اﻟﺘﺜﺒﻴﺖ ﺧﻴﺎرات اﻟﺘﺜﺒﻴﺖ ﻟﻜﻞٍ ﻣﻦ Classicو .OS X ﻋﺮﺑﻲ ﻋﺮﺑﻲ ﺗﺜﺒﻴﺖ ﺑﺮﻧﺎﻣﺞ اﻟﻄﺎﺑﻌﺔ ) .(Macintoshﺑﺎﻟﻨﺴﺒﺔ إﻟﻰ ﻧﻈﺎم اﻟﺘﺸﻐﻴﻞ OS 9.1ﺣﺘﻰ ،9.
(2ﻗﻢ ﺑﺈرﻓﺎق ﻣﻠﻘﻢ اﻟﻄﺒﺎﻋﺔ إﻟﻰ اﻟﻄﺎﺑﻌﺔ ﺑﺎﺳﺘﺨﺪام ﻛﺒﻞ (3 .USBأدﺧﻞ ﺳﻠﻚ اﻟﻄﺎﻗﺔ )اﻟﺘﻴﺎر اﻟﻤﺴﺘﻤﺮ (DCﻣﻦ ﻣﺤﻮل اﻟﻄﺎﻗﺔ إﻟﻰ ﻣﻨﻔﺬ ﺗﻮﺻﻴﻞ اﻟﺘﻴﺎر اﻟﻜﻬﺮﺑﻲ ﻓﻲ اﻟﻠﻮﺣﺔ اﻟﺨﻠﻔﻴﺔ ﺑﺎﻟﻄﺎﺑﻌﺔ ،ﺛﻢ ﻗﻢ ﺑﺘﻮﺻﻴﻠﻪ ﺑﻤﺄﺧﺬ اﻟﺘﻴﺎر اﻟﻜﻬﺮﺑﻲ اﻟﻌﻤﻮﻣﻲ. ﺳﻴﻀﻲء ﻣﺼﺒﺎح اﻹﺷﺎرة LED 10أو ،LED 100ﻣﺸﻴﺮاً إﻟﻰ ﺗﻮﺻﻴﻞ اﻟﺸﺒﻜﺔ ،ﻛﻤﺎ ﻳﻮﻣﺾ ﻣﺼﺒﺎح إﺷﺎرة اﻟﻄﺎﻗﺔ/اﻟﺤﺎﻟﺔ .ﺑﻌﺪ 15ﺛﺎﻧﻴﺔ ،ﺗﺘﺤﻮل إﺿﺎءة ﻣﺼﺎﺑﻴﺢ إﺷﺎرة اﻟﻄﺎﻗﺔ/اﻟﺤﺎﻟﺔ ووﺻﻠﺔ USBﺑﺎﻟﻄﺎﺑﻌﺔ إﻟﻰ اﻹﺿﺎءة ﺑﺎﻟﻠﻮن اﻷﺧﻀﺮ .
ﻋﺮﺑﻲ ﻋﺮﺑﻲ ﻧﻈﺎم اﻟﺘﺸﻐﻴﻞ (1 :OS Xﺗﺸﻐﻴﻞ ﺑﺮﻧﺎﻣﺞ اﻟﺘﺜﺒﻴﺖ .اﺳﺘﻜﻤﺎل ﻋﻤﻠﻴﺔ ﺗﺜﺒﻴﺖ ﺳﻬﻠﺔ. ﻣﻼﺣﻈﺔ إذا ﻛﺎن ﻛﻼ ﻧﻈﺎﻣﻲ اﻟﺘﺸﻐﻴﻞ OS Xو ) 9.1 (Classicﺣﺘﻰ 9.2x ) (Classicﻣﺜﺒﺘﻴﻦ ﻋﻠﻰ ﻧﻔﺲ ﺟﻬﺎز اﻟﻜﻤﺒﻴﻮﺗﺮ ،ﺳﻴُﻈﻬﺮ ﺑﺮﻧﺎﻣﺞ اﻟﺘﺜﺒﻴﺖ ﺧﻴﺎرات اﻟﺘﺜﺒﻴﺖ ﻟﻜﻞٍ ﻣﻦ Classicو .OS X (2اﺑﺪأ ﺗﺸﻐﻴﻞ "ﻣﺮﻛﺰ اﻟﻄﺒﺎﻋﺔ" ﻣﻦ .HD/Applications/Utilities/Print Center (3إذا ﻇﻬﺮت اﻟﻄﺎﺑﻌﺔ ﻓﻲ ) Printer Listﻗﺎﺋﻤﺔ اﻟﻄﺎﺑﻌﺎت( ،اﺣﺬف اﻟﻄﺎﺑﻌﺔ .اﻧﻘﺮ ﻓﻮق ) Addإﺿﺎﻓﺔ( (4 .اﻧﻘﺮ ﻓﻮق اﻟﻘﺎﺋﻤﺔ اﻟﻤﻨﺴﺪﻟﺔ ،ﺛﻢ ﺣﺪد .
OS 9.1إﻟﻰ (1 :9.2xﺗﺸﻐﻴﻞ ﺑﺮﻧﺎﻣﺞ اﻟﺘﺜﺒﻴﺖ .اﺳﺘﻜﻤﻞ ﻋﻤﻠﻴﺔ ﺗﺜﺒﻴﺖ ﻣﺨﺼﺺ. (2ﻓﻲ ﺣﺎﻟﺔ اﻟﺘﺜﺒﻴﺖ اﻟﻤﺨﺼﺺ ،ﺣﺪد ﻛﺎﻓﺔ اﻟﺨﻴﺎرات ﺑﻤﺎ ﻓﻴﻬﺎ USB Components ) (Classicﻣﻜﻮﻧﺎت ) USBﻧﻤﻄﻲ( (3 .ﻋﻨﺪﻣﺎ ﺗﺘﻢ ﻣﻄﺎﻟﺒﺘﻚ ،أﻋﺪ ﺗﺸﻐﻴﻞ ﺟﻬﺎز اﻟﻜﻤﺒﻴﻮﺗﺮ. (4ﻗﻢ ﺑﺘﺸﻐﻴﻞ "اﻷداة اﻟﻤﺴﺎﻋﺪة ﻟﻄﺎﺑﻌﺔ "Apple Desktopﻣﻦ (5 HD/Applications/Utilities.اﻧﻘﺮ ﻧﻘﺮاً ﻣﺰدوﺟﺎً ﻓﻮق ﻃﺎﺑﻌﺔ ) ،HP (USBﺛﻢ اﻧﻘﺮ ﻓﻮق ) OKﻣﻮاﻓﻖ( (6 .إﻟﻰ ﺟﺎﻧﺐ ) USB Printer Selectionﺗﺤﺪﻳﺪ ﻃﺎﺑﻌﺔ ،(USBاﻧﻘﺮ ﻓﻮق ) Changeﺗﻐﻴﻴﺮ(.
ﺗﻮﺻﻴﻞ اﻟﻄﺎﺑﻌﺔ ﺑﺠﻬﺎز ﻛﻤﺒﻴﻮﺗﺮ ﻳﻌﻤﻞ ﺑﻨﻈﺎم ﺗﺸﻐﻴﻞ (1 .Macintoshﻗﻢ ﺑﺘﻮﺻﻴﻞ ﻛﺒﻞ USBﺑﻴﻦ ﻣﻨﻔﺬ USBﻋﻠﻰ اﻟﻄﺎﺑﻌﺔ وﻣﻨﻔﺬ USBﻋﻠﻰ ﺟﻬﺎز اﻟﻜﻤﺒﻴﻮﺗﺮ. (2ﺿﻊ اﻟﻘﺮص اﻟﻤﻀﻐﻮط ﻓﻲ ﻣﺤﺮك اﻷﻗﺮاص اﻟﻤﻀﻐﻮﻃﺔ .ﺑﺎﻟﻨﺴﺒﺔ إﻟﻰ ﻧﻈﺎم اﻟﺘﺸﻐﻴﻞ OS 9.1ﺣﺘﻰ ،9.2xاﻧﺘﻘﻞ إﻟﻰ ﺧﻄﻮة أ .وﺑﺎﻟﻨﺴﺒﺔ إﻟﻰ ﻧﻈﺎم اﻟﺘﺸﻐﻴﻞ ،OS Xاﻧﺘﻘﻞ إﻟﻰ ﺧﻄﻮة ب. ﻋﺮﺑﻲ ﻋﺮﺑﻲ (4اﻧﻘﺮ ﻓﻮق .إﻧﻬﺎء .إذا ﺗﻤﺖ ﻣﻄﺎﻟﺒﺘﻚ ،أﻋﺪ ﺗﺸﻐﻴﻞ ﺟﻬﺎز اﻟﻜﻤﺒﻴﻮﺗﺮ (5 .اﻧﺘﻘﻞ إﻟﻰ ﺧﻄﻮة رﻗﻢ .21 اﻟﺘﻮﺻﻴﻞ ﺛﻢ اﻟﺘﺸﻐﻴﻞ .
اﺧﺘﻴﺎر أﺣﺪ ﻃﺮق اﻟﺘﺜﺒﻴﺖ .ﻟﺘﻮﺻﻴﻞ اﻟﻄﺎﺑﻌﺔ ﻣﺒﺎﺷﺮة ﺑﺠﻬﺎز ﻛﻤﺒﻴﻮﺗﺮ ﺷﺨﺼﻲ ﻳﻌﻤﻞ ﺑﻨﻈﺎم ﺗﺸﻐﻴﻞ ® ،Windowsاﻧﺘﻘﻞ إﻟﻰ ﺧﻄﻮة رﻗﻢ .16وﻟﺘﻮﺻﻴﻞ اﻟﻄﺎﺑﻌﺔ ﻣﺒﺎﺷﺮة ﺑﺠﻬﺎز ﻛﻤﺒﻴﻮﺗﺮ ﻳﻌﻤﻞ ﺑﻨﻈﺎم اﻟﺘﺸﻐﻴﻞ ،Macintoshاﻧﺘﻘﻞ إﻟﻰ ﺧﻄﻮة رﻗﻢ .18 ﻟﺘﻮﺻﻴﻞ اﻟﻄﺎﺑﻌﺔ HP Color LaserJet 3550nﺑﺸﺒﻜﺔ اﺗﺼﺎل ،اﻧﺘﻘﻞ إﻟﻰ ﺧﻄﻮة رﻗﻢ .19 ﺗﻮﺻﻴﻞ اﻟﻄﺎﺑﻌﺔ ﺑﺠﻬﺎز ﻛﻤﺒﻴﻮﺗﺮ ﺷﺨﺼﻲ ﻳﻌﻤﻞ ﺑﻨﻈﺎم ﺗﺸﻐﻴﻞ (1 .Windowsﺿﻊ اﻟﻘﺮص اﻟﻤﻀﻐﻮط ﻓﻲ ﻣﺤﺮك اﻷﻗﺮاص اﻟﻤﻀﻐﻮﻃﺔ. ﻣﻼﺣﻈﺔ ﻗﻢ ﺑﺘﺜﺒﻴﺖ اﻟﺒﺮﻧﺎﻣﺞ ﻣﻦ اﻟﻘﺮص اﻟﻤﻀﻐﻮط ﻗﺒﻞ ﺗﻮﺻﻴﻞ اﻟﻜﺒﻞ إﻟﻰ اﻟﻄﺎﺑﻌﺔ.
ﻋﺮﺑﻲ ﻋﺮﺑﻲ أﻋﺪ ﺗﻮﺻﻴﻞ ﻛﺎﺑﻞ اﻟﻄﺎﻗﺔ ،وﻗﻢ ﺑﺘﺸﻐﻴﻞ اﻟﻄﺎﺑﻌﺔ .ﺑﻌﺪ ﻣﺮور دﻗﻴﻘﺘﻴﻦ ﺑﺤﺪ أدﻧﻰ، ﺳﻴﻀﻲء ﻣﺼﺒﺎح "ﺟﺎﻫﺰ" اﻷﺧﻀﺮ. ﺗﻨﺒﻴﻪ ﻻ ﺗﻘﻢ ﺑﺘﻮﺻﻴﻞ اﻟﻄﺎﺑﻌﺔ ﺑﺎﻟﻜﻤﺒﻴﻮﺗﺮ وﻻ ﺑﺎﻟﺸﺒﻜﺔ ﺧﻼل ﺗﻠﻚ اﻟﻤﺪة. إذا ﺗﻤﺖ ﻣﻄﺎﻟﺒﺘﻚ ﺑﺎﺧﺘﻴﺎر ﻟﻐﺔ ﻟﻠﻮﺣﺔ اﻟﺘﺤﻜﻢ ،اﺿﻐﻂ ﻋﻠﻰ اﻟﻤﻄﻠﻮﺑﺔ .اﺿﻐﻂ ﻋﻠﻰ ﻟﺘﺤﺪﻳﺪﻫﺎ. ﻟﺘﻤﻴﻴﺰ ﻃﺒﺎﻋﺔ ﺻﻔﺤﺔ ﺗﺠﺮﻳﺒﻴﺔ (1 .اﺿﻐﻂ ﻗﺎﺋﻤﺔ ﻟﻠﺪﺧﻮل إﻟﻰ اﻟﻘﻮاﺋﻢ (2 .اﺿﻐﻂ ﻟﺘﻤﻴﻴﺰ ﻃﺒﺎﻋﺔ ﺻﻔﺤﺔ ﺗﺠﺮﻳﺒﻴﺔ ،ﺛﻢ ﻣﻌﻠﻮﻣﺎت ،ﺛﻢ اﺿﻐﻂ ﻟﺘﺤﺪﻳﺪﻫﺎ (3 .اﺿﻐﻂ اﺿﻐﻂ ﻟﺘﺤﺪﻳﺪﻫﺎ.
(6أدﺧﻞ اﻟﺪرج ﻓﻲ اﻟﻄﺎﺑﻌﺔ. ﺗﺤﻤﻴﻞ اﻟﻮرق داﺧﻞ "درج ) "1إﺟﺮاء اﺧﺘﻴﺎري( (1 .اﻓﺘﺢ "درج ."1 ﻣﻼﺣﻈﺔ إذا ﻛﻨﺖ ﺗﻘﻮم ﺑﻄﺒﺎﻋﺔ وﺳﺎﺋﻂ ﺧﺎﺻﺔ ،ﻣﺜﻞ ﻣﻐﻠﻔﺎت اﻟﺨﻄﺎﺑﺎت ،اﺳﺘﺨﺪم "درج ."1 (2اﺳﺤﺐ اﻣﺘﺪاد اﻟﺪرج ﻟﻠﺨﺎرج ،وإذا ﻟﺰم اﻷﻣﺮ ،اﻓﺘﺢ اﻣﺘﺪاد اﻟﺪرج اﻹﺿﺎﻓﻲ. (3ﺣﺮك دﻻﺋﻞ اﻟﻌﺮض ﺑﺮﻓﻖ ﻟﻠﺨﺎرج ﻹﺗﺎﺣﺔ ﻣﺴﺎﻓﺔ أﻛﺒﺮ ﻗﻠﻴﻼً ﻣﻦ ﻋﺮض وﺳﻴﻄﺔ اﻟﻄﺒﺎﻋﺔ اﻟﻤﺴﺘﺨﺪﻣﺔ (4 .أزل أي وﺳﺎﺋﻂ ﻃﺒﺎﻋﺔ ﻏﻴﺮ ﻣﺴﺘﺨﺪﻣﺔ وأﻏﻠﻖ اﻟﺪرج ﻋﻨﺪﻣﺎ ﺗﻨﺘﻬﻲ ﻣﻬﻤﺔ اﻟﻄﺒﺎﻋﺔ.
(4ﻗﻢ ﺑﺘﺤﻤﻴﻞ اﻟﺪرج ﺑﺎﻟﻮرق .إذا ﻛﺎن ﻫﺬا ورﻗﺎً ﻣﻦ ﻧﻮع ﻣﺨﺼﻮص ،ﻣﺜﻞ اﻟﻮرق ذي اﻟﺮأﺳﻴﺔ ،ﺿﻌﻪ ﺑﺤﻴﺚ ﻳﻜﻮن اﻟﺠﺎﻧﺐ اﻟﻤﻄﻠﻮب ﻃﺒﺎﻋﺘﻪ ﻣﻮاﺟﻬﺎً ﻷﺳﻔﻞ وﺣﺎﻓﺔ رأس اﻟﻮرﻗﺔ ﺑﺎﺗﺠﺎه ﻣﻘﺪﻣﺔ اﻟﺪرج. ﻣﻼﺣﻈﺔ ﻻ ﺗﻘﻢ ﺑﺘﻬﻮﻳﺔ اﻟﻮرق ﻗﺒﻞ ﺗﺤﻤﻴﻠﻪ ﺑﺎﻟﺪرج. (5ادﻓﻊ رﺻﺔ اﻟﻮرق ﻷﺳﻔﻞ ﺣﺘﻰ ﺗﺜﺒﺖ ﺷﺮﻳﺤﺔ اﻟﺮﻓﻊ اﻟﻤﻌﺪﻧﻴﺔ ﻓﻲ ﻣﻜﺎﻧﻬﺎ ﺑﺈﺣﻜﺎم. ﺗﺄﻛﺪ ﻣﻦ أن رﺻﺔ اﻟﻮرق ﻣﺴﺘﻮﻳﺔ ﺗﻤﺎﻣﺎً وأن ارﺗﻔﺎﻋﻬﺎ أﻗﻞ ﻣﻦ ﻋﻼﻣﺎت اﻟﺤﺪ اﻷﻗﺼﻰ ﻻرﺗﻔﺎع اﻟﻮرق.
(4ﺣﺪد ﻣﻜﺎن ﻓﺘﺤﺔ اﻟﻠﻮن اﻟﻤﻄﺎﺑﻖ ﻟﺨﺮﻃﻮﺷﺔ اﻟﺤﺒﺮ اﻟﺘﻲ أﺧﺬﺗﻬﺎ. (5ﻗﻢ ﺑﻤﺤﺎذاة ﺧﺮﻃﻮﺷﺔ اﻟﻄﺒﺎﻋﺔ ﻣﻊ اﻟﻤﺠﺎري اﻟﺨﺎﺻﺔ ﺑﻬﺎ داﺧﻞ اﻟﻄﺎﺑﻌﺔ وﺑﺎﺳﺘﺨﺪام اﻟﻤﻘﺒﺾ ،أدﺧﻞ اﻟﺨﺮﻃﻮﺷﺔ ﻣﻜﺎﻧﻬﺎ (6 .ﻛﺮر ﻫﺬه اﻟﻌﻤﻠﻴﺔ ﻣﻊ ﺧﺮاﻃﻴﺶ ﻃﺒﺎﻋﺔ اﻷﻟﻮان اﻟﺜﻼﺛﺔ اﻟﺒﺎﻗﻴﺔ. (7أﻏﻠﻖ اﻟﺒﺎب اﻷﻣﺎﻣﻲ ﺑﺈﺣﻜﺎم. ﻗﻢ ﺑﺘﺤﻤﻴﻞ اﻟﻮرق ﻓﻲ "درج (1 ."2اﺟﺬب "درج "2ﺧﺎرج اﻟﻄﺎﺑﻌﺔ.
(2أﻣﺴﻚ اﻟﺨﺮﻃﻮﺷﺔ ﻣﻦ ﺟﺎﻧﺒﻴﻬﺎ وﻗﻢ ﺑﺘﻮزﻳﻊ ﻣﺴﺤﻮق اﻟﺤﺒﺮ داﺧﻠﻬﺎ ﻋﻦ ﻃﺮﻳﻖ ﻫﺰ اﻟﺨﺮﻃﻮﺷﺔ ﺑﺮﻓﻖ ﻣﻦ ﺟﺎﻧﺐ إﻟﻰ آﺧﺮ. (3ﻗﻢ ﺑﺈزاﻟﺔ أﺷﺮﻃﺔ اﻟﺸﺤﻦ اﻟﺒﺮﺗﻘﺎﻟﻴﺔ ووﺳﺎﺋﻞ ﺗﺄﻣﻴﻦ اﻟﺸﺤﻦ ﻣﻦ ﺧﺮﻃﻮﺷﺔ ﺣﺒﺮ اﻟﻄﺒﺎﻋﺔ اﻟﺠﺪﻳﺪة وﺗﺨﻠﺺ ﻣﻨﻬﺎ. ﻣﻼﺣﻈﺔ ﻳﺠﺐ أن ﺗﺘﺒﻊ اﻟﻘﻮاﻋﺪ اﻟﻤﺘﺒﻌﺔ ﻣﺤﻠﻴﺎً ﺑﺸﺄن اﻟﺘﺨﻠﺺ ﻣﻦ ﻣﻮاد اﻟﺘﻐﻠﻴﻒ واﻟﺸﺤﻦ. ﻋﺮﺑﻲ ﻋﺮﺑﻲ (4ﻗﻢ ﺑﺈزاﻟﺔ أﺷﺮﻃﺔ اﻟﺤﻤﺎﻳﺔ أﺛﻨﺎء اﻟﺸﺤﻦ؛ ﺑﺮﺗﻘﺎﻟﻴﺔ اﻟﻠﻮن؛ ﻣﻦ اﻟﺠﺰء اﻟﺨﻠﻔﻲ ﻟﻮﺣﺪة اﻟﻨﻘﻞ وﻋﻦ ﻳﻤﻴﻨﻬﺎ وﻋﻦ ﻳﺴﺎرﻫﺎ. ﺗﺮﻛﻴﺐ ﺧﺮاﻃﻴﺶ اﻟﻄﺒﺎﻋﺔ (1 .ﺧﺬ ﺧﺮﻃﻮﺷﺔ ﻃﺒﺎﻋﺔ ﺟﺪﻳﺪة ﻣﻦ اﻟﺤﻘﻴﺒﺔ.
إزاﻟﺔ ﻣﻮاد اﻟﺘﻐﻠﻴﻒ (1 .ﻗﻢ ﺑﺈزاﻟﺔ ﻛﺎﻓﺔ اﻷﺷﺮﻃﺔ ﺑﺮﺗﻘﺎﻟﻴﺔ اﻟﻠﻮن اﻟﺨﺎرﺟﻴﺔ وﻗﻄﻊ اﻟﺤﻤﺎﻳﺔ اﻟﺒﺮﺗﻘﺎﻟﻴﺔ وﺑﺎﻗﻲ ﻣﻮاد اﻟﺘﻐﻠﻴﻒ اﻷﺧﺮى. (2اﻓﺘﺢ "درج ،"2وﻗﻢ ﺑﺈزاﻟﺔ اﻟﺴﺪادات اﻟﺒﺮﺗﻘﺎﻟﻴﺔ اﻟﺨﺎﺻﺔ ﺑﻌﻤﻠﻴﺔ اﻟﺸﺤﻦ وأي ﻣﻮاد ﺗﻐﻠﻴﻒ أﺧﺮى ﻣﻮﺟﻮدة ﺑﺪاﺧﻠﻪ. (3ارﻓﻊ ﻣﻘﺒﺾ اﻟﺒﺎب اﻷﻣﺎﻣﻲ ،ﺛﻢ اﺟﺬﺑﻪ ﻷﺳﻔﻞ. ﺗﻨﺒﻴﻪ ﻻ ﺗﻀﻊ أي ﺷﻲء ﻋﻠﻰ وﺣﺪة اﻟﻨﻘﻞ .ﻻ ﺗﻠﻤﺲ اﻟﺴﻄﺢ اﻟﻌﻠﻮي ﻟﻮﺣﺪة اﻟﻨﻘﻞ أو ﻣﻮاﺿﻊ اﺗﺼﺎﻟﻬﺎ ﻋﻠﻰ ﺟﺎﻧﺒﻬﺎ اﻷﻳﺴﺮ.
6 7 5 4 3 3 2 2 ﻣﺤﺘﻮﻳﺎت إﺿﺎﻓﻴﺔ ﻳﺘﻢ ﺷﺤﻨﻬﺎ ﻣﻊ ﻃﺎﺑﻌﺔ (1 .HP Color LaserJet 3550nﻣﻠﻘﻢ ﻃﺒﺎﻋﺔ ﺧﺎرﺟﻲ (2 HP Jetdirect en3700ﻛﺒﻞ ﻃﺎﻗﺔ network install (3 ) guideدﻟﻴﻞ ﺗﺜﺒﻴﺖ اﻟﺸﺒﻜﺔ( ﻣﻼﺣﻈﺔ اﻟﻌﻨﺎﺻﺮ اﻟﻤﺬﻛﻮرة ﻫﻨﺎ ﺧﺎﺻﺔ ﺑﺘﻮﺻﻴﻼت ﻣﻠﻘﻢ اﻟﻄﺒﺎﻋﺔ اﻟﺨﺎرﺟﻲ. ﺗﺤﺪﻳﺪ ﻣﻮاﺿﻊ أﺟﺰاء اﻟﻄﺎﺑﻌﺔ )واﺟﻬﺔ اﻟﻄﺎﺑﻌﺔ اﻷﻣﺎﻣﻴﺔ( (1 .
اﻷﺑﻌﺎد .اﻟﻄﺎﺑﻌﺔ :HP Color LaserJet 3550اﻻرﺗﻔﺎع 467 ،ﻣﻢ؛ اﻟﻌﻤﻖ، 447ﻣﻢ؛ اﻟﻌﺮض 483 ،ﻣﻢ؛ اﻟﻮزن 32,5 ،ﻛﺠﻢ ﺗﻬﻴﺌﺔ اﻟﺒﻴﺌﺔ اﻟﻤﺤﻴﻄﺔ ﺑﺎﻟﻄﺎﺑﻌﺔ .ﻻ ﺗﻀﻊ اﻟﻄﺎﺑﻌﺔ ﻓﻲ ﻣﻜﺎن ﻣﻌﺮض ﻷﺷﻌﺔ اﻟﺸﻤﺲ اﻟﻤﺒﺎﺷﺮة وﻻ ﻓﻲ ﻣﻜﺎن ﻳﺘﻌﺮض ﻟﺘﻐﻴﺮات ﻣﻔﺎﺟﺌﺔ وﺣﺎدة ﻓﻲ درﺟﺔ اﻟﺤﺮارة واﻟﺮﻃﻮﺑﺔ .اﻟﻨﻄﺎﻗﺎت اﻟﻤﺴﻤﻮح ﺑﻬﺎ :ﻣﻦ 17°إﻟﻰ 25°درﺟﺔ ﻣﺌﻮﻳﺔ وﻣﻦ 20إﻟﻰ 60 ﺑﺎﻟﻤﺎﺋﺔ رﻃﻮﺑﺔ ﻧﺴﺒﻴﺔ إﻋﺪاد اﻟﻄﺎﺑﻌﺔ .وﺿﻊ اﻟﻄﺎﺑﻌﺔ ﻓﻲ اﻟﻤﻜﺎن اﻟﺬي ﻗﻤﺖ ﺑﺘﺠﻬﻴﺰه ﻟﻬﺎ. ﺗﺤﺬﻳﺮ! ﻳﺠﺐ أن ﻳﺤﻤﻞ اﻟﻄﺎﺑﻌﺔ وﻳﻨﻘﻠﻬﺎ ﺷﺨﺼﺎن إﻟﻰ ﻣﻜﺎﻧﻬﺎ اﻟﺬي ﺗﻢ ﺗﺠﻬﻴﺰه .
اﻟﺤﺪ اﻷدﻧﻰ ﻟﻤﺘﻄﻠﺒﺎت اﻟﻨﻈﺎم .أﻟﻖ ﻧﻈﺮة ﻣﻦ اﻟﺨﺎرج ﻋﻠﻰ ﺻﻨﺪوق اﻟﺸﺤﻦ اﻟﺬي ﺟﺎءت اﻟﻄﺎﺑﻌﺔ ﺑﺪاﺧﻠﻪ أو اﻧﻈﺮ "ﻣﻼﺣﻈﺎت اﻟﺘﺜﺒﻴﺖ" ﻓﻲ اﻟﻘﺮص اﻟﻤﻀﻐﻮط. إﻋﺪاد اﻟﻤﻜﺎن اﻟﻤﻨﺎﺳﺐ ﻟﻮﺿﻊ اﻟﻄﺎﺑﻌﺔ .ﺗﺨﻴﺮ ﻣﻜﺎﻧﺎً ﻣﻨﺎﺳﺒﺎً ﻗﻮي اﻟﺘﺤﻤﻞ وذا ﺳﻄﺢ ﻣﺴﺘﻮٍ وﺟﻴﺪ اﻟﺘﻬﻮﻳﺔ وﺧﺎﻟﻲ ﻣﻦ اﻟﺘﻌﺮض ﻟﻸﺗﺮﺑﺔ واﻟﻐﺒﺎر .ﻣﺘﻄﻠﺒﺎت اﻟﻤﺴﺎﺣﺔ ﻟﻠﻤﻜﺎن اﻟﻤﺤﻴﻂ ﺑﺎﻟﻄﺎﺑﻌﺔ :ﻣﻦ اﻟﻨﺎﺣﻴﺔ اﻷﻣﺎﻣﻴﺔ 635 ،ﻣﻢ؛ ﻣﻦ اﻟﻨﺎﺣﻴﺔ اﻟﺨﻠﻔﻴﺔ 203 ،ﻣﻢ؛ ﻣﻦ اﻟﺠﺎﻧﺒﻴﻦ 229 ،ﻣﻢ ،ﻣﻦ اﻟﻨﺎﺣﻴﺔ اﻟﻌﻠﻮﻳﺔ 254 ،ﻣﻢ ﻋﺮﺑﻲ ﻋﺮﺑﻲ اﻟﻄﺮاز .
© 2004 Hewlett-Packard Development Company, L.P. www.hp.