HP LaserJet 3050 Getting Started Guide
Copyright Information FCC Regulations © 2006 Copyright Hewlett-Packard Development Company, L.P. Edition 1, 4/2006 This equipment has been tested and found to comply with the limits for a Class B digital device, pursuant to Part 15 of the FCC rules. These limits are designed to provide reasonable protection against harmful interference in a residential installation. This equipment generates, uses, and can radiate radio frequency energy.
Table of contents 1 Setting up the all-in-one Step 1: Prepare the location...................................................................................................................1 Step 2: Regulate the environment..........................................................................................................1 Step 3: Verify the package contents.......................................................................................................2 Step 4: Locate the all-in-one parts.....
vi ENWW
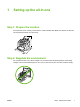
1 Setting up the all-in-one Step 1: Prepare the location Place the all-in-one on a sturdy, level surface in a well-ventilated area. Make sure that the air vents are not blocked and all doors can open freely. mm (16 .9 i nch es) (1 443 7. 4 mm in ch es ) 460 mm (18.1 inches) 430 Step 2: Regulate the environment Do not place the all-in-one in direct sunlight or in an area that has abrupt temperature and humidity changes. The recommended ranges are 15 to 32.5°C (59 to 90.
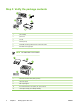
Step 3: Verify the package contents 1 print cartridge 2 power cord 3 fax cord 4 media input tray 5 CD-ROMs containing software and the online User Guide 6 Start Guide and support flyer NOTE The USB cable is not included.
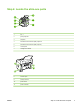
Step 4: Locate the all-in-one parts 5 4 6 3 2 7 1 1 tray 1 2 priority input slot 3 output bin 4 automatic document feeder (ADF) output bin 5 automatic document feeder (ADF) input tray 6 control panel 7 cartridge-door release 9 10 11 8 ENWW 8 interface ports 9 security-lock slot 10 power switch 11 power connector Step 4: Locate the all-in-one parts 3
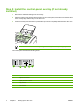
Step 5: Install the control-panel overlay (if not already installed) 1. Remove the adhesive backing from the overlay. 2. Align the bottom of the overlay with the bottom of the control panel, and make sure that the holes in the overlay align with the keys on the all-in-one. 3. Press the overlay from the bottom up toward the top until it is completely attached to the all-in-one. NOTE Make sure that the overlay is aligned correctly and is not pressing any buttons.
Step 6: Install the media tray ENWW 1. Remove any shipping tape from the inside and outside of the tray. 2. Slide the tray in until it fits securely. 3. Open the top of the media input tray. 4. Slide out the media guides. 5. Pull out the long-media support.
6. Place the media in the tray, and then adjust the media guides until they are flush with the media. NOTE Do not fan the media before placing it in the tray. 7. 6 Close the top of the media input tray.
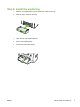
Step 7: Install the output bin support Insert the pin on one side of the support into the hole in the all-in-one. Flex the pin on the other side inward, and insert it into the hole. Step 8: Install the automatic document feeder (ADF) input tray ENWW 1. Align the two tabs on the input tray with the two grooves in the ADF lid. 2. Slide the tray into the grooves until the tray snaps into place.
Step 9: Install the ADF output support Insert the pin on one side of the support into the hole in the all-in-one. Flex the pin on the other side inward, and insert it into the hole. Step 10: Install the print cartridge 8 1. Press the cartridge-door release to open the print-cartridge door. 2. Remove the print cartridge from its packaging, and then rock the cartridge gently five or six times. 3. Bend the plastic tab at the end of the cartridge. 4.
5. Hold the print cartridge by the handle and insert it into the all-in-one. 6. Close the print-cartridge door. CAUTION If toner gets on your clothing, wipe the toner off with a clean cloth, wash the items in cold water, and air dry. Hot water or heat from a dryer sets the toner in the fabric. NOTE Hewlett-Packard Company cannot recommend using non-HP print cartridges, whether they are new, refilled, or remanufactured.
Step 11: Connect the power cord 1. Connect the power cord to the power connector on the back of the all-in-one. 2. Connect the other end of the power cord to a grounded alternating current (AC) outlet. NOTE Use only the power cord that came with the all-in-one. Step 12: Connect a printer cable to the all-in-one NOTE If you are using the all-in-one as a standalone fax machine, go to step 14. If you are using it as a standalone copier, go to step 15. Connect the USB cable (A/B) cable to the correct port.
Step 13: Connect to a telephone line NOTE If you are not using the fax functionality, go to step 15. 1. Connect the included fax cord to the port on the all-in-one that is marked with an "L". 2. Connect the cord to a telephone jack. NOTE Use only the fax cord that came with the all-in-one. For more information about faxing, see the online User Guide. Step 14: Turn on the all-in-one Press the power switch on the back of the all-in-one.
Step 15: Set the control-panel display language and location (if necessary) If prompted by the control panel, select your language and location. Follow the instructions on the control panel. NOTE The all-in-one automatically restarts after you select the location. Step 16: Test the hardware setup by printing a configuration report 1. Press Menu. 2. Use the < or the > button to select Reports, and then press 3. Use the < or the > button to select Config report, and then press . .
Step 17: Test the copier by using the automatic document feeder (ADF) 1. Load the configuration report that you just printed print-side down into the ADF input tray. 2. Adjust the media guides to sit against the page. 3. Press Start Copy. Hint If the copy job produces a blank page, make sure that the original is loaded print-side up and that no jams exist in the ADF and paper path. For information about removing jams and other troubleshooting tips, see the online User Guide.
Step 19: Connect to a Windows computer (Windows only) The all-in-one software supports a full-featured installation for Windows 2000 and XP. Only print and scan functions are supported for Windows 98, Me, and Server 2003. NOTE To connect to a Macintosh computer, go to step 20. 1. Close all programs that are running on the computer. 2. Insert the software CD-ROM into the CD drive. If the installation program does not begin automatically, click Start, click Run, click Browse, select the HPSetup.
Step 20: Connect to a Macintosh computer (Mac OS X V10.3 and 10.4 only) ENWW 1. Connect the USB cable (A/B) to the Macintosh. 2. Close all of the programs that are running on the computer. 3. Insert the software CD-ROM into the CD drive. 4. In the CD folder, double-click the HP All-in-One Installer icon. 5. Follow the onscreen instructions, and then click Install. 6. When prompted, restart the computer. 7. When the HP All-in-One Setup Assistant starts, follow the instructions.
Step 21: Fax setup If you installed the all-in-one software, the HP LaserJet Fax Setup Utility (Windows) or Setup Assistant (Mac) automatically runs. The software prompts you to set the time, date and fax header. In many countries/regions, this is a legal requirement. Hint If the utility does not run automatically, access it in the program group. If you are using the all-in-one as a standalone fax, complete the following steps: 1. Press Menu. 2.
Step 22: Test the software installation Print a page from any program to make sure that the software is correctly installed. If the installation failed, reinstall the software. If the reinstallation fails, go to step 26. Step 23: Register the all-in-one Register at http://www.register.hp.com to receive free all-in-one updates and information that is relevant to you, including driver or software update notifications, all-in-one support alerts, and tips for using your HP all-in-one.
Step 26: Support information For customer support, see http://www.hp.com/support/lj3050, or see the support flyer for more information. Congratulations! The all-in-one is ready to use. See the online User Guide or use the HP ToolboxFX software (Windows 2000 or XP only) to solve problems. The following sections provide tips for using the all-in-one. Tips for using the all-in-one Preventing streaks and spots on scans and copies 18 1. Unplug the all-in-one. 2. Tilt the control panel forward. 3.
Clearing print jams ENWW 1. Unplug the all-in-one. 2. Remove the print cartridge. 3. Remove all media from tray 1. 4. Remove all jammed media. See the online User Guide for complete information.
© 2006 Hewlett-Packard Development Company, L.P. www.hp.