
HP LaserJet 3050 Getting Started Guide
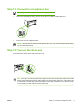
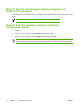
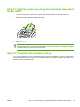
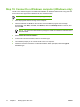

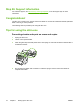
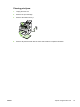

Table Of Contents
- Setting up the all-in-one
- Step 1: Prepare the location
- Step 2: Regulate the environment
- Step 3: Verify the package contents
- Step 4: Locate the all-in-one parts
- Step 5: Install the control-panel overlay (if not already installed)
- Step 6: Install the media tray
- Step 7: Install the output bin support
- Step 8: Install the automatic document feeder (ADF) input tray
- Step 9: Install the ADF output support
- Step 10: Install the print cartridge
- Step 11: Connect the power cord
- Step 12: Connect a printer cable to the all-in-one
- Step 13: Connect to a telephone line
- Step 14: Turn on the all-in-one
- Step 15: Set the control-panel display language and location (if necessary)
- Step 16: Test the hardware setup by printing a configuration report
- Step 17: Test the copier by using the automatic document feeder (ADF)
- Step 18: Complete the hardware setup
- Step 19: Connect to a Windows computer (Windows only)
- Step 20: Connect to a Macintosh computer (Mac OS X V10.3 and 10.4 only)
- Step 21: Fax setup
- Step 22: Test the software installation
- Step 23: Register the all-in-one
- Step 24: Program the Scan To button (Windows only)
- Step 25: Use the HP ToolboxFX software to set device settings (Windows only)
- Step 26: Support information
- Congratulations!
- Tips for using the all-in-one

Step 26: Support information
For customer support, see http://www.hp.com/support/lj3050, or see the support flyer for more
information.
Congratulations!
The all-in-one is ready to use. See the online User Guide or use the HP ToolboxFX software (Windows
2000 or XP only) to solve problems.
The following sections provide tips for using the all-in-one.
Tips for using the all-in-one
Preventing streaks and spots on scans and copies
1. Unplug the all-in-one.
2. Tilt the control panel forward.
3. Clean the glass strip and white platen with a soft sponge or cloth that has been moistened with a
nonabrasive cleaner.
4. Dry the glass and platen with a chamois or cellulose sponge. See the online User Guide for
complete information.
18 Chapter 1 Setting up the all-in-one ENWW