
HP Designjet 30/90/130 Printing Guide [EFI Designer Edition RIP] - Proof the output on the monitor [Adobe InDesign CS - Windows]


• Click OK.
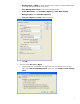
5. Place the images if needed, File menu > Place…, browse the image and click Open….
6. So that you get a good display select a High Quality Display, View menu > Display
performace > High Quality Display.
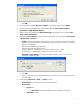
7. Make sure you have configured the Document Setup appropriately for your document, File
menu > Document Setup….
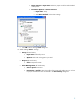
8. Configure the Proof Setup dialog box in order to proof the output on the monitor, View menu
> Proof Setup > Custom…:
• Profile: Select the profile of the output device you want to proof; the printer profile generally
depends on the printer model and the media type. If you don’t have it on the list, you should
copy it in the next folder:
Windows 98: WINDOWS>System>Color
Windows NT: WinNT>System32>Color
Windows 2000: C: > WINDOWS > System32 > Spool > Drivers > Color
Windows XP: C: > WINDOWS > System32 > Spool > Drivers > Color
• Simulate > Paper White: This setting only affects the display, check it if you want to
emulate the white of the paper.
• Click OK.
• Now, you can retouch your image and the monitor will show you how it’s going to look once
you’ve printed it.
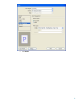
9. Printer settings, File menu > Print… > Setup… button:
• Select Printer...: Select the printer (ex. EFI Designer Edition).
• Preferences:
o Layout tab:
• Orientation: Select the orientation of your document on the paper.
o Advanced… button:
4