
HP Designjet 30/90/130 Printing Guide [HP Software RIP - dj30/130] - Create and print a contact sheet [Mac OS X]
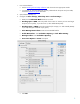
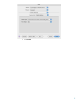

5. Create the contact sheet, File menu > Automate > Contact Sheet II…:
• Source Images > Use: Folder, and then click the Choose… button to specify the folder
containing the images you want to use. Select Include All Subfolders to include images
inside any subfolders.
• Document:
o Specify the Dimensions and Resolution for the contact sheet.
o Mode: RGB Color.
o Flatten All Layers: Select this to create a contact sheet with all images and text on
a single layer. Deselect Flatten All Layers to create a contact sheet in which each
image is on a separate layer and each caption is on a separate text layer.
• Thumbnails: Specify layout options for the thumbnail previews. Select Rotate For Best
Fit to rotate the images, regardless of their orientation, so they fit efficiently on a contact
sheet.
• Use Filename As Caption: Select this to label the thumbnails using their source image
filenames. Use the menu to specify a caption font and font size.
• Click OK.
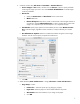
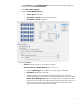
5. Adobe Photoshop Print with Preview… settings, File menu > Print with Preview…:
• Page Setup… button:
o Format for...: Select the printer (ex. hp_designjet_130_RIP).
o Paper Size: Select the paper size of the media loaded on the printer.
o Orientation: Select the orientation of your image on the paper.
o Click OK.
3