HP LF Printing Knowledge Center Printing a black & white photo for an exhibition Application: Adobe Illustrator CS2 Printer: HP Designjet Z2100 series Software: HP raster driver Operating System: Windows
1. First recommendations: • Refer to Media type functionality & features and choose the most appropriate media. • It is essential you have the media type correctly calibrated with the printer and print mode, consult the Calibrate my printer section. • In order to get a correct display, it’s also essential you have the monitor calibrated, refer to the Calibrate my monitor section. 2. Open Adobe Illustrator CS2. 3.
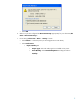
• Select OK. 4. Open the image, File menu > Open…: • If the document has an embedded color profile that does not match the current working space, select Use the embedded profile (instead of the working space). Otherwise, select Assign working space; if the displayed image does not look correct, try assigning it to other color spaces with Edit > Assign Profile (try sRGB, Adobe RGB, ColorMatch RGB and others) until you are satisfied.
• Click OK. 5. If you place an image, you should embed the image in the document. If it has an embedded profile, it will be converted from the embedded color profile to the document color profile preserving the color appearance. If it doesn’t have an embedded color profile, Illustrator will assign the document color profile. • File menu > Place…: browse the image and uncheck the Link check box. If you are asked How do you want to treat the data? Select Convert (preserve color appearance).
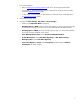
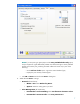
• Select OK. 6. Make sure you have configured the Document Setup appropriately for your document, File menu > Document Setup…. 7. Driver Settings, File menu > Print… > Setup… button: • Select Printer...: Select the printer (ex. HP Designjet Z2100 24in Photo). • Select Preferences: o Paper/Quality tab: • Paper Type: Select the media type that is loaded on the printer. • Print Quality: Select Standard Options and drag the slider to Quality.
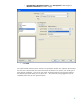
o Color tab > Color Options: • Select Print In Grayscale > Gray and Black Inks Only. • Select Color Management > Application Managed Colors.
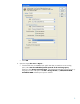
NOTE: If you are printing on photo paper with the Gray and Black Inks Only option, and you experience a gloss differential problem when fluorescent light is directly reflected towards you from the print, producing 'bronzed' reflections from the ink; try one of the following: - Use the Full set of inks option. It gives less neutral shades of gray - Display the print vertically or behind glass. • Click OK and Print until the Illustrator Print… dialog box. 8.
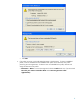
o • Print Method > Rendering Intent: Select Perceptual (for RGB images) or Relative Colorimetric (for CMYK images). Click Print. You should consider that each person has their own perception and their own subjective opinion about the result; this is because there are various factors that can influence our opinions, such as the type of photo (portrait, landscape…), the source color space, the media used, the environmental conditions, the subjective perception about your own photo, etc....
For more information on HP Designjet products www.hp.com/go/designjet © 2006 Hewlett-Packard Development Company, L.P. The information contained herein is subject to change without notice. The only warranties for HP products and services are set forth in the express warranty statements accompanying such products and services. Nothing herein should be construed as constituting an additional warranty. HP shall not be liable for technical or editorial errors or omissions contained herein.