
HP LaserJet - Network Install Guide (multiple language)

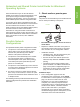
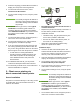

Table Of Contents
- Networked and Shared Printer Install Guide for Windows® Operating Systems
- Possible Network Configurations
- 1 - Direct mode or peer-to-peer printing
- 2 - Client-server printing via network port-connected shared print queue
- 3 - Client-server printing via direct-connected shared printer
- 4 - Client-server printing via direct-connected shared printer
- Manually configuring an IP address
- Creating a printer port while the printer is not connected to the network
- Possible Network Configurations
- Guide d’installation d’imprimantes réseau et partagées pour systèmes d’exploitation Windows®
- Configurations réseau possibles
- 1 - Mode direct ou impression homologue
- 2 - Impression client-serveur via une file d’attente d’impression partagée avec connexion au port réseau
- 3 - Impression client-serveur via une imprimante partagée avec connexion directe
- 4 - Impression client-serveur via une imprimante partagée avec connexion directe
- Définition manuelle d’une adresse IP
- Création d’un port d’imprimante lorsque l’imprimante n’est pas connectée au réseau
- Configurations réseau possibles
- Οδηγός εγκατάστασης δικτυωµένων και κοινόχρηστων εκτυπωτών για λειτουργικά συστήµατα Windows®
- Πιθανές διαµορφώσεις δικτύου
- 1 – Απευθείας λειτουργία ή εκτύπωση µεταξύ οµοτίµων
- 2 – Εκτύπωση πελάτη-διακοµιστή µέσω κοινόχρηστης ουράς εκτύπωσης συνδεδεµένης σε θύρα δικτύου
- 3 – Εκτύπωση πελάτη-διακοµιστή µέσω απευθείας συνδεδεµένου και κοινόχρηστου εκτυπωτή
- 4 – Εκτύπωση πελάτη-διακοµιστή µέσω απευθείας συνδεδεµένου και κοινόχρηστου εκτυπωτή
- Μη αυτόµατη διαµόρφωση διεύθυνσης IP
- Δημιουργία θύρας εκτυπωτή ενώ ο εκτυπωτής δεν είναι συνδεδεμένος στο δίκτυο
- Πιθανές διαµορφώσεις δικτύου
- Руководство по установке сетевого и общеиспользуемого принтера для операционных систем Windows®
- Возможные сетевые конфигурации
- 1 – режим прямого соединения или одноранговая печать
- 2 – печать в режиме клиент-сервер через сетевой порт с назначенной общей очередью печати
- 3 – печать в режиме клиент-сервер на подключенном напрямую общем принтере
- 4 – печать в режиме клиент-сервер на подключенном напрямую общем принтере
- Настройка адреса IP вручную
- Создание порта принтера без подключения принтера к сети
- Возможные сетевые конфигурации
- دليل تثبيت طابعة مشتركة ومتصلة بشبكة اتصال تعمل بنظم تشغيل Windows(R)

ENWW 5
EnglishEnglish
Creating a printer port while the
printer is not connected to the
network
Note This feature is only supported on an
IP network.
To create a printer port when the printer is not
currently connected to the network, but will be at a
later time, have the following information available:
● Printer name or IP address
● Port name
● Device type
Installation steps:
1. Insert the CD that came with the printer. The
software installer should start without assistance.
If it does not, browse to setup.exe in the root
directory of the CD, and double-click on it.
2. Select the language you would like the installer to
display, and accept the License Agreement.
3. On the Printer Connection screen, select
Connected via the network.
4. Let the software search for a printer on the
network. When the Printer Not Found dialog
appears, select Next. Choose Enter Settings for a
Printer Not on the Network and select Next. On
the Printer Settings screen, identify the printer by
either specifying the hardware or an IP address.
5. On the Set Port Name screen, select the port
name or use the default.
6. On the Printer Name screen, assign the printer a
name to be used in the Printers folder.
7. If you are sharing the printer with other PCs that
are running operating systems different than the
PC you are using, add these drivers on the Client
Driver Support screen after the printer is installed.
• To add drivers for sharing with different
operating systems, highlight the printer and
select File, Properties. On the Sharing tab,
select Additional Drivers and point to the
desired drivers.
8. For Windows 2000 and XP, you can provide
location and descriptive information if desired.
9. On the Ready to Install screen, select Install and
allow the installation to complete.
10. When you are ready to use the printer, you must
connect it to the network.