
HP LaserJet - Network Install Guide (multiple language)


ENWW 1
EnglishEnglish
Networked and Shared Printer Install Guide for Windows®
Operating Systems
HP recommends that you use the HP software
installer on the CD that comes with the printer to set
up the printer using the network configurations
described in this document. You are not required to
install additional printer software using this installer.
You can also set up these configurations using the
Add Printer Wizard, but instructions on how to do this
are not included in this document. See the User
Guide, located on the CD that shipped with the printer,
for these instructions and for more detailed
instructions on using the installer. Instructions for
other operating systems can also be found there. The
HP Jetdirect Administrator Guide and the Installation
Notes, also located on the CD, have additional
instructions.
Possible Network
Configurations
Four possible network printer configurations include:
1. The printer is connected directly to the network
(direct mode or peer-to-peer printing). Each
network user prints directly to the network
address of the printer's network card.
2. The printer is connected directly to the network
and a shared print queue is configured on a
network file/print server (client-server printing).
This shared print queue spools directly to the
printer via a network port.
3. The printer is connected directly to a PC that acts
as a print server, allowing the printer to be shared
to PC clients on the network.
4. PC clients connect to a printer that has already
been set up on the network, or connect to a print
queue that is shared from either another PC client
or file/print server.
The following sections provide information about each
network configuration and provide basic installation
information.
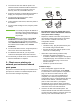
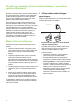
1 - Direct mode or peer-to-peer
printing
The printer is connected directly to the network and all
PCs or clients print directly to the printer.
● Recommended for groups of 10 to 20 users or
small offices.
● Requires a network connection on the printer or
an internal or external print server. If the printer
does not have one, use configuration 3 below.
● Installation overview:
• Hardware setup - plug the printer directly into
the network using a network cable.
• Run the CD that came with the printer and
follow the steps below for each PC to enable
printing.
• Information required during software setup -
printer hardware or IP address obtained from
page 2 of the printer configuration page. For
instructions on how to print the configuration
page, see the User Guide on the CD.
Installation steps:
1. Print a configuration page and note the
IP address on the second page, under TCP-IP.
For instructions on how to print the configuration
page, see the User Guide on the CD. If the
IP address is 0.0.0.0, wait for initialization to
complete (2 or 3 minutes) and print another
configuration page. If a valid IP address still is not
found over the network, a default IP address
(192.0.0.192 or 169.254.x.x) is assigned
automatically. If you want to assign a particular
IP address using the printer control panel, see the
instructions at the end of this document.
Printer
Clients