Network Installation Guide Guide d’installation sur réseau Handbuch für die Netzwerkinstallation Guida di installazione in rete Guía de instalación de red Netwerkinstallatiehandleiding Guia de instalação de rede
Copyright and License Copyright et licence © 2005 Copyright Hewlett-Packard Development Company, L.P. © 2005 Copyright Hewlett-Packard Development Company, L.P. Reproduction, adaptation or translation without prior written permission is prohibited, except as allowed under the copyright laws. Il est interdit de reproduire, adapter ou traduire ce manuel sans autorisation expresse par écrit, sauf dans les cas permis par les lois régissant les droits d'auteur.
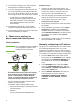
HP recommends that you use the HP software installer on the CD that comes with the printer to set up the printer using the network configurations described in this document. You are not required to install additional printer software using this installer. 1 - Direct mode or peer-to-peer printing The printer is connected directly to the network and all PCs or clients print directly to the printer.
2. Insert the CD that came with the printer. The software installer should start without assistance. If it does not, browse to setup.exe in the root directory of the CD, and double-click on it. Print Server Printer 3. Select the language you would like the installer to display, and accept the License Agreement. 4. On the Printer Connection screen, select Connected via the network. Clients 5. On the Printers Found screen, select the printer to be installed. 6.
3. Select the language you would like the installer to display, and accept the License Agreement. Server Printer English English 4. On the Printer Connection screen, select Connected via the network. 5. On the Confirm Settings screen, verify the printer settings. Clients Note To manually change the IP address of the printer, select Change Settings on the Confirm Settings screen and follow the prompts. 6. On the Installation Type screen, select Typical Installation to install the typical software.
8. On the Printer Sharing screen, click the Printer Sharing button and follow the prompts. 9. If you are sharing the printer with other PCs that are running operating systems different than the PC you are using, add these drivers on the Client Driver Support screen after the printer is installed. • To add drivers for sharing with different operating systems, highlight the printer and select File, Properties. On the Sharing tab, select Additional Drivers and point to the desired drivers. 10.
Note English English Creating a printer port while the printer is not connected to the network This feature is only supported on an IP network. To create a printer port when the printer is not currently connected to the network, but will be at a later time, have the following information available: ● Printer name or IP address ● Port name ● Device type Installation steps: 1. Insert the CD that came with the printer. The software installer should start without assistance.
Guide d’installation d’imprimantes réseau et partagées pour systèmes d’exploitation Windows® HP vous recommande d’utiliser le programme d’installation de logiciel HP disponible sur le CD fourni avec l’imprimante. Vous pouvez ainsi configurer l’imprimante à l’aide des paramètres réseau décrits dans ce document. Il n’est pas requis d’installer de logiciels d’imprimante supplémentaires à l’aide de ce programme d’installation.
1. Imprimez une page de configuration et notez l’adresse IP sur la seconde page, sous TCP-IP. Pour obtenir des instructions sur l’impression de la page de configuration, reportez-vous au guide d’utilisation de l’imprimante sur le CD. Si l’adresse IP est 0.0.0.0, attendez la fin de l’initialisation (2 ou 3 minutes) et imprimez une autre page de configuration. Si une adresse IP valide est toujours introuvable sur le réseau, une adresse IP par défaut (192.0.0.192 ou 169.254.x.x) est automatiquement attribuée.
● Informations requises durant la configuration logicielle : • Déterminez l’adresse IP ou matérielle de l’imprimante, obtenue à partir de la page 2 de la page de configuration de l’imprimante. Pour obtenir des instructions sur l’impression de la page de configuration, reportez-vous au Guide d’utilisation de l’imprimante sur le CD. • Donnez à l’imprimante un nom de partage. Procédure d’installation : 1. Imprimez une page de configuration et notez l’adresse IP sur la seconde page, sous TCP-IP.
Présentation de l’installation : • Configuration matérielle - branchez directement l’imprimante sur le PC en utilisant un câble USB ou parallèle. • Exécutez le CD livré avec l’imprimante sur le PC serveur afin d’activer l’impression. ● 9. Si vous partagez l’imprimante avec d’autres PC qui exécutent un système d’exploitation différent de celui du PC que vous utilisez, ajoutez ces pilotes dans l’écran Prise en charge du pilote client après l’installation de l’imprimante.
● Informations requises durant la configuration logicielle : • Nom UNC (Universal Naming Convention) de l’imprimante partagée • Exemple : \\nom_serveur\nompartage\chemin\nomfichier Procédure d’installation : 1. Introduisez le CD livré avec l’imprimante. Le programme d’installation du logiciel doit démarrer sans assistance. Dans le cas contraire, naviguez jusqu’au fichier setup.exe dans le répertoire racine du CD et cliquez deux fois sur ce fichier. 2.
• Pour ajouter des pilotes pour un partage entre différents systèmes d’exploitation, mettez l’imprimante en surbrillance et sélectionnez Fichier, Propriétés. Sous l’onglet Partage, sélectionnez l’option Autres pilotes, puis les pilotes souhaités. 8. Pour Windows 2000 et XP, vous pouvez au besoin fournir un emplacement et des informations descriptives. 9. Dans l’écran Prêt pour l’installation, sélectionnez Installer et laissez s’effectuer l’installation. Français Français 10.
Installationshandbuch für Netzwerkdrucker und freigegebene Drucker unter Windows®-Betriebssystemen Zur Einrichtung des Druckers anhand der in diesem Handbuch beschriebenen Netzwerkkonfigurationen empfiehlt sich die Verwendung des HP Software-Installationsprogramms, das auf der mit dem Drucker gelieferten CD enthalten ist. Wenn Sie dieses Installationsprogramm verwenden, müssen Sie keine weitere Druckersoftware installieren.
Installation: 1. Drucken Sie eine Konfigurationsseite, und notieren Sie sich die IP-Adresse, die auf der zweiten Seite unter TCP-IP angegeben ist. Anweisungen zum Drucken der Konfigurationsseite finden Sie im Benutzerhandbuch auf der CD. Wenn die IP-Adresse 0.0.0.0 lautet, warten Sie, bis die Initialisierung abgeschlossen ist (2 oder 3 Minuten), und drucken Sie dann eine weitere Konfigurationsseite.
● Überblick über die Installation: • Einrichten der Hardware – Verbinden Sie den Drucker über ein Netzwerkkabel direkt mit dem Netzwerk. • Führen Sie die mit dem Drucker gelieferte CD auf dem Server-PC aus, um das Drucken zu ermöglichen. ● Bei der Software-Installation erforderliche Informationen: • Legen Sie die Hardware- oder IP-Adresse des Druckers fest, die Seite 2 der Konfigurationsseite zu entnehmen ist. Anweisungen zum Drucken der Konfigurationsseite finden Sie im Benutzerhandbuch auf der CD.
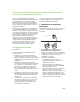
3 - Client-Server-Druck über einen direkt angeschlossenen, freigegebenen Drucker 4. Wählen Sie auf dem Bildschirm „Anschlusstyp“ den Kabeltyp aus, der zum Anschließen des Druckers verwendet wird. 5. Überprüfen Sie die Druckereinstellungen auf dem Bildschirm Einstellungen bestätigen. Serverinstallation Hinweis Der Drucker ist mit einem USB- oder einem Parallelkabel direkt an einen PC angeschlossen und für andere PCs oder Clients im Netzwerk freigegeben. Drucker Clients 6.
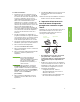
4 - Client-Server-Druck über einen direkt angeschlossenen, freigegebenen Drucker Client-Installation Hinweis Server Die Serverinstallation muss abgeschlossen sein (siehe Konfiguration 3), bevor die Client-Installation durchgeführt werden kann.
Erstellen eines Druckeranschlusses, während der Drucker nicht mit dem Netzwerk verbunden ist Hinweis Diese Funktion wird nur in einem IP-Netzwerk unterstützt.
Guida all'installazione della stampante in rete e condivisa per sistemi operativi Windows® HP consiglia di utilizzare il programma di installazione del software HP incluso nel CD fornito con la stampante per impostare la stampante utilizzando le configurazioni di rete descritte nel presente documento. Non è necessario installare ulteriori software di stampa mediante questo programma di installazione.
assegnato automaticamente un indirizzo IP predefinito (192.0.0.192 o 169.254.x.x). Se si desidera assegnare un indirizzo IP specifico utilizzando il pannello di controllo della stampante, vedere le istruzioni riportate alla fine di questo documento. 2. Inserire il CD fornito con la stampante. Il programma di installazione si avvia automaticamente. In caso contrario, fare doppio clic sul file setup.exe nella directory principale del CD.
Passaggi di installazione: 1. Stampare una pagina di configurazione e annotare l'indirizzo IP indicato nella seconda pagina, sotto TCP-IP. Per istruzioni su come stampare la pagina di configurazione, vedere la Guida dell'utente sul CD. Se l'indirizzo IP è 0.0.0.0, attendere il completamento dell'inizializzazione (2 o 3 minuti) e stampare un'altra pagina di configurazione. Se non viene rilevato alcun indirizzo IP valido nella rete, viene assegnato automaticamente un indirizzo IP predefinito (192.0.0.
Informazioni necessarie durante l'installazione hardware: stabilire un nome di condivisione della stampante. Passaggi di installazione: 1. Inserire il CD fornito con la stampante. Il programma di installazione si avvia automaticamente. In caso contrario, fare doppio clic sul file setup.exe nella directory principale del CD. 2. Selezionare la lingua di visualizzazione del programma di installazione e accettare il Contratto di licenza. 3.
Passaggi di installazione: 1. Inserire il CD fornito con la stampante. Il programma di installazione si avvia automaticamente. In caso contrario, fare doppio clic sul file setup.exe nella directory principale del CD. 2. Selezionare la lingua di visualizzazione del programma di installazione e accettare il Contratto di licenza. 3. Dalla schermata Connessione della stampante, selezionare Connessa mediante la rete.
• Per aggiungere driver per la condivisione con sistemi operativi diversi, evidenziare la stampante e selezionare File, Proprietà. Nella scheda di condivisione selezionare Driver addizionali e individuare i driver desiderati. 8. Se si desidera, per Windows 2000 e XP è possibile fornire una posizione e informazioni descrittive. 9. Nella schermata Pronta per l'installazione, selezionare l'opzione di installazione e attendere il completamento della procedura. Italiano Italiano 10.
Guía de instalación de impresoras compartidas y conectadas en red para sistemas operativos Windows® HP recomienda utilizar el instalador de software de HP incluido en el CD que viene con la impresora para configurar la impresora mediante las configuraciones de red que se describen en este documento. No es necesario instalar software adicional para la impresora con este instalador. 1.
dirección IP válida en la red, se asigna una dirección IP (192.0.0.192 ó 169.254.x.x) automáticamente. Si desea asignar una dirección IP particular utilizando el panel de control de la impresora, consulte las instrucciones que aparecen al final de este documento. Servidor de impresión 2. Introduzca el CD suministrado con la impresora. El instalador del software deberá iniciarse automáticamente. Si no lo hace, busque el archivo setup.exe en el directorio raíz del CD y haga doble clic sobre él.
dirección IP (192.0.0.192 o 169.254.x.x) automáticamente. Si desea asignar una dirección IP particular utilizando el panel de control de la impresora, consulte las instrucciones que aparecen al final de este documento. 2. Introduzca el CD suministrado con la impresora. El instalador del software deberá iniciarse automáticamente. Si no lo hace, busque el archivo setup.exe en el directorio raíz del CD y haga doble clic sobre él. 3. Seleccione el idioma del instalador y acepte el Acuerdo de licencia. 3.
5. En la pantalla Confirmar configuración, controle los valores de la impresora. Nota Servidor Para modificar manualmente la dirección IP de la impresora, seleccione Cambiar configuración en la pantalla Confirmar configuración y siga las indicaciones. 6. En la pantalla Tipo de instalación, seleccione Instalación típica para instalar el software típico. Para instalar el conjunto mínimo de controladores y software, seleccione Instalación mínima.
Configuración manual de una dirección IP La impresora puede encontrar automáticamente una dirección IP desde el servidor de red BootP/DHCP o se puede configurar desde el software. Pero si desea asignar una dirección IP particular a su impresora, puede configurar una dirección IP manualmente desde el panel de control de la impresora. 1. Presione el botón Menú del panel de control de la impresora y busque el menú JETDIRECT.
U kunt het beste het software-installatieprogramma van HP vanaf de cd die bij de printer wordt geleverd, gebruiken om de printer te installeren voor de netwerkconfiguraties die in dit document worden beschreven. U hoeft geen extra printersoftware te installeren als u dit installatieprogramma gebruikt. 1 - Directmodus of peer-to-peer-afdrukken De printer is rechtstreeks aangesloten op het netwerk en alle computers of clients drukken rechtstreeks af naar deze printer.
Installatieprocedure: 1. Druk een configuratiepagina af en noteer het IP-adres op de tweede pagina onder TCP-IP. Raadpleeg de gebruikershandleiding op de cd voor instructies over het afdrukken van de configuratiepagina. Als het IP-adres 0.0.0.0 is, moet u wachten totdat het initialiseren is voltooid (twee of drie minuten) en drukt u opnieuw een configuratiepagina af. Als er geen geldig IP-adres via het netwerk wordt gevonden, wordt er automatisch een standaard IP-adres (192.0.0.192 of 169.254.x.
1. Druk een configuratiepagina af en noteer het IP-adres op de tweede pagina onder TCP-IP. Raadpleeg de gebruikershandleiding op de cd voor instructies over het afdrukken van de configuratiepagina. Als het IP-adres 0.0.0.0 is, moet u wachten totdat het initialiseren is voltooid (twee of drie minuten) en drukt u opnieuw een configuratiepagina af. Als er geen geldig IP-adres via het netwerk wordt gevonden, wordt er automatisch een standaard IP-adres (192.0.0.192 of 169.254.x.x) toegewezen.
Installatieprocedure: 1. Plaats de cd die bij de printer is geleverd. Het installatieprogramma voor de software wordt automatisch gestart. Is dit niet het geval, dan gaat u naar setup.exe in de hoofdmap van de cd en dubbelklikt u hierop. 2. Selecteer de taal die u wilt gebruiken in het hulpprogramma en accepteer de Gebruiksrechtovereenkomst. 3. Selecteer Rechtstreeks op deze computer in het venster Printeraansluiting. 4.
● Printernaam of IP-adres ● Poortnaam 4. Selecteer de printer die u wilt installeren in het venster met gevonden printers. ● Apparaattype 5. Selecteer Standaardinstallatie in het venster Type installatie om de standaardsoftware te installeren. Selecteer Minimuminstallatie om het minimumaantal stuurprogramma’s en softwareonderdelen te installeren. Selecteer Aangepaste installatie als u de software die u wilt installeren, wilt selecteren. 6.
Guia de instalação para impressoras em rede e compartilhadas em sistemas operacionais Windows® A HP recomenda a utilização do instalador de software HP no CD fornecido com a impressora para instalá-la com as configurações de rede descritas neste documento. Você não precisa instalar nenhum software de impressora adicional utilizando esse instalador.
1. Imprima uma página de configuração e anote o endereço IP na segunda página, em TCP-IP. Para obter instruções sobre como imprimir a página de configuração, consulte o Guia do usuário no CD. Se o endereço IP for 0.0.0.0, aguarde a conclusão da inicialização (2 ou 3 minutos) e imprima outra página de configuração. Se ainda assim não for encontrado um endereço IP válido na rede, um endereço IP padrão (192.0.0.192 ou 169.254.x.x) será atribuído automaticamente.
• Para adicionar drivers ao compartilhamento com sistemas operacionais diferentes, destaque a impressora e selecione Arquivo, Propriedades. Na guia Compartilhamento, selecione Drivers adicionais e aponte para os drivers desejados. Etapas de instalação: 1. Imprima uma página de configuração e anote o endereço IP na segunda página, em TCP-IP. Para obter instruções sobre como imprimir a página de configuração, consulte o Guia do usuário no CD. Se o endereço IP for 0.0.0.
1. Insira o CD fornecido com a impressora. O instalador do software deve iniciar sem assistência. Caso contrário, procure o arquivo setup.exe no diretório raiz do CD e clique duas vezes nele. 4 - Impressão cliente-servidor por meio de uma impressora compartilhada conectada diretamente 2. Selecione o idioma que gostaria que o instalador exibisse e aceite o Contrato de licença. Instalação do cliente 3. Na tela Conexão da impressora, selecione Conectada diretamente ao computador. Nota 4.
Etapas de instalação: 1. Insira o CD fornecido com a impressora. O instalador do software deve iniciar sem assistência. Caso contrário, procure o arquivo setup.exe no diretório raiz do CD e clique duas vezes nele. 2. Selecione o idioma que gostaria que o instalador exibisse e aceite o Contrato de licença. 3. Na tela Conexão da impressora, selecione Connected via the network (Conectada pela rede).
8. Para o Windows 2000 e XP, é possível fornecer a localização e informações descritivas, se desejar. 9. Na tela Pronto para instalar, selecione Instalar e permita a conclusão da instalação. Português Português 10. Quando estiver pronto para utilizar a impressora, você deverá conectá-la à rede.
.1 הכנס את התקליטור המצורף למדפסת .מתקין התוכנה אמור להתחיל לפעול באופן עצמאי. אם מתקין התוכנה אינו מתחיל לפעול ,אתר את הקובץ setup.exeבספריית הבסיס של התקליטור ולחץ עליו פעמיים. .2 בחר את השפה שבה ברצונך להציג את המתקין ואשר את הסכם הרישיון. .3 במסך ’חיבור המדפסת‘ ,בחר מחוברת דרך הרשת. .4 אפשר לתוכנה לחפש אחר מדפסת ברשת .בעת הצגת התיבה ’לא נמצאה מדפסת‘ ,בחר ’הבא‘ .בחר ’הזן הגדרות עבור מדפסת שאינה נמצאת ברשת‘ ובחר ’הבא‘ .
- 4הדפסת לקוח-שרת באמצעות מדפסת משותפת ,מחוברת בחיבור ישיר .5 במסך ’סוג התקנה‘ ,בחר התקנה אופיינית כדי להתקין את התוכנה הרגילה .כדי להתקין את הערכה המינימלית של מנהלי התקנים ותוכנות, בחר התקנה מינימלית .אם ברצונך לבחור את התוכנה להתקנה ,בחר התקנה מותאמת אישית. התקנת לקוח .6 במסך ’מוכן להתקנה‘ ,בחר ’התקן‘ ואפשר להתקנה להסתיים.
.7 במסך ’שם מדפסת‘ ,בחר את שם המדפסת שיוצג בתיקיה ’מדפסות‘. .8 במסך ’שיתוף מדפסת‘ ,לחץ על לחצן ’שיתוף מדפסת‘ ועקוב אחר ההנחיות. .9 אם הנך משתף את המדפסת עם מחשבים נוספים, שעליהם מותקנות מערכות הפעלה אחרות השונות מזו המותקנת במחשב שלך ,הוסף את מנהלי ההתקן עבור מערכות הפעלה אלה במסך ’תמיכה במנהל התקן לקוח‘ ,לאחר התקנת המדפסת. • מידע הנחוץ במהלך התקנת התוכנה -בחר שם שיתוף למדפסת. שלבי ההתקנה: .1 הכנס את התקליטור המצורף למדפסת .
.2 הכנס את התקליטור המצורף למדפסת .מתקין התוכנה אמור להתחיל לפעול באופן עצמאי. אם מתקין התוכנה אינו מתחיל לפעול ,אתר את הקובץ setup.exeבספריית הבסיס של התקליטור ולחץ עליו פעמיים. .3 בחר את השפה שבה ברצונך להציג את המתקין ואשר את הסכם הרישיון. .4 במסך ’חיבור המדפסת‘ ,בחר מחוברת דרך הרשת. .5 במסך ’מדפסות שנמצאו‘ ,בחר במדפסת שברצונך להתקין. .6 במסך ’אישור הגדרות‘ ,אמת את הגדרות המדפסת.
מדריך התקנה למדפסת משותפת המחוברת לרשת עבור מערכות הפעלה של ®Windows המדפסת מחוברת ישירות לרשת וכל המחשבים או הלקוחות מדפיסים ישירות למדפסת. באפשרותך גם להגדיר תצורות אלה באמצעות אשף הוספת המדפסת ,אך ההנחיות לכך אינן מפורטות במסמך זה .ראה את המדריך למשתמש ,שנמצא בתקליטור המצורף למדפסת ,לקבלת הנחיות אלה והנחיות אחרות אודות השימוש במתקין .ניתן למצוא בתקליטור גם הנחיות עבור התקנה על-גבי מערכות הפעלה אחרות .
© 2005 Hewlett-Packard Development Company, L.P. www.hp.