
HP LaserJet - Network Install Guide (multiple language)


2 ENWW
2. Insert the CD that came with the printer. The
software installer should start without assistance.
If it does not, browse to setup.exe in the root
directory of the CD, and double-click on it.
3. Select the language you would like the installer to
display, and accept the License Agreement.
4. On the Printer Connection screen, select
Connected via the network.
5. On the Printers Found screen, select the printer to
be installed.
6. On the Confirm Settings screen, verify the printer
settings.
Note To manually change the IP address of
the printer, select Change Settings on
the Confirm Settings screen and follow
the prompts.
7. On the Installation Type screen, select Typical
Installation to install the typical software. To
install the minimum set of drivers and software,
select Minimum Installation. If you want to select
the software to be installed, select Custom
Installation.
8. On the Printer Name screen, assign the printer a
name to be used in the Printers folder.
9. For Windows 2000 and XP, you can provide
location and descriptive information if desired.
10. On the Ready to Install screen, select Install and
allow the installation to complete.
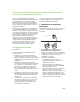
2 - Client-server printing via
network port-connected shared
print queue
The printer is connected directly to the network and a
print queue is created on a network file/print server.
The server then manages the printing.
● Recommended for larger workgroups, more
than 30 users. Allows administrator control of
client printer driver settings.
● Requires a network connection on the printer or
an internal or external print server. If the printer
does not have a network connection, use
configuration 3 below.
● Installation overview:
• Hardware setup - plug the printer directly into
the network using a network cable.
• Run the CD that came with the printer on the
server PC to enable printing.
● Information required during software setup:
• Determine the printer’s hardware or
IP address, obtained from page 2 of the printer
configuration page. For instructions on how to
print the configuration page, see the User
Guide on the CD.
• Decide on a printer share name.
Installation steps:
1. Print a configuration page and note the
IP address on the second page, under TCP-IP.
For instructions on how to print the configuration
page, see the User Guide on the CD. If the
IP address is 0.0.0.0, wait for initialization to
complete (2 or 3 minutes) and print another
configuration page. If a valid IP address still is not
found over the network, a default IP address
(192.0.0.192 or 169.254.x.x) is assigned
automatically. If you want to assign a particular
IP address using the printer control panel, see the
instructions at the end of this document.
2. Insert the CD that came with the printer. The
software installer should start without assistance.
If it does not start, browse to setup.exe in the root
directory of the CD and double-click on it.
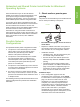
Printer
Clients
Print Server