HP LaserJet P3005 Series Printers Getting Started Guide Guide de mise en route
Copyright and License © 2006 Copyright Hewlett-Packard Development Company, L.P. Copyright et licence © 2006 Copyright Hewlett-Packard Development Company, L.P. Reproduction, adaptation or translation without prior written permission is prohibited, except as allowed under the copyright laws. La reproduction, l’adaptation ou la traduction, sans autorisation écrite préalable, sont interdites sauf dans le cadre des lois sur le copyright. The information contained herein is subject to change without notice.
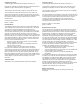
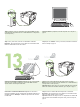
17˚ - 25˚C (62.6˚ - 77˚F) 309 mm (12.17 in) 474 mm (18.6 in) 165 mm (6.5 in) 42 6 mm (1 6. 7 in 4 ) 10 mm (1 6. 14 in ) Select a sturdy, well-ventilated, dust-free area to position the printer. Choisissez une zone résistante, bien aérée et exempte de poussière pour placer l’imprimante. 254 mm (10.0 in) 89 m m (3.5 i n) 89 m m (3.5 in) mm 8 n) 7 1 0i . (7 1 38 mm .
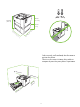
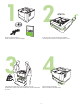
1 2 Check the contents of the box. Vérifiez le contenu du carton d’emballage. If you have a tray 3, remove the tape and cardboard. Si vous disposez d’un bac 3, retirez la bande et le carton. If the printer came with a tray 3, place the printer on top of it. Si l’imprimante est livrée avec un bac d’alimentation 3, placez l’imprimante sur ce bac. Remove all of the orange tape. Retirez l’ensemble de la bande orange.
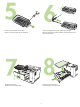
Remove the print cartridge from the bag. Retirez la cartouche d’impression de l’emballage. Remove the shipping locks and tape from the print cartridge. Retirez le dispositif de sécurité d’expédition et la bande adhésive de la cartouche d’impression. 8 Install the print cartridge. Installez la cartouche d’impression. Load paper and close the trays. Chargez du papier et fermez les bacs.
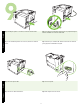
9.2) Do not plug in the USB cable. Wait until you are prompted during the software installation to connect the USB cable. 9.1) Si vous installez l’imprimante sur un réseau, branchez le câble de réseau. 9.2) Ne branchez pas le câble USB. Attendez d’être invité à le brancher par le programme d’installation du logiciel. 9.3) Connect the power cable. 9.4) Turn on the printer. 9.3) Connectez le câble d’alimentation. 9.4) Mettez l’imprimante sous tension. Français English Français English 9.
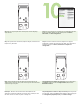
? Menu Ready Stop Data Attention 9.5) When you are prompted at the control panel, enter the language, date, and time. 10.1) If you are connected to a network, print a configuration page and check for a valid IP Address. On the control panel, touch Menu, Information, and Print Configuration. 9.5) Dans le panneau de commande, indiquez la langue, la date et l’heure lorsque vous y êtes invité. 10.
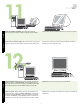
Macintosh For Macintosh software installation instructions, go to step 13 on page 8. Préparez-vous à installer le logiciel. HP recommande de fermer tous les programmes inutiles avant d’installer le logiciel du système d’impression. Pour prendre connaissance des instructions d’installation logicielle sur Macintosh, passez à l’étape 13, page 8. Install the software. 12.1) Insert the CD that came with the printer. On the welcome screen, click Install Printer. The Setup Wizard appears.
12.3) If prompted, connect a USB cable to the computer. Note: HP does not recommend using USB hubs. Use a USB cable that is no longer than 2 meters (6.5 feet). 12.4) Click Finish. If prompted, restart the computer. Go to step 14 on page 9. 12.3) Si vous y êtes invité, connectez un câble USB à l’ordinateur. Remarque : HP recommande de ne pas utiliser de concentrateurs USB. Utilisez un câble USB de moins de 2 mètres. 12.4) Cliquez sur Terminer. Si vous y êtes invité, redémarrez l’ordinateur.
Français English Macintosh Macintosh 13.3) From Apple System Preferences (available in the Apple drop-down menu) click Print, and then click the Printing tab at the top of the window. 13.4) To add your printer, click the “+” icon to launch the Printer Browser. By default, the Printer Browser displays printers that are connected through USB, Bonjour, and AppleTalk networking. 13.5) From the Printer Browser window, select the HP printer.
15 Congratulations! The printer is ready to use. The user guide is located on the CD. See www.hp.com/support/LJP3005 for more information or support. Note: Save the boxes and the packing materials in case you need to transport the printer. Register your printer. Register at www.register.hp.com.
Troubleshooting Area Symptom Cause/Remedy Control-panel display Blank 1) Make sure that the power cable is connected to a working power outlet. 2) Make sure that the printer is turned on. See page 5 for more information. Print Not printing 1) Check the network or USB cable. See pages 5 or 8 for more information. 2) If you are printing over a network, print a configuration page and make sure that the IP address is correct. 3) Reinstall the print driver.
Dépannage Zone Symptôme Cause/Solution Affichage du panneau de commande Vide 1) Assurez-vous que le câble d'alimentation est bien connecté à une prise de courant qui fonctionne. 2) Assurez-vous que l’imprimante est sous tension. Reportez-vous à la page 5 pour plus d’informations. Impression Pas d’impression 1) Vérifiez le câble réseau ou le câble USB. Reportez-vous à la page 5 ou 8 pour plus d’informations.
ARWW 13
14
Macintosh Macintosh Macintosh 15
Macintosh Macintosh 16
Macintosh 17
? Menu Ready ? Data Attention ? Menu Ready Stop Stop Data Menu Attention Ready 18 Stop Data Attention
19
20
Q7817A 21
17˚ - 25˚C (62.6˚ - 77˚F) 309 mm (12.17 in) 474 mm (18.6 in) 165 mm (6.5 in) 42 6 mm (1 6. in 4 ) 10 mm 254 mm (10.0 in) 89 m m 7 (1 (3.5 i n) 6. 14 in ) 89 m m (3.5 mm 8 n) 7 1 0i . (7 1 38 22 mm .
© 2006 Hewlett-Packard Development Company, L.P. www.hp.