HP LaserJet P3005 Series Printers Getting Started Guide Panduan Penggunaan Terdaftar di Deperindag Provinsi DKI Jakarta No : 0089/1.824.
Copyright and License © 2006 Copyright Hewlett-Packard Development Company, L.P. 版权与许可 © 2006 版权所有 Hewlett-Packard Development Company, L.P. Reproduction, adaptation or translation without prior written permission is prohibited, except as allowed under the copyright laws. 未经事先书面许可,严禁进行任何形式的复制、改编或翻译, 除非版权法另有规定。 The information contained herein is subject to change without notice.
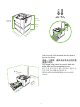
17˚ - 25˚C (62.6˚ - 77˚F) 309 mm (12.17 in) 474 mm (18.6 in) 165 mm (6.5 in) 42 6 mm (1 6. 7 in 4 ) 10 mm (1 6. 14 in ) Select a sturdy, well-ventilated, dust-free area to position the printer. 选择一个稳固、通风良好且无尘的位置 放置打印机。 254 mm (10.0 in) 89 m m (3.5 i n) Pilih tempat yang kokoh, berventilasi baik dan bebas debu untuk menempatkan printer. 환기가 잘 되고 먼지가 없는 장소에서 표면이 단 단한 곳에 프린터를 설치하십시오 . เลือกบริเวณที่ตั้งของเครื่องพิมพที่ไมมีฝุน ระบายอากาศไดดี และมั่นคง 89 m m (3.
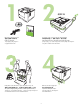
1 2 Q7817A Check the contents of the box. If you have a tray 3, remove the tape and cardboard. 检查包装箱中的物品。 如果您有纸盘 3,请撕下胶带,取出纸板。 ตรวจดูสิ่งของที่ใหมาในกลอง Jika Anda punya baki 3, lepaskan pita perekat dan kardus. 용지함 3( 있는 경우 ) 에서 포장용 테이프와 포장재를 제거하십시오 . หากคุณมีถาด 3 ใหลอกเทปและการดบอรดออก If the printer came with a tray 3, place the printer on top of it. Remove all of the orange tape. 如果打印机随附纸盘 3,请将打印机放在纸盘 3 上面。 撕下所有橙色胶带。 Jika printer dilengkapi dengan baki 3, letakkan printer di atasnya.
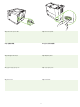
Remove the print cartridge from the bag. Remove the shipping locks and tape from the print cartridge. 从包装袋中取出打印碳粉盒。 取下打印碳粉盒上的装运锁,撕下胶带。 นําตลับหมึกพิมพออกจากหีบหอ ถอดตัวล็อคที่ใชในการขนสงและลอกเทปออกจากตลับหมึกพิมพ Keluarkan kartrid cetak dari kantungnya. 포장지에서 카트리지를 꺼내십시오 . Lepaskan pengunci dan pita pengiriman dari kartrid cetak. 카트리지에 달린 포장용 잠금 장치와 테이프를 떼어내십시오 . 8 Install the print cartridge. Load paper and close the trays.
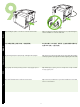
9.2) Do not plug in the USB cable. Wait until you are prompted during the software installation to connect the USB cable. 9.1) 如果在网络上安装打印机,请连接网线。 9.2) 请勿插入 USB 电缆。 请等待,直至安装软件时提示您 连接 USB 电缆,才进行连接。 9.1) Jika menginstal printer pada jaringan, hubungkan kabel jaringan. 9.2) Jangan menyolokkan kabel USB. Tunggu sampai Anda diperintahkan sewaktu penginstalan perangkat lunak untuk menghubungkan kabel USB. 9.1) 프린터를 네트워크에 설치하려면 네트워크 케이블을 연결하십시오 . 9.2) USB 케이블을 연결하라는 메시지가 표시될 때까지 기다렸다가 USB 케이블을 연결하십시오 . 9.
9.3) Connect the power cable. 9.4) Turn on the printer. 9.3) 连接电源线。 9.4) 打开打印机电源。 9.3) Hubungkan kabel daya. 9.4) Hidupkan printer. 9.3) 전원 케이블을 꽂으십시오 . 9.4) 프린터를 켜십시오 . 9.3) เชื่อมตอสายไฟ 9.
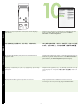
? Menu Ready Stop Data Attention 10.1) If you are connected to a network, print a configuration page and check for a valid IP Address. On the control panel, touch Menu, Information, and Print Configuration. 9.5) 控制面板上出现提示时,输入语言、日期和时间。 10.1) 如果连接到网络,请打印一张配置页,检查 IP 地址是 否有效。在控制面板上,依次轻触菜单、信息和打印配置。 9.5) Jika Anda diperintahkan pada panel kontrol, masukkan bahasa, tanggal dan waktu. 10.1) Jika Anda terhubung ke jaringan, cetak halaman konfigurasi dan cek Alamat IP yang berlaku.
? ? Menu Ready Stop Data Menu Attention Ready Stop Data Attention Note: Several networks provide IP addresses automatically. If the IP address shows a series of zeros, make sure that you are connected to the network and go to step 10.2. 10.2) Configure the IP address (if necessary). On the control panel, press Menu. Scroll to and touch Configure Device, I/O, and then Embedded Jetdirect. 注:许多网络可自动提供 IP 地址。如果 IP 地址显示为一 组零,请确保您已连接到网络,然后转至步骤 10.2。 10.
Macintosh For Macintosh software installation instructions, go to step 13 on page 12. 准备安装软件。 在安装打印系统软件之前 HP 建议您先关闭 所有不必要的程序。 有关 Macintosh 软件安装说明,请转至第 12 页的步骤 13。 Persiapan untuk instalasi perangkat lunak. HP menganjurkan agar Anda menutup semua program yang tidak perlu sebelum menginstal perangkat lunak sistem pencetakan. Untuk mendapatkan petunjuk instalasi perangkat lunak Macintosh, tuju ke langkah 13 di halaman 12. 소프트웨어 설치 준비 . 인쇄 시스템 소프트웨어를 설치하기 전에 실행 중 인 다른 응용 프로그램을 종료하는 것이 좋습니다 .
Install the software. 12.1) Insert the CD that came with the printer. On the welcome screen, click Install Printer. The Setup Wizard appears. Note: If the welcome screen does not appear, click Start, and then Run. Type X:SETUP (replace X with CD-ROM drive letter), and click OK. 12.2) Follow the onscreen instructions in the Setup Wizard. 12.2) 按照 “安装向导”中的说明执行操作。 安装软件。 12.
English 简体中文 Bahasa indonesia 12.4) Click Finish. If prompted, restart the computer. Go to step 14 on page 14. 12.3) 如果收到提示,请将 USB 电缆连接至计算机。注: HP 不推荐使用 USB 集线器。使用的 USB 电缆长度不能超 过 2 米 (6.5 英尺)。 12.4) 单击完成。如果出现提示,则重新启动计算机。 转至第 14 页的步骤 14。 12.3) Jika diperintahkan, hubungkan kabel USB ke komputer. Catatan HP tidak menganjurkan penggunaan hub USB. Gunakan kabel USB yang panjangnya tidak lebih dari 2 meter (6,5 kaki). 12.4) Klik Finish [Selesai]. Jika diminta, hidupkan ulang komputer.
Macintosh Macintosh Connect to a Macintosh computer. 13.1) Place the CD in the CD-ROM drive and run the installer. Complete an easy install. Note: Install the software before connecting the USB cable. 13.2) Connect a USB cable between the printer and the computer. Note: HP does not recommend using USB hubs. Use a USB cable that is no longer than 2 meters (6.5 feet). Important: Perform steps 13.3-13.7 only if the USB cable was connected before the software was installed.
ไทย 한국어 Bahasa indonesia 简体中文 English Macintosh Macintosh 13.3) From Apple System Preferences (available in the Apple drop-down menu) click Print, and then click the Printing tab at the top of the window. 13.4) To add your printer, click the “+” icon to launch the Printer Browser. By default, the Printer Browser displays printers that are connected through USB, Bonjour, and AppleTalk networking. 13.5) From the Printer Browser window, select the HP printer.
Macintosh 13.6) Click Add to create a printer queue, and then follow the prompt to manually configure the printer’s installable options. Note: Macintosh OS X V 10.2 and V 10.3 might require you to manually select the printer model from the Printer Model drop-down menu. 13.7) Under Model Name, select the printer, click Add, and go to step 14. Test the software installation. Print a page from any program to make sure that the software is installed correctly.
한국어 Bahasa indonesia 简体中文 English 15 Congratulations! The printer is ready to use. The user guide is located on the CD. See www.hp.com/support/LJP3005 for more information or support. Note: Save the boxes and the packing materials in case you need to transport the printer. Register your printer. Register at www.register.hp.com.
Troubleshooting Area Symptom Cause/Remedy Control-panel display Blank 1) Make sure that the power cable is connected to a working power outlet. 2) Make sure that the printer is turned on. See page 6 for more information. Print Not printing 1) Check the network or USB cable. See pages 5 or 11 for more information. 2) If you are printing over a network, print a configuration page and make sure that the IP address is correct. 3) Reinstall the print driver.
故障排除 区域 原因 / 纠正措施 症状 控制面板显示屏 空白 1) 确保电源线已连接至有效的电源插座。 2) 确保打印机电源已打开。有关更多信息,请参阅第 6 页。 打印 不打印 1) 检查网络或 USB 电缆。有关更多信息,请参阅第 5 或 11 页。 2) 如果通过网络进行打印,请打印配置页并确保 IP 地址正确。 3) 重新安装打印驱动程序。 卡纸 1) 确保已除去橙色包装胶带和纸板。有关更多信息,请参阅第 3 页。 2) 确保使用受支持的纸张。有关更多信息,请参阅 CD 上的用户指南。 3) 确保正确调整了纸盘中的介质导板。 空白页 确保从打印碳粉盒上撕下了条带。有关更多信息,请参阅第 4 页。 打印机不能识别纸盘中所 装的 Letter/A4 纸 确保正确调整了纸盘中的介质导板。 所有症状 有关更多信息,请参阅 CD 上的用户指南。 其它 ZHCN 17
Memecahkan masalah Area Gejala Penyebab/Perbaikan Tampilan panel kontrol Kosong 1) Pastikan kabel daya terhubung ke stopkontak listrik yang berfungsi baik. 2) Pastikan printer sudah dihidupkan. Lihat halaman 6 untuk informasi lebih lanjut. Mencetak Tidak mencetak 1) Periksa jaringan atau kabel USB. Lihat halaman 5 atau 11 untuk informasi lebih lanjut. 2) Jika Anda mencetak melalui jaringan, cetaklah halaman konfigurasi dan pastikan alamat IP sudah benar. 3) Instal ulang driver cetak.
문제 해결 영역 증상 원인 / 해결 방법 제어판 디스플 레이 아무 것도 표시되지 않습니 다. 1) 전원 케이블이 작동하는 전원 콘센트에 연결되어 있는지 확인하십시오 . 2) 프린터가 켜져 있는지 확인하십시오 . 자세한 내용은 6 페이지를 참조하십시 오. 인쇄 인쇄가 안 됩니다 . 1) 네트워크 케이블이나 USB 케이블의 상태를 확인하십시오 . 자세한 내용은 5 - 11 페이지를 참조하십시오 . 2) 네트워크 프린터에서 인쇄하는 경우 , 구성 페이지를 인쇄하여 IP 주소가 올 바른지 확인하십시오 . 3) 프린터 드라이버를 다시 설치하십시오 . 용지가 걸립니다 . 1) 포장용 주황 테이프와 포장재를 모두 제거했는지 확인하십시오 . 자세한 내용 은 3 페이지를 참조하십시오 . 2) 사용하는 용지가 지원되는 것인지 확인하십시오 . 자세한 내용은 CD 에 들어 있는 사용 설명서를 참조하십시오 . 3) 용지를 올바르게 넣었는지 확인하십시오 . 내용이 인쇄되지 않습니다 .
การแกปญหา จุดที่เกิดปญหา ลักษณะอาการ หนาจอแผงควบคุม หนาจอวาง สาเหตุ/การแกไข 1) 2) การพิมพ ตรวจดูวา ตอสายไฟเขากับเตาเสียบไฟที่ใชได ตรวจดูวา เปดเครือ่ งพิมพไวแลว โปรดดูขอ มูลเพิม่ เติมในหนา 6 ไมพมิ พงานออกมา 1) ตรวจดูที่ระบบเครือขายหรือสายเคเบิล USB โปรดดูขอ มูลเพิ่มเติมในหนา 5 หรือ 11 2) หากคุณสั่งพิมพผานเครือขาย ใหพิมพหนากําหนดคาและตรวจดูวา IP แอดเดรสถูกตองหรือไม 3) ติดตัง้ ไดรเวอรการพิมพอก ี ครั้ง กระดาษติด 1) หนาวาง ตรวจดูวาไดดึงแถบออกจากตลับหมึกพิมพแ
21
17˚ - 25˚C (62.6˚ - 77˚F) 309 mm (12.17 in) 474 mm (18.6 in) 165 mm (6.5 in) 42 6 mm (1 6. 7 in 4 ) 10 mm (1 6. 14 in ) 選擇堅固、通風良好且無灰塵的區域來放置印表 機。 Choün nåi væîng chàõc, âæåüc thäng håi täút, khäng coï buûi bàûm âãø âàût maïy in. 254 mm (10.0 in) 89 m m (3.5 i n) 89 m m (3.5 in) mm 8 n) 7 1 0i . (7 1 38 mm .
1 2 檢查包裝箱中的內容物。 Kiãøm tra táút caí caïc bäü pháûn trong häüp. 如果有 3 號紙匣,請撕下膠帶、取出紙板。 Nãúu coï khay 3, haîy thaïo bàng daïn vaì caïctäng. 如果印表機隨附 3 號紙匣,請將印表機置於其上。 Nãúu maïy in coï khay 3, âàût maïy in lãn trãn khay naìy. 撕下所有橙色膠帶。 Boïc táút caí caïc bàng maìu da cam.
從包裝袋中取出碳粉匣。 Boí häüp mæûc ra khoíi tuïi. 從碳粉匣上取下裝運鎖並撕下裝運膠帶。 Thaïo caïc khoïa váûn chuyãøn vaì bàng daïn ra khoíi häüp mæûc. 8 安裝碳粉匣。 Làõp häüp mæûc. 裝入紙張,然後合上紙匣。 Cho giáúy vaìo vaì âoïng caïc khay laûi.
9.2) 請勿插入 USB 電纜。請等待系統在軟體安裝期間提示您以後再連接 USB 電纜。 9.1) Nãúu caìi âàût maïy in trãn maûng, haîy càõm caïp maûng. 9.2) Khäng càõm caïp USB. Chåì cho tåïi khi baûn âæåüc nhàõc trong quaï trçnh caìi âàût pháön mãöm âãø càõm caïp USB. 9.3) 連接電源線。 9.4) 開啟印表機電源。 9.3) Kãút näúi caïp nguäön. 9.4) Báût maïy in. Tiãúng Viãüt 繁體中文 Tiãúng Viãüt 繁體中文 9.
? Menu Ready Stop Data Attention 9.5) 當控制面板上出現提示時,請輸入語言、日期及時間。 10.1) 如果已連線至網路,請列印組態頁,並檢查 IP 位址是否有效。 在控 制面板上,依次點選功能表、資訊及列印組態。 9.5) Khi âæåüc nhàõc trong panen âiãöu khiãøn, nháûp ngän ngæî, ngaìy, vaì giåì. 10.1) Nãúu baûn âang kãút näúi våïi mäüt maûng, in thæí mäüt trang cáúu hçnh vaì kiãøm tra xem Âëa Chè IP coï håüp lãû khäng. Trãn panen âiãöu khiãøn, chaûm vaìo Menu, Thäng Tin, vaì Cáúu Hçnh In.
Macintosh 如需 Macintosh 軟體安裝指示,請移至第 28 頁步驟 13。 Chuáøn bë caìi âàût pháön mãöm. HP khuyãn baûn haîy âoïng táút caí nhæîng chæång trçnh khäng cáön thiãút laûi træåïc khi caìi âàût pháön mãöm hãû thäúng in. Âãø biãút hæåïng dáùn caìi âàût pháön mãöm cho Macintosh, âãún bæåïc 13 trãn trang 28. 安裝軟體。 12.1) 放入印表機隨附的 CD。在歡迎使用畫面上,按一下安裝 印表機。「設定精靈」會出現。注意: 如果未出現歡迎使用畫面,請按一 下開始,然後按一下執行。鍵入 X:SETUP ( 以 CD-ROM 光碟機代號取 代 X),然後按一下確定。 12.2) 依照 「設定精靈」畫面上的指示進行。 Caìi âàût pháön mãöm. 12.
12.3) 如果出現提示,請將 USB 電纜連接至電腦。 注意:HP 不建議使用 USB 集線器。使用長度 2 公尺 (6.5 英呎 ) 以下的 USB 電纜。 12.4) 按一下完成。如果出現提示,請重新啟動電腦。移至第 29 頁步 驟 14。 12.3) Nãúu âæåüc nhàõc, haîy kãút näúi caïp USB våïi maïy tênh. Læu yï: HP khuyãn khäng nãn sæí duûng caïc hubs USB. Sæí duûng caïp USB khäng daìi quaï 2 meït (6,5 bäü). 12.4) Báúm vaìo Hoaìn táút. Nãúu âæåüc nhàõc, haîy khåíi âäüng laûi maïy tênh. Âãún bæåïc 14 trãn trang 29. Macintosh Macintosh 連接至 Macintosh 電腦。 13.
Tiãúng Viãüt 繁體中文 Macintosh Macintosh 13.3) 在 「Apple 系統喜好設定」 ( 可在 Apple 下拉式功能表中找到 ) 中, 按一下列印,然後按一下視窗頂部的列印標籤。13.4) 要新增印表機,請按 一下 「+」圖示,以啟動 「印表機瀏覽器」。根據預設值,「印表機瀏覽 器」會顯示已透過 USB、Bonjour 及 AppleTalk 網路連接的印表機。 13.5) 從 「印表機瀏覽器」視窗中,選擇 HP 印表機。注意:如果安裝了 HP 軟體,該軟體應會自動設定用於 Macintosh OS X V 10.4。 13.3) Tæì System Preferences cuía Apple (khaí duûng trong menu thaí xuäúng cuía Apple) báúm vaìo Print, vaì sau âoï báúm vaìo tab Printing åí phêa trãn cuìng cuía cæía säø. 13.
15 恭喜! 印表機已就緒可以使用了。使用者指南可在 CD 中取得。請參閱 www.hp.com/support/LJP3005,以取得更多資訊或支援。 注意: 請保留包裝箱與包裝材料,以便日後搬運印表機時使用。 註冊印表機。在 www.register.hp.com 註冊。這是最快且最容易的註冊方 式,讓您能夠獲得下列資訊:技術支援更新、進階支援選項、使用新 HP 印表機的點子與方法及技術新知。 Xin chuïc mæìng baûn! Maïy in âaî sàôn saìng âãø sæí duûng. Hæåïng dáùn sæí duûng coï trãn âéa CD. Xem trãn trang web www.hp.com/support/LJP3005 âãø biãút thãm thäng tin hoàûc nháûn häù tråü. Læu yï: Læu caïc häüp vaì taìi liãûu bao goïi trong træåìng håüp baûn cáön váûn chuyãøn maïy in.
疑難排解 區域 原因 / 措施 症狀 控制面板顯示區 空白 1) 確定已將電源線連接至作用中的牆上插座。 2) 確定已開啟印表機電源。請參閱第 25 頁以取得更多資訊。 列印 無法列印 1) 檢查網路或 USB 電纜。請參閱第 25 頁或第 28 頁,以取得更多資訊。 2) 如果透過網路列印,請列印組態頁,確定 IP 位址是否正確。 3) 重新安裝列印驅動程式。 卡紙 1) 確定已取出橙色包裝帶和紙板。請參閱第 23 頁以取得更多資訊。 2) 確定所用的是受支援的紙張。請參閱 CD 上的使用者指南以取得更多資訊。 3) 確定已正確調整紙匣中的紙材導板。 空白頁 確定已從碳粉匣上取下膠帶。請參閱第 24 頁以取得更多資訊。 印表機無法識別紙匣中裝 入的 Letter/A4 紙張 確定已正確調整紙匣中的紙材導板。 所有症狀 請參閱 CD 上的使用者指南以取得更多資訊。 其他 ZHTW 31
Giaíi quyãút sæû cäú Vuìng Biãøu hiãûn Nguyãn nhán/Biãûn phaïp khàõc phuûc Hiãøn thë panen âiãöu khiãøn Träúng 1) Âaím baío ràòng caïp nguäön âaî âæåüc kãút näúi våïi äø âiãûn coìn hoaût âäüng täút. 2) Âaím baío ràòng maïy in âaî âæåüc báût. Xem trãn trang 25 âãø biãút thãm thäng tin. In Khäng in 1) Kiãøm tra maûng hoàûc caïp USB. Xem trang 25 hoàûc trang 28 âãø biãút thãm thäng tin. 2) Nãúu baûn muäún in qua maûng, haîy in mäüt trang cáúu hçnh vaì âaím baío ràòng âëa chè IP laì âuïng.
33
© 2006 Hewlett-Packard Development Company, L.P. www.hp.