HP LaserJet P3005 Series Printers Getting Started Guide Начално ръководство Οδηγός για τα πρώτα βήµατα Руководство по началу работы Başlangıç Kılavuzu
Copyright and License © 2006 Copyright Hewlett-Packard Development Company, L.P. Reproduction, adaptation or translation without prior written permission is prohibited, except as allowed under the copyright laws. The information contained herein is subject to change without notice. The only warranties for HP products and services are set forth in the express warranty statements accompanying such products and services. Nothing herein should be construed as constituting an additional warranty.
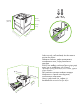
17˚ - 25˚C (62.6˚ - 77˚F) 309 mm (12.17 in) 474 mm (18.6 in) 165 mm (6.5 in) 42 6 mm (1 6. in 4 ) 10 mm 254 mm (10.0 in) 89 m m 7 (1 (3.5 i n) 6. 14 in ) 89 m m (3.5 Select a sturdy, well-ventilated, dust-free area to position the printer. , , , . , µ . Принтерді орнату шін ша сыз, жел со атын, т ра ты жерді та да ыз.
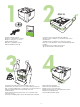
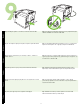
1 2 Check the contents of the box. . Ελέγξτε το περιεχόµενο του κουτιού. орапты ішін тексері із. . Kutunun içindekileri kontrol edin. If you have a tray 3, remove the tape and cardboard. 3, . Αν διαθέτετε δίσκο 3, αφαιρέστε την ταινία και το χαρτόνι. Егер сізде 3 -науа бар болса, таспа мен атырма а азды алып таста ыз. 3 .
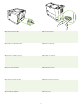
Remove the print cartridge from the bag. ! . Αφαιρέστε την καινούργια κασέτα εκτύπωσης από τη σακούλα. Принтер картриджін апшы тан шы арып алы ыз. . Çantadan yazıcı kartuşunu çıkarın. Remove the shipping locks and tape from the print cartridge. " ! . Αφαιρέστε τις ασφάλειες αποστολής και την ταινία από την κασέτα εκτύπωσης. Принтер картриджінен бекіткіштер мен таспаларды алып таста ыз.
9.2) Do not plug in the USB cable. Wait until you are prompted during the software installation to connect the USB cable. 9.1) 9.2) & USB . $ , " USB . English 9.1) If installing the printer on a network, connect the network cable. , . 9.2) Μην συνδέσετε το καλώδιο USB.
9.3) Connect the power cable. 9.4) Turn on the printer. 9.3) ( 9.4) ) ! . . 9.3) Συνδέστε το καλώδιο ρεύµατος. 9.4) Ανάψτε τον εκτυπωτή. 9.3) орек сымын жал а ыз. 9.4) Принтерді осы ыз. 9.3) . 9.4) ) 9.3) Güç kablosunu bağlayın. 9.4) Yazıcıyı açın. 6 .
? Menu Ready Stop Data Attention 10.1) If you are connected to a network, print a configuration page and check for a valid IP Address. On the control panel, touch Menu, Information, and Print Configuration. 9.5) * . , , 10.1) , $ + " + IP . & Menu, Information ( " + ) Print Configuration (* " + ). 9.
? ? Menu Ready Stop Data Menu Attention Ready Stop Data Attention Note: Several networks provide IP addresses automatically. If the IP address shows a series of zeros, make sure that you are connected to the network and go to step 10.2. 10.2) Configure the IP address (if necessary). On the control panel, press Menu. Scroll to and touch Configure Device, I/O, and then Embedded Jetdirect. : & IP .
Macintosh For Macintosh software installation instructions, go to step 13 on page 12. # * . HP ' " ! . % + " Macintosh 13 ( + 12. Προετοιµασία για την εγκατάσταση λογισµικού. Η ΗΡ συνιστά να κλείνετε όσα προγράµµατα δεν χρειάζονται, προτού εγκαταστήσετε το λογισµικό του συστήµατος εκτύπωσης.
Install the software. 12.1) Insert the CD that came with the printer. On the welcome screen, click Install Printer. The Setup Wizard appears. Note: If the welcome screen does not appear, click Start, and then Run. Type X:SETUP (replace X with CD-ROM drive letter), and click OK. 12.2) Follow the onscreen instructions in the Setup Wizard. , . 12.1) , . Install Printer ( ). $ .
English Ελληνικά Казакша 12.4) Click Finish. If prompted, restart the computer. Go to step 14 on page 14. 12.3) , USB . : HP USB + . $ USB , - 2 . 12.4) & Finish (8 ). $ . 14 12.3) Αν εµφανιστεί το σχετικό µήνυµα, συνδέστε στον υπολογιστή ένα καλώδιο USB.
Macintosh Macintosh Connect to a Macintosh computer. 13.1) Place the CD in the CD-ROM drive and run the installer. Complete an easy install. Note: Install the software before connecting the USB cable. 13.2) Connect a USB cable between the printer and the computer. Note: HP does not recommend using USB hubs. Use a USB cable that is no longer than 2 meters (6.5 feet). Important: Perform steps 13.3-13.7 only if the USB cable was connected before the software was installed.
Türkçe Казакша Ελληνικά English Macintosh Macintosh 13.3) From Apple System Preferences (available in the Apple drop-down menu) click Print, and then click the Printing tab at the top of the window. 13.4) To add your printer, click the “+” icon to launch the Printer Browser. By default, the Printer Browser displays printers that are connected through USB, Bonjour, and AppleTalk networking. 13.5) From the Printer Browser window, select the HP printer.
Macintosh 13.6) Click Add to create a printer queue, and then follow the prompt to manually configure the printer’s installable options. Note: Macintosh OS X V 10.2 and V 10.3 might require you to manually select the printer model from the Printer Model drop-down menu. 13.7) Under Model Name, select the printer, click Add, and go to step 14. Test the software installation. Print a page from any program to make sure that the software is installed correctly.
Türkçe Казакша Ελληνικά English 15 Congratulations! The printer is ready to use. The user guide is located on the CD. See www.hp.com/support/LJP3005 for more information or support. Note: Save the boxes and the packing materials in case you need to transport the printer. Register your printer. Register at www.register.hp.com.
Troubleshooting Area Symptom Cause/Remedy Control-panel display Blank 1) Make sure that the power cable is connected to a working power outlet. 2) Make sure that the printer is turned on. See page 6 for more information. Print Not printing 1) Check the network or USB cable. See pages 5 or 11 for more information. 2) If you are printing over a network, print a configuration page and make sure that the IP address is correct. 3) Reinstall the print driver.
+ " + " " # /$ G $ 1) , ! ! . 2) , . ) . 6 " + . & 1) USB . ) . 5 11 " + . 2) , $ ! " + , IP . 3) $ $ .
Αντιµετώπιση προβληµάτων Σηµείο Σύµπτωµα Αιτία/Αποκατάσταση Οθόνη του πίνακα ελέγχου Κενή 1) Βεβαιωθείτε ότι το καλώδιο ρεύµατος είναι συνδεδεµένο σε πρίζα που λειτουργεί. 2) Βεβαιωθείτε ότι ο εκτυπωτής είναι αναµµένος. Για περισσότερες πληροφορίες, ανατρέξτε στη σελίδα 6. Εκτύπωση ∆εν εκτυπώνει 1) Ελέγξτε το καλώδιο δικτύου ή USB. Για περισσότερες πληροφορίες, ανατρέξτε στις σελίδες 5 ή 11.
А аулы тарды табу ж-не ж8ндеу Айма Белгі Себеп/Ж8ндеу жолы Бас ару панеліні дисплейі Бос 1) орек сымыны ж мыс істеп т р ан орек к!зіне осыл анына к!з жеткізі із. 2) Принтерді осулы екендігіне к!з жеткізі із. осымша а парат алу шін 6 -бетті ара ыз. Басып шы ару Басып шы арылмайды 1) Желілік кабельді немесе USB кабелін тексері із. осымша а парат алу шін 5 немесе 11-бетті ара ыз.
6 + " " G $ G $ & # G # / 1) , ! $ . 2) , . ? # + . + 6. 1) USB . ? # + . + 5 11. 2) $ + " + , IP- .
Sorun giderme Alan Belirti Neden/Çözüm Kontrol paneli ekranı Boş 1) Güç kablosunun çalışan bir elektrik prizine bağlandığından emin olun. 2) Yazıcının açıldığından emin olun. Ek bilgi için, bkz. sayfa 6. Yazdırma Yazdırılmıyor 1) Ağ veya USB kablosunu kontrol edin. Ek bilgi için, bkz. sayfa 5 veya 11. 2) Yazdırma işlemini ağ üzerinden gerçekleştiriyorsanız, bir yapılandırma sayfası yazdırın ve IP adresinin doğruluğundan emin olun. 3) Yazıcı sürücüsünü yeniden takın.
17˚ - 25˚C (62.6˚ - 77˚F) 309 mm (12.17 in) 474 mm (18.6 in) 165 mm (6.5 in) 42 6 mm (1 6. 7 in 4 ) 10 mm (1 6. 14 in ) K Z! $ Z$ Z$ Z Z Z +Z. 254 mm (10.0 in) 89 m m (3.5 i n) 89 m m (3.5 in) mm 8 n) 7 1 0i . (7 1 38 mm .
1 2 Z Z . % Z Z Z Z [ ! . 3, Z Z Z Z Z 23 Q7817A 3, ! Z Z Z . .
) $ Z . % Z Z Z 8 ) Z . % 24 Z Z $ . .
6 @ 9.1) ) . $ , Z ’\ $ $ 9.2) Z ’\ $ USB. & Z ’\ $ USB, ’ Z Z Z Z . . 9.4) Z Z 6 @ 9.3) Z ’\ $ 25 .
? Menu Ready 9.5) * Z , . Stop Data Attention ’ Z Z Z , Z 10.1) Z Z ’\ Z, $ Z Z "Z +Z Z , ]K- . & Z Z Menu (4 ), Information (] " +Z ) Print Configuration (% Z "Z +Z ). ? ? Menu Ready Stop Data Menu Attention Ready # "B : G Z Z ]K- . [ ! Z ]K- ’ \ Z , Z Z ’\ Z Z
6 @ 6 @ Macintosh #B " * * . * &P Z ’ Z , ' Z . Z G Z +Z$ ’ Z Macintosh $ Z 13 . 28. & B " * * . 12.1) ) - , $ \ . Z Z Z Install Printer (& ). ? ! $ .
12.3) * ’ Z Z Z , Z ’\ $ USB ’ . # "B : HP \ USB- + . ) $ USB Z ' 2 Z . 12.4) & Z Finish (% ' ). [ ! ’ Z Z $ , ' . $ Z 14 . 29. Macintosh Macintosh #B 'H " ’ Macintosh. 13.1) ) Z$ - Z Z . ) $ (Easy).
6 @ Macintosh Macintosh 13.3) ) Apple System Preferences (( Z Apple) ( Apple) Z Print (G ), Z Z Printing (G ) Z Z . 13.4) v , + Z Z “+” Z . % Z Z \ , ! Z ’\ Z ’\ USB, Bonjour AppleTalk. 13.5) Z Z Z Z HP.
15 &B H" ! $ . Z - . G q Z " +Zq Z q Z Z $ Z www.hp.com/support/LJP3005. # "B : % Z Z Z . H B . % \ Z$ www.register.hp.com. x $' ' $ Z $ Z' $ Z \ +Zq, \ q Z " +Zq: Z q Z , ' Z Z , Z q
6 + # " # /& B? G $ Z $ G Z$ \ 1) Z ’\ Z ’\ USB. G Z Z Z Z . 25 28. 2) Z , $ Z "Z +Z Z , IP- . 3) Z $ . % 1) Z , Z . G Z Z Z Z . 23. 2) Z , Z$ Z \ Z , $ \
32
33
© 2006 Hewlett-Packard Development Company, L.P. www.hp.