HP Color LaserJet 2700 Series printers Lea esto primero
Copyright Information Informations Copyright © 2006 Copyright Hewlett-Packard Development Company, L.P. © 2006 Copyright Hewlett-Packard Development Company, L.P. Reproduction, adaptation or translation without prior written permission is prohibited, except as allowed under the copyright laws. La reproduction, l'adaptation ou la traduction, sans autorisation écrite préalable, sont interdites sauf dans le cadre des lois sur le copyright.
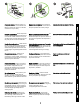
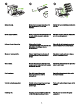
229 mm (9.5 in) m 89 m ) (3.5 in m 89 m ) (3.5 in 178 mm (7 i n) 356 mm (14 in) 17° - 25°C (62.6° - 77°F) Regulate the environment. Do not place the printer in direct sunlight or in an area that has abrupt temperature and humidity changes. Unpack and check the contents of the box. Préparez l'emplacement. Placez l'imprimante sur une surface résistante et plane située dans une zone bien ventilée.
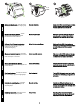
1 2 3 4 Open the front door. Remove the FOUR print cartridges by holding the blue handles on both sides of each cartridge and then pulling straight out. Retirez toute la bande adhésive. Vérifiez attentivement le périphérique et retirez l'ensemble de la bande adhésive. Ouvrez le capot avant. Retirez les QUATRE cartouches d'encre en prenant appui sur le support bleu situé de chaque coté des cartouches puis en tirant. Entfernen Sie die Transportversiegelung.
1 2 3 4 Remove the strip. Remove the two shipping locks and pull the tape completely out of the four print cartridges. Reinstall the four print cartridges and close the front door. Retirez la bande adhésive. Retirez le dispositif de sécurité d'expédition et la bande adhésive des quatre cartouches d’impression. Réinsérez les quatre cartouches d'impression puis refermez le capot avant. Entfernen Sie den Klebestreifen.
Adjust the tray guides and then load paper. Plug in the power cord. NOTE Do not plug in the USB cable until you are prompted to during the software installation. Installez le bac de sortie. Ajustez les guides du bac puis chargez le papier. Branchez le cordon d’alimentation. Remarque Ne branchez pas le câble USB avant d'y être invité lors de l'installation du logiciel. Setzen Sie das Ausgabefach ein. Passen Sie die Führungen der Fächer an, und legen Sie Papier ein. Schließen Sie das Netzkabel an.
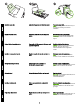
2 3 1 Turn on the printer. Familiarize yourself with control panel features. 1) Use the < or > button to select menu options. 2) Use the OK button to accept selections. 3) Use the CANCEL button to return to the READY screen. If prompted, select a language and location for the printer. Press OK to accept selections. Mettez l’imprimante sous tension. Familiarisez-vous avec les fonctions du panneau de commande. 1) Appuyez sur les boutons < ou > pour sélectionner les options de menu.
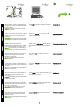
Network USB Windows 19 Macintosh 21 Windows 26 Macintosh 32 (HP Color LaserJet 2700n only) USB Installation. To install software for Windows using a direct connection (USB), go to step 19. To install software for Macintosh using a direct connection (USB), go to step 21. Network installation. To install software for Windows using a network connection, go to step 26. To install software for Macintosh using a network connection, go to step 32.
Windows Windows Windows Windows USB installation. Install the software from the CD. Do not plug in the USB cable until you are prompted to during the installation. If New Hardware Found appears, insert the CD. Follow the onscreen instructions. On the welcome screen, click Install. If the welcome screen does not appear, click Start, click Run, type X:Setup, where X is the CDROM drive letter, and then click OK. Follow the onscreen instructions.
Windows Windows Windows Click Finish. If prompted, restart the computer. Go to step 41. English Cliquez sur Terminer. Si vous y êtes invité, redémarrez l’ordinateur. Passez à l'étape 41. Français Lorsque vous y êtes invité, branchez un câble USB de moins de 2 m entre l'imprimante et l'ordinateur. Remarque HP recommande de ne pas utiliser de concentrateurs USB avec cette imprimante. Klicken Sie auf Fertig stellen. Starten Sie bei entsprechender Aufforderung den Computer neu.
Macintosh Macintosh Macintosh Macintosh USB installation. Install the software from the CD. Run the Installer. Complete an Easy Install. Click Quit when the installation is finished. Installation pour Macintosh. Installez le logiciel à partir du CD. Exécutez le programme d’installation. Effectuez une installation standard. Cliquez sur Quitter lorsque l'installation est terminée. USB-Installation für Macintosh. Installieren Sie die Software von der CD. Führen Sie das Installationsprogramm aus.
Macintosh English Go to HD/Applications/Utilities/Printer Setup Utility or Print Center. If the printer name displays in the Printer List, the installation is complete. If the printer name does not display in the Printer List, go to the next step. Add the printer From HD/Applications/Utilities/ Printer Setup Utility or Print Center, click Add. On the next page, click the drop-down menu, and then select USB. Français Connectez le câble USB.
Macintosh Macintosh Windows 41 From the Printer Model drop-down list, select HP. Under Printer Name, select the printer, and then click Add. Go to step 41. Windows network installation. Connect the network cable to the printer. NOTE Ensure that all cables are HPcompliant. Dans la liste déroulante Modèle d’imprimante, sélectionnez HP. Sous Nom de l'imprimante, sélectionnez l'imprimante, puis cliquez sur Ajouter. Passez à l'étape 41. Installation réseau pour Windows.
Windows On the printed report you will see the IP Address under Product Settings. NOTE You might need to assign an IP address depending on the type of network that is installed. See step 28. Configure an IP address, if necessary. At the printer control panel, press OK, press the < or > buttons to select Network Config, and then press OK. Press the < or > buttons to select TCP/IP Config, and then press OK. Obtenez l'adresse IP en imprimant une page de configuration.
Windows Windows Windows Press the < or > buttons to select Manual, use the control-panel buttons to specify an IP address, and then press OK. Prepare for the software installation. Quit all programs (including terminate-and-stay resident [TSR], antivirus, and firewall programs) on the print server or on each computer that will use the printer. Install the software from the CD.
Eesti Nederlands Dansk Español Italiano Deutsch Français English Windows Windows Windows On the welcome screen, click Install. If the welcome screen does not appear, click Start, click Run, type X:Setup, where X is the CDROM drive letter, and then click OK. Follow the onscreen instructions. When prompted, select Through the Network., and then click Next. The installer shows available printers. Select the appropriate IP address. Click Finish. If prompted, restart the computer.
Windows Macintosh Macintosh 41 Go to step 41. Macintosh network installation. Connect the network cable to the printer. NOTE Ensure that all cables are HPcompliant. Find the IP address or the Bonjour printer name by printing a Network Report. At the control panel, press OK to select Main Menu, and then press OK. Select Network Report, and then press OK. Passez à l'étape 41. Installation du réseau pour Macintosh. Connectez le câble réseau à l’imprimante.
Macintosh Configure an IP address, if necessary. At the printer control panel, press OK, press the < or > buttons to select Network Config, and then press OK. Press the < or > buttons to select TCP/IP Config, and then press OK. Press the < or > buttons to select Manual, use the control-panel buttons to specify an IP address, and then press OK. Le rapport indique l'adresse IP ou le nom d'imprimante Bonjour sous Réglages du produit.
Macintosh Macintosh Macintosh Prepare for the software installation. Quit all programs (including terminate-and-stay resident [TSR], antivirus, and firewall programs) on the print server or on each computer that will use the printer. Install the software from the CD. Run the Installer. Complete an Easy Install. Préparation à l’installation du logiciel.
Macintosh Macintosh IP Printer Macintosh 39 41 Bonjour Add the printer. Go to HD/Applications/ Utilities/Printer Setup Utility or Print Center, and then click Add. To add the printer using the IP address go to Step 39. To add the printer using the Bonjour printer name, go to Step 40. Add the printer using the IP address. On the next page, click IP Printer. Type the IP address in the address field, and then click Add. Go to Step 41. Cliquez sur Quitter lorsque l'installation est terminée.
Macintosh 41 Add the printer using the Bonjour printer name. On the next page, click the drop-down menu, and then select Bonjour. Under Printer Name, select the printer, and then click Add. Go to Step 41. Print a test page. Print a page from any program to make sure that the software is correctly installed. Congratulations! The printer is ready to use. The user guide is located on the CD and in the HP ToolboxFX. Save the boxes and the packing materials in case you need to transport the printer.
English Français Deutsch Registrieren Sie den Drucker unter www.register.hp.com. Onlineregistrierung ist die schnellste und einfachste Methode, Updates zur technischen Unterstützung, erweiterte Unterstützung sowie Vorschläge und Möglichkeiten zur Verwendung Ihres neuen HP Druckers zu erhalten. Eseguire la registrazione della stampante sul sito www.register.hp.com.
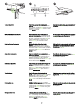
229 mm (9.5 in) m 89 m ) (3.5 in m 89 m ) (3.5 in 178 mm (7 i n) 356 mm (14 in) 17° - 25°C (62.6° - 77°F) Ota huomioon ympäristö. Älä aseta tulostinta suoraan auringonpaisteeseen tai tilaan, jossa se voi altistua äkkinäisille lämpötila- tai kosteusmuutoksille. Pura laatikko ja tarkista sen sisältö. Prepareu la ubicació. Col·loqueu la impressora en una superfície sòlida i anivellada d'un lloc ben ventilat.
1 2 3 4 Avaa etuluukku. Poista NELJÄ tulostinkasettia tarttumalla kunkin kasetin sivuilla oleviin sinisiin kahvoihin ja vetämällä. Traieu la cinta d’embalatge. Comproveu el dispositiu detalladament i traieu tota la cinta d’embalatge. Obriu la porta frontal. Traieu els QUATRE cartutxos d'impressió tibant-los per les nanses blaves dels costats. Noņemiet pārvadāšanas lenti. Rūpīgi pārbaudiet ierīci un noņemiet visas pārvadāšanas lentes. Atveriet priekšējās durtiņas.
1 2 3 4 Irrota nauha. Poista molemmat kuljetuslukot ja irrota teippi kokonaan neljästä tulostuskasetista. Aseta neljä tulostuskasettia takaisin paikalleen ja sulje etuluukku. Traieu la cinta. Traieu els dos bloquejos i tota la cinta dels quatre cartutxos d’impressió. Torneu a instal·lar els cartutxos d’impressió i tanqueu la porta frontal. Noņemiet lenti. Noņemiet abus pārvadāšanas bloķētājus un pilnīgi novelciet lenti no četrām drukas kasetnēm.
Säädä lokeron ohjaimet ja aseta sitten paperi. Kytke virtajohto. Huomautus Älä kytke USB-kaapelia ennen ohjelmiston asennuksen kehotetta. Instal·leu la safata de sortida. Ajusteu les guies de les safates i carregueu paper. Endolleu el cable elèctric. Nota No endolleu el cable USB fins que us ho demanin durant la instal·lació del programari. Uzlieciet izvades kasti. Noregulējiet padeves vadotnes un ielieciet papīru. Pieslēdziet strāvas vadu.
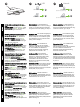
2 3 1 Kytke tulostimeen virta. Tutustu ohjauspaneelin toimintoihin. 1) Valitse valikkokomennot <- tai >-painikkeella. 2) Hyväksy valinnat OK-painikkeella. 3) Palaa VALMIS-näyttöön PERUUTA-painikkeella. Valitse kieli ja tulostimen käyttöalue tarvittaessa. Hyväksy valinnat valitsemalla OK. Enceneu la impressora. Familiaritzeu-vos amb les característiques del tauler de control. 1) Utilitzeu el botó < o > per seleccionar opcions de menú. 2) Utilitzeu el botó OK per acceptar les seleccions.
Network USB Windows 19 Macintosh 21 Windows 26 Macintosh 32 (HP Color LaserJet 2700n only) USB-asennus Jos haluat asentaa ohjelmiston Windowsiin suoralla yhteydellä (USB), siirry vaiheeseen 19. Jos haluat asentaa ohjelmiston Macintoshiin suoralla yhteydellä (USB), siirry vaiheeseen 21. Verkko-asennus. Jos haluat asentaa ohjelmiston Windowsiin verkkoyhteydellä, siirry vaiheeseen 26. Jos haluat asentaa ohjelmiston Macintoshiin verkkoyhteydellä, siirry vaiheeseen 32.
Windows Windows Windows USB-asennus Windowsissa Asenna ohjelmisto CD-levyltä. Älä kytke USB-kaapelia ennen asennuksen kehotetta. Jos näyttöön tulee ilmoitus Uusi laite löydetty, aseta CD-levy asemaan. Noudata näyttöön tulevia ohjeita. Valitse tervetuloruudussa Asenna. Ellei tervetuloruutu ilmesty näkyviin, valitse Käynnistä, Suorita ja kirjoita X:Setup siten, että korvaat X:n CD-aseman tunnuskirjaimella, ja valitse OK. Noudata näyttöön tulevia ohjeita.
Windows Windows Windows Valitse Valmis. Käynnistä tietokone uudelleen kehotettaessa. Siirry vaiheeseen 41. Feu clic a Finish. Si el sistema us ho demana, reinicieu l’ordinador. Aneu al pas 41. Català Quan el sistema us ho demani, connecteu un cable USB d'una llargada màxima de 2 metres a la impressora i a l'ordinador. Nota HP no recomana la utilització de concentradors USB amb aquesta impressora. Noklikšķiniet uz Finish. Ja atveras attiecīgā uzvedne, restartējiet datoru. Pārejiet pie 41. soļa.
Macintosh Macintosh Macintosh USB-asennus Macintoshissa Asenna ohjelmisto CD-levyltä. Käynnistä asennusohjelma. Viimeistele Helppo asennus. Kun asennus on valmis, valitse Sulje. Instal·lació USB al Macintosh. Instal·leu el programari del CD. Executeu l’Instal·lador. Completeu una instal·lació senzilla. Feu clic a Quit quan s'acabi la instal·lació. Macintosh USB uzstādīšana. Uzstādiet programmatūru no kompaktdiska. Palaidiet uzstādīšanas programmu. Veiciet vieglo uzstādīšanu.
Macintosh Suomi Etsi Kovalevy/Ohjelmat/Lisäohjelmat/ Kirjoittimen asetustyökalu tai Tulostuskeskus. Jos tulostimen nimi näkyy luettelossa, asennus on valmis. Jos tulostimen nimi ei näy kirjoitinluettelossa, siirry seuraavaan vaiheeseen. Tulostimen lisääminen Valitse kohdassa Kovalevy/Ohjelmat/Lisäohjelmat/Kirjoittimen asetustyökalu tai Tulostuskeskus Lisää. Valitse seuraavan sivun avattavasta luettelosta USB. Català Connecteu el cable USB.
Macintosh Macintosh Windows 41 Valitse avattavasta Kirjoittimen malli luettelosta HP. Valitse Kirjoittimen nimi kohdasta tulostin ja valitse Lisää. Siirry vaiheeseen 41. Verkko-asennus Windowsissa Liitä verkkokaapeli tulostimeen. Huomautus Varmista, että kaikki kaapelit ovat HP-yhteensopivia. A la llista desplegable Printer Model, trieu HP. A Printer Name, seleccioneu la impressora i feu clic a Add. Aneu al pas 41. Instal·lació en xarxa al Windows. Connecteu el cable de xarxa a la impressora.
Svenska Português Norsk Lietuviškai Latviski Català Suomi Windows Windows Windows Saat IP-osoitteen selville tulostamalla asetussivun. Valitse Päävalikko painamalla ohjauspaneelissa OK-painiketta ja valitsemalla sitten uudelleen OK. Valitse Verkkoraportti <- tai >-painikkeella ja valitse sitten OK. Tarkista IP-osoite tulostetun raportin kohdasta Tuotteen asetukset. Huomautus Voi olla tarpeen määrittää IPosoite asennettavan verkon tyypin mukaan. Katso vaihe 28. Määritä IP-osoite, jos tarpeen.
Windows Windows Windows Valitse Manuaalinen <- tai >-painikkeella, määritä IP-osoite ohjauspaneelin painikkeilla ja valitse sitten OK. Valmistele ohjelmiston asennus. Sulje kaikki tulostuspalvelimessa tai tulostinta käyttävissä tietokoneissa käynnissä olevat ohjelmat (myös muistiin jäävät ohjelmat [TSR] sekä virustorjunta- ja palomuuriohjelmat). Asenna ohjelmisto CD-levyltä.
Noudata näyttöön tulevia ohjeita. Valitse kehotettaessa Verkon kautta ja valitse sitten Seuraava. Asennusohjelma näyttää käytettävissä olevat tulostimet. Valitse oikea IP-osoite. Valitse Valmis. Käynnistä tietokone uudelleen kehotettaessa. Seguiu les instruccions que apareixen a la pantalla. Quan la màquina us ho demani, seleccioneu Through the Network i després feu clic a Next. L’instal·lador mostrarà les impressores disponibles. Trieu l’adreça IP apropiada. Feu clic a Finish.
Windows Macintosh Macintosh 41 Siirry vaiheeseen 41. Verkko-asennus Macintoshissa Liitä verkkokaapeli tulostimeen. Huomautus Varmista, että kaikki kaapelit ovat HP-yhteensopivia. Saat selville IP-osoitteen ja Bonjourtulostinnimen tulostamalla verkkoraportin. Valitse Päävalikko valitsemalla ohjauspaneelissa OK ja valitsemalla uudelleen OK. Valitse Verkkoraportti ja OK. Aneu al pas 41. Instal·lació en xarxa al Macintosh. Connecteu el cable de xarxa a la impressora.
Macintosh Svenska Português Norsk Lietuviškai Latviski Català Suomi Macintosh Macintosh IP-osoite tai Bonjour-tulostinnimi on raportissa kohdassa Tuotteen asetukset. Huomautus Verkon tyypin mukaan voi olla tarpeen määrittää IP-osoite. Siirry vaiheeseen 34. Määritä IP-osoite, jos tarpeen. Valitse Verkkokokoonpano valitsemalla tulostimen ohjauspaneelissa OK tai painamalla <- tai >painiketta ja valitse sitten OK. Valitse TCP/IPkokoonp. <- tai >-painikkeella ja valitse sitten OK.
Macintosh Macintosh Macintosh Valmistele ohjelmiston asennus. Sulje kaikki tulostuspalvelimessa tai tulostinta käyttävissä tietokoneissa käynnissä olevat ohjelmat (myös muistiin jäävät ohjelmat [TSR] sekä virustorjunta- ja palomuuriohjelmat). Asenna ohjelmisto CD-levyltä. Käynnistä asennusohjelma. Viimeistele Helppo asennus. Prepareu-vos per a la instal·lació del programari.
Macintosh Macintosh IP Printer Macintosh 39 41 Bonjour Tulostimen lisääminen Valitse kohdassa Kovalevy/Ohjelmat/Lisäohjelmat/Kirjoittimen asetustyökalu tai Tulostuskeskus Lisää. Jos haluat lisätä tulostimen käyttäen IP-osoitetta, siirry vaiheeseen 39. Jos haluat lisätä tulostimen käyttäen Bonjour-tulostinnimeä, siirry vaiheeseen 40. Lisää tulostin käyttämällä IP-osoitetta. Valitse seuraavalla sivulla IP-tulostin. Kirjoita IPosoite osoitekenttään ja valitse Lisää. Siirry vaiheeseen 41.
Macintosh 41 Lisää tulostin käyttämällä Bonjourtulostinnimeä. Valitse seuraavan sivun avattavasta luettelosta Bonjour. Valitse Kirjoittimen nimi -kohdasta tulostin ja valitse Lisää. Siirry vaiheeseen 41. Tulosta testisivu. Tulosta jokin sivu mistä tahansa ohjelmasta ja varmista, että ohjelmisto on asennettu oikein. Onnittelumme! Tulostin on käyttövalmis. Käyttöopas on CD-levyllä ja HP ToolboxFX ohjelmassa. Säilytä tulostimen pakkausmateriaali mahdollista kuljetusta varten.
Suomi Català Latviski Lietuviškai Norsk Português Svenska Rekisteröi tulostin osoitteessa www.register.hp.com. Online-rekisteröinti on nopein ja helpoin tapa saada HP-tulostimen käyttövihjeitä sekä tietoja teknisen tuen päivityksistä ja laajennetuista tukivaihtoehdoista. Registreu la impressora a www.register.hp.com. El registre en línia és la forma més fàcil i ràpida de rebre actualitzacions d'assistència tècnica, opcions d'assistència millorades i suggeriments per a l'ús de la vostra impressora HP.
42
43
© 2006 Hewlett-Packard Development Company, L.P. www.hp.