HP Color LaserJet 2700 Series printers Terdaftar di Deperindag Provinsi DKI Jakarta No : 0089/1.824.
The only warranties for HP products and services are set forth in the express warranty statements accompanying such products and services. Nothing herein should be construed as constituting an additional warranty. HP shall not be liable for technical or editorial errors or omissions contained herein. 版权信息 © 2006 Copyright Hewlett-Packard Development Company, L.P.
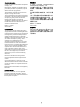
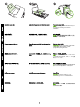
229 mm (9.5 in) m 89 m ) (3.5 in m 89 m ) (3.5 in 178 mm (7 i n) 356 mm (14 in) 17° - 25°C (62.6° - 77°F) Regulate the environment. Do not place the printer in direct sunlight or in an area that has abrupt temperature and humidity changes. Unpack and check the contents of the box. 准备安装位置。将打印机放在一个稳 固、四周通风良好的水平台面上。 确 保通风无阻且所有挡盖都能自由打开。 控制环境。请勿将打印机放在日光直 射或温度和湿度变化剧烈的地方。 拆开包装,检查包装箱中的物品。 Menyiapkan lokasi. Letakkan printer pada permukaan yang kokoh dan rata di tempat yang berventilasi baik.
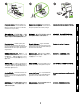
1 2 3 4 Open the front door. Remove the FOUR print cartridges by holding the blue handles on both sides of each cartridge and then pulling straight out. 撕下所有装运胶带。彻底检查设备, 然后撕下所有装运胶带。 打开前挡盖。 抓住每个碳粉盒两侧的蓝色手柄将其 平直拉出,依次卸下四个打印碳粉 盒。 Lepaskan semua pita rekat kemasan pengiriman. Periksa perangkat secara saksama dan lepaskan semua pita rekat kemasan pengiriman. Buka pintu depan. Keluarkan KEEMPAT kartrid cetak dengan memegang gagang biru pada kedua samping tiap kartrid, lalu tarik lurus keluar.
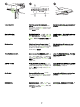
1 2 3 4 Remove the strip. Remove the two shipping locks and pull the tape completely out of the four print cartridges. Reinstall the four print cartridges and close the front door. 取出条带。 取出两个装运锁,然后完全撕下四个 打印碳粉盒上的胶带。 重新安装四个打印碳粉盒,然后合上 前挡盖。 Lepaskan pita perekat. Lepaskan pengaman pengiriman dan tarik seluruh pita dari keempat kartrid cetak. Pasang kembali keempat kartrid cetak dan tutup pintu depan.
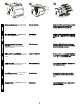
Adjust the tray guides and then load paper. Plug in the power cord. NOTE Do not plug in the USB cable until you are prompted to during the software installation. 安装出纸槽。 调整纸盘导板,然后装入纸张。 插入电源线。 注意 在软件安装期间收到提示之前, 请勿插入 USB 电缆。 Pasang nampan keluaran. Sesuaikan pemandu baki kemudan muatkan kertas. Colokkan kabel listrik. Perhatikan Jangan menyolokkan kabel USB sampai Anda diperintahkan sewaktu penginstalan perangkat lunak.
2 3 1 Turn on the printer. 打开打印机电源。 Familiarize yourself with control panel features. 1) Use the < or > button to select menu options. 2) Use the OK button to accept selections. 3) Use the CANCEL button to return to the READY screen. If prompted, select a language and location for the printer. Press OK to accept selections. 熟悉控制面板功能。1) 使用 < 或 > 按 钮选择菜单选项。 2) 使用 OK(确 定)按钮接受选择。 3) 使用 CANCEL (取消)按钮返回 READY(就绪)屏 幕。 如果出现提示,请为打印机选择语言 和位置。按 OK 接受选择。 Hidupkan printer.
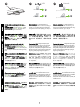
Network USB Windows 19 Macintosh 21 Windows 26 Macintosh 32 (HP Color LaserJet 2700n only) USB Installation. To install software for Windows using a direct connection (USB), go to step 19. To install software for Macintosh using a direct connection (USB), go to step 21. Network installation. To install software for Windows using a network connection, go to step 26. To install software for Macintosh using a network connection, go to step 32.
Windows Windows Windows Windows USB installation. Install the software from the CD. Do not plug in the USB cable until you are prompted to during the installation. If New Hardware Found appears, insert the CD. Follow the onscreen instructions. On the welcome screen, click Install. If the welcome screen does not appear, click Start, click Run, type X:Setup, where X is the CDROM drive letter, and then click OK. Follow the onscreen instructions.
Windows Windows Windows Click Finish. If prompted, restart the computer. Go to step 41. 出现提示时,使用一根长度不超过 2 米(6.5 英尺)的 USB 电缆连接打印 机和计算机。 注意 HP 建议您不要将 USB 集线器与 此打印机一同使用。 单击完成。 如果出现提示,则重新启 动计算机。 转至步骤 41。 Sewaktu diperintahkan, hubungkan kabel USB yang tidak lebih panjang dari 2 meter (6,5 feet) ke printer dan komputer. Perhatikan HP tidak menganjurkan Anda menggunakan hub USB dengan printer ini. Klik Finish. Jika diperintahkan, hidupkan ulang komputer. Langsung ke langkah 41.
Macintosh Macintosh Macintosh Macintosh USB installation. Install the software from the CD. Run the Installer. Complete an Easy Install. Click Quit when the installation is finished. Macintosh USB 安装。从 CD 安装软 件。 运行安装程序。完成简易安装。 安装完成后单击退出。 Penginstalan USB Macintosh. Instal perangkat lunak dari CD. Jalankan Installer. Tuntaskan Easy Install. Klik Quit setelah penginstalan seleasi.
Macintosh Go to HD/Applications/Utilities/Printer Setup Utility or Print Center. If the printer name displays in the Printer List, the installation is complete. If the printer name does not display in the Printer List, go to the next step. Add the printer From HD/Applications/Utilities/ Printer Setup Utility or Print Center, click Add. On the next page, click the drop-down menu, and then select USB. 连接 USB 电缆。使用一根长度不超 过 2 米(6.
Macintosh Macintosh Windows 41 From the Printer Model drop-down list, select HP. Under Printer Name, select the printer, and then click Add. Go to step 41. Windows network installation. Connect the network cable to the printer. NOTE Ensure that all cables are HPcompliant. 从“打印机型号”下拉列表中选择 HP。 在“打印机名称”下选择相应打印 机,然后单击添加。 转至步骤 41。 Windows 网络安装。将网线连接至打 印机。 注意 确保所有电缆都符合 HP 标准。 Dari daftar buka bawah Printer Model, pilih HP. Di bawah Printer Name, pilih printer, kemudian klik Add. Langsung ke langkah 41.
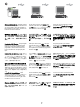
Windows On the printed report you will see the IP Address under Product Settings. NOTE You might need to assign an IP address depending on the type of network that is installed. See step 28. Configure an IP address, if necessary. At the printer control panel, press OK, press the < or > buttons to select Network Config, and then press OK. Press the < or > buttons to select TCP/IP Config, and then press OK.
Windows Windows Windows Press the < or > buttons to select Manual, use the control-panel buttons to specify an IP address, and then press OK. Prepare for the software installation. Quit all programs (including terminate-and-stay resident [TSR], antivirus, and firewall programs) on the print server or on each computer that will use the printer. Install the software from the CD.
繁體中文 ไทย 한국어 日本語 Bahasa Indonesia 简体中文 English Windows Windows Windows On the welcome screen, click Install. If the welcome screen does not appear, click Start, click Run, type X:Setup, where X is the CDROM drive letter, and then click OK. Follow the onscreen instructions. When prompted, select Through the Network., and then click Next. The installer shows available printers. Select the appropriate IP address. Click Finish. If prompted, restart the computer.
Windows Macintosh Macintosh 41 Go to step 41. Macintosh network installation. Connect the network cable to the printer. NOTE Ensure that all cables are HPcompliant. Find the IP address or the Bonjour printer name by printing a Network Report. At the control panel, press OK to select Main Menu, and then press OK. Select Network Report, and then press OK.
Macintosh 繁體中文 ไทย 한국어 日本語 Bahasa Indonesia 简体中文 English Macintosh Macintosh On the report, the IP Address or Bonjour printer name appears under Product Settings. NOTE Depending on the network type, you might need to assign an IP address. Go to step 34. Configure an IP address, if necessary. At the printer control panel, press OK, press the < or > buttons to select Network Config, and then press OK. Press the < or > buttons to select TCP/IP Config, and then press OK.
Macintosh Macintosh Macintosh Prepare for the software installation. Quit all programs (including terminate-and-stay resident [TSR], antivirus, and firewall programs) on the print server or on each computer that will use the printer. Install the software from the CD. Run the Installer. Complete an Easy Install. 准备安装软件。退出打印服务器或将 使用该打印机的每台计算机上的所有 程序,包括内存驻留程序 (TSR)、防 病毒程序和防火墙程序。 从 CD 安装软件。 运行安装程序。完成简易安装。 Persiapan untuk penginstalan perangkat lunak.
Macintosh Macintosh IP Printer Macintosh 39 41 Bonjour Add the printer. Go to HD/Applications/ Utilities/Printer Setup Utility or Print Center, and then click Add. To add the printer using the IP address go to Step 39. To add the printer using the Bonjour printer name, go to Step 40. Add the printer using the IP address. On the next page, click IP Printer. Type the IP address in the address field, and then click Add. Go to Step 41.
Macintosh 41 Add the printer using the Bonjour printer name. On the next page, click the drop-down menu, and then select Bonjour. Under Printer Name, select the printer, and then click Add. Go to Step 41. Print a test page. Print a page from any program to make sure that the software is correctly installed. Congratulations! The printer is ready to use. The user guide is located on the CD and in the HP ToolboxFX. Save the boxes and the packing materials in case you need to transport the printer.
English 简体中文 Bahasa Indonesia 日本語 한국어 ไทย 繁體中文 Register the printer at www.register.hp.com. Online registration is the quickest and easiest way to receive technical support updates, enhanced support options, and ideas and ways to use your HP printer. 请登录 www.register.hp.com 注册您 的打印机。在线注册是获得技术支持 更新、改进的支持选项以及有关使用 HP 打印机的一些创意和方法的最快捷 的方法。 Daftarkan printer di www.register.hp.com.
22
© 2006 Hewlett-Packard Development Company, L.P. www.hp.