HP Color LaserJet 2700 Series printers
Copyright Information © 2006 Copyright Hewlett-Packard Development Company, L.P. Reproduction, adaptation or translation without prior written permission is prohibited, except as allowed under the copyright laws. The information contained in this document is subject to change without notice. The only warranties for HP products and services are set forth in the express warranty statements accompanying such products and services. Nothing herein should be construed as constituting an additional warranty.
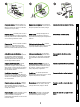
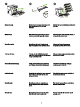
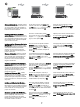
229 mm (9.5 in) m 89 m ) (3.5 in m 89 m ) (3.5 in 178 mm (7 i n) 356 mm (14 in) 17° - 25°C (62.6° - 77°F) Regulate the environment. Do not place the printer in direct sunlight or in an area that has abrupt temperature and humidity changes. Unpack and check the contents of the box. Priprema lokacije. Postavite pisač na čvrstu i ravnu površinu u dobro provjetrenom području. Pazite da prolazi za zrak ne budu blokirani i da se sva vrata mogu slobodno otvarati. Zaštita okoliša.
1 2 3 4 Open the front door. Remove the FOUR print cartridges by holding the blue handles on both sides of each cartridge and then pulling straight out. Uklonite svu vrpcu za transport. Dobro provjerite uređaj i uklonite svu vrpcu za transport. Otvorite prednja vrata. Uklonite ČETIRI spremnika s tintom držeći za plave ručice s obje strane svakog spremnika i povlačenjem prema van. Odstraňte veškerou přepravní pásku. Důkladně zkontrolujte zařízení a odstraňte veškerou přepravní pásku.
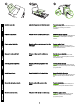
1 2 3 4 Remove the strip. Remove the two shipping locks and pull the tape completely out of the four print cartridges. Reinstall the four print cartridges and close the front door. Uklonite vrpcu. Uklonite dva zasuna za transport i dokraja izvucite vrpcu iz četiri spremnika s tintom. Ponovo umetnite četiri spremnika s tintom, a zatim zatvorite prednja vrata. Odstraňte proužek. Odstraňte ze všech čtyř tiskových kazet přepravní pojistky a zcela vytáhněte pásku.
Adjust the tray guides and then load paper. Plug in the power cord. NOTE Do not plug in the USB cable until you are prompted to during the software installation. Priključite izlaznu ladicu. Podesite vodilice na ladici i umetnite papir. Priključite kabel za napajanje. Napomena Nemojte uključivati USB kabel dok se to od vas ne zatraži tijekom instalacije softvera. Připojte výstupní přihrádku. Nastavte vodítka v zásobníku a poté do něho vložte papír. Zapojte napájecí kabel.
2 3 1 Turn on the printer. Familiarize yourself with control panel features. 1) Use the < or > button to select menu options. 2) Use the OK button to accept selections. 3) Use the CANCEL button to return to the READY screen. If prompted, select a language and location for the printer. Press OK to accept selections. Uključite pisač. Upoznavanje sa značajkama upravljačke ploče. 1) Za odabir opcija na izborniku koristite gumbe < ili >. 2) Za prihvaćanje odabira koristite gumb OK.
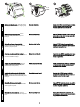
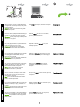
Network USB Windows 19 Macintosh 21 Windows 26 Macintosh 32 (HP Color LaserJet 2700n only) USB Installation. To install software for Windows using a direct connection (USB), go to step 19. To install software for Macintosh using a direct connection (USB), go to step 21. Network installation. To install software for Windows using a network connection, go to step 26. To install software for Macintosh using a network connection, go to step 32. Postavljanje vrste i veličine medija za ulazne ladice.
Windows Windows Windows Windows USB installation. Install the software from the CD. Do not plug in the USB cable until you are prompted to during the installation. If New Hardware Found appears, insert the CD. Follow the onscreen instructions. On the welcome screen, click Install. If the welcome screen does not appear, click Start, click Run, type X:Setup, where X is the CDROM drive letter, and then click OK. Follow the onscreen instructions.
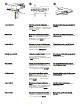
Windows Windows Windows Click Finish. If prompted, restart the computer. Go to step 41. Kad se to zatraži, priključite USB kabel koji nije duži od 2 m (6,5 stopa) na pisač i računalo. Napomena HP ne preporučuje korištenje USB sabirnice za ovaj pisač. Pritisnite Finish. Ako se to od vas zatraži, ponovno pokrenite računalo. Idite na korak 41. Při výzvě připojte tiskárnu k počítači kabelem USB, který je dlouhý max. 2 metry. Poznámka Společnost HP nedoporučuje použití rozbočovačů USB s touto tiskárnou.
Macintosh Macintosh Macintosh Macintosh USB installation. Install the software from the CD. Run the Installer. Complete an Easy Install. Click Quit when the installation is finished. Instalacija putem USB-a u operativnom sustavu Macintosh. Instalirajte programe s CD-a. Pokrenite program za instalaciju. Koristite opciju Easy Install. Pritisnite Quit kada se instalacija završi. Instalace v systému Macintosh prostřednictvím připojení USB. Nainstalujte software z disku CD. Spusťte instalační program.
Macintosh English Go to HD/Applications/Utilities/Printer Setup Utility or Print Center. If the printer name displays in the Printer List, the installation is complete. If the printer name does not display in the Printer List, go to the next step. Add the printer From HD/Applications/Utilities/ Printer Setup Utility or Print Center, click Add. On the next page, click the drop-down menu, and then select USB. Hrvatski Priključivanje USB kabela.
Macintosh Macintosh Windows 41 From the Printer Model drop-down list, select HP. Under Printer Name, select the printer, and then click Add. Go to step 41. Windows network installation. Connect the network cable to the printer. NOTE Ensure that all cables are HPcompliant. Iz padajućeg izbornika Printer Model, odaberite HP. Pod opcijom Printer Name odaberite pisač, a zatim pritisnite Add. Idite na korak 41. Instalacija u mreži u operativnom sustavu Windows. Mrežni kabel spojite na pisač.
Windows Find the IP address by printing a Configuration Page. At the printer control panel, press OK to select Main Menu, and then press OK. Press the < or > buttons to select Network Report, and then press OK. On the printed report you will see the IP Address under Product Settings. NOTE You might need to assign an IP address depending on the type of network that is installed. See step 28. Configure an IP address, if necessary.
Windows Windows Windows Press the < or > buttons to select Manual, use the control-panel buttons to specify an IP address, and then press OK. Prepare for the software installation. Quit all programs (including terminate-and-stay resident [TSR], antivirus, and firewall programs) on the print server or on each computer that will use the printer. Install the software from the CD.
Slovenščina Slovenčina Română Polski Magyar Čeština Hrvatski English Windows Windows Windows On the welcome screen, click Install. If the welcome screen does not appear, click Start, click Run, type X:Setup, where X is the CDROM drive letter, and then click OK. Follow the onscreen instructions. When prompted, select Through the Network., and then click Next. The installer shows available printers. Select the appropriate IP address. Click Finish. If prompted, restart the computer.
Windows Macintosh Macintosh 41 Go to step 41. Macintosh network installation. Connect the network cable to the printer. NOTE Ensure that all cables are HPcompliant. Find the IP address or the Bonjour printer name by printing a Network Report. At the control panel, press OK to select Main Menu, and then press OK. Select Network Report, and then press OK. Idite na korak 41. Instalacija u mreži u operativnom sustavu Macintosh. Mrežni kabel spojite na pisač.
Macintosh Slovenščina Slovenčina Română Polski Magyar Čeština Hrvatski English Macintosh Macintosh On the report, the IP Address or Bonjour printer name appears under Product Settings. NOTE Depending on the network type, you might need to assign an IP address. Go to step 34. Configure an IP address, if necessary. At the printer control panel, press OK, press the < or > buttons to select Network Config, and then press OK. Press the < or > buttons to select TCP/IP Config, and then press OK.
Macintosh Macintosh Macintosh Prepare for the software installation. Quit all programs (including terminate-and-stay resident [TSR], antivirus, and firewall programs) on the print server or on each computer that will use the printer. Install the software from the CD. Run the Installer. Complete an Easy Install. Priprema instalacije softvera.
Macintosh Macintosh Macintosh 39 IP Printer 41 40 Bonjour Add the printer. Go to HD/Applications/ Utilities/Printer Setup Utility or Print Center, and then click Add. To add the printer using the IP address go to Step 39. To add the printer using the Bonjour printer name, go to Step 40. Add the printer using the IP address. On the next page, click IP Printer. Type the IP address in the address field, and then click Add. Go to Step 41. Pritisnite Quit kada se instalacija završi.
Macintosh 41 Add the printer using the Bonjour printer name. On the next page, click the drop-down menu, and then select Bonjour. Under Printer Name, select the printer, and then click Add. Go to Step 41. Print a test page. Print a page from any program to make sure that the software is correctly installed. Congratulations! The printer is ready to use. The user guide is located on the CD and in the HP ToolboxFX. Save the boxes and the packing materials in case you need to transport the printer.
English Hrvatski Registrirajte pisač na www.register.hp.com. Online registracija je najbrži i najlakši način za primanje ažuriranja tehničke podrške, poboljšanih opcija podrške te prijedloga za korištenje HP pisača. Čeština Zaregistrujte tiskárnu na adrese www.register.hp.com. Registrací online získáte snadno a rychle aktualizace technické podpory, rozšířené možnosti podpory a rady k použití tiskárny HP. Slovenščina Slovenčina Română Polski Magyar Register the printer at www.register.hp.com.
22
23
24
25
26
27
28
Macintosh 41 הוסף את המדפסת באמצעות שם מדפסת .Bonjourבדף הבא ,לחץ על התפריט הנפתח ובחר באפשרות .Bonjourתחת ,Printer Nameבחר את המדפסת ולאחר מכן לחץ על .Addעבור לשלב .41 הדפס דף ניסיון .הדפס דף מכל תוכנית שהיא כדי לוודא שהתוכנה הותקנה כהלכה. רשום את המדפסת בכתובת .www.register.hp.comהרישום המקוון הוא השיטה המהירה והקלה ביותר לקבל עדכונים על תמיכה טכנית וליהנות מאפשרויות תמיכה מתקדמות ומרעיונות ושיטות להפעלת מדפסת HP שברשותך.
עברית Macintosh Macintosh התכונן להתקנת התוכנה .סגור את כל התוכניות )כולל תוכניות ] TSRסיים-והישאר-בזיכרון[, תוכנות אנטי-וירוס ותוכנות חומת אש( בשרת ההדפסה ,או בכל אחד מהמחשבים שישתמשו במדפסת. התקן את התוכנה מהתקליטור. הפעל את .Installerבצע התקנה קלה. Macintosh Macintosh IP Printer 39 Bonjour 40 Macintosh Macintosh 41 עברית בסיום ההתקנה ,לחץ על .Quit הוסף את המדפסת .
Macintosh Windows Macintosh 41 התקנת רשת במחשב .Macintoshחבר את כבל הרשת למדפסת. הערה ודא שכל הכבלים תואמים ל.HP - עבור לשלב .41 Macintosh Macintosh בדוח ,כתובת ה IP-או שם מדפסת Bonjourיופיעו תחת .Product Settings הערה בהתאם לסוג הרשת ,ייתכן שתצטרך להקצות כתובת .IPעבור לשלב .34 קבע תצורה של כתובת ,IPאם יש צורך .
עברית Windows לחץ על הלחצנים > או < כדי לבחור באפשרות ,Manualהשתמש בלחצני לוח הבקרה כדי לציין כתובת IPולאחר מכן לחץ על .OK Windows Windows התכונן להתקנת התוכנה .סגור את כל התוכניות )כולל תוכניות ] TSRסיים-והישאר-בזיכרון[, תוכנות אנטי-וירוס ותוכנות חומת אש( בשרת ההדפסה ,או בכל אחד מהמחשבים שישתמשו במדפסת. עברית Windows במסך הפתיחה ,לחץ על .
Macintosh Macintosh Windows 41 בחר באפשרות HPמתוך הרשימה הנפתחת Printer .Modelתחת ,Printer Nameבחר את המדפסת ולאחר מכן לחץ על .Add התקנת רשת במחשב .Windowsחבר את כבל הרשת למדפסת. הערה ודא שכל הכבלים תואמים ל.HP - עבור לשלב .41 Windows אתר את כתובת ה IP -על-ידי הדפסת דף תצורה. בלוח הבקרה של המדפסת ,לחץ על לחצן OKכדי לבחור ,Main Menuולאחר מכן לחץ על .
Macintosh בסיום ההתקנה ,לחץ על .Quit עברית התקנת USBבמחשב .Macintoshהתקן את התוכנה מהתקליטור. Macintosh הפעל את .Installerבצע התקנה קלה. Macintosh עברית Macintosh חיבור כבל ה . USB -חבר את כבל ה) USB-באורך של עד 2מ'( אל המדפסת ואל המחשב .הפעל את המחשב מחדש HP .אינה ממליצה להשתמש ברכזות USBעם מדפסת זו. Macintosh עבור אל HD/Applications/Utilities/Printer Setup Utilityאו .
Windows Windows התקנת USBבמחשב .Windowsהתקן את התוכנה מהתקליטור .אל תחבר את כבל ה USB-עד שתקבל הנחיה לעשות כן במהלך ההתקנה .אם תופיע על המסך ההודעה ,New Hardware Found הכנס את התקליטור לכונן .פעל לפי ההוראות שעל המסך. במסך הפתיחה ,לחץ על .Installאם לא מופיע מסך הפתיחה ,לחץ על התחל ,לחץ על הפעלה והקלד ,X:Setupכאשר Xהוא האות המייצגת את כונן התקליטורים ,ולחץ על .OK Windows Windows פעל לפי ההוראות שעל המסך .
2 3 הדלק את המדפסת. ערוך היכרות עם מאפייני לוח הבקרה (1 .השתמש בלחצן > או < כד לבחור אפשרויות תפריט(2 . השתמש בלחצן OKכדי לאשר בחירות (3 .השתמש בלחצן CANCELכדי לחזור למסך .READY אם תוצג לך בקשה ,בחר שפה ומיקום עבור המדפסת .לחץ על OKכדי לאשר בחירות. הגדר את הגודל והסוג של חומרי ההדפסה עבור מגשי הקלט .בלוח הבקרה ,לחץ על ,OKבחר באפשרות SYSTEM SETUPולחץ על אישור .בחר PAPER SETUPובחר גדלים וסוגים של חומרי הדפסה לכל מגש. התקנת .
1 2 3 4 הסר את הסרט . הסר את שתי נעילות הפלסטיק ומשוך את הסרט במלואו מארבע מחסניות ההדפסה. החזר למקומן את ארבע מחסניות ההדפסה וסגור את הדלת הקדמית. התקן את סל הפלט. כוונן את גובלי המגש ולאחר מכן טען נייר. חבר את כבל החשמל. הערה אל תחבר את כבל ה USB-עד שתתבקש לעשות זאת במהלך התקנת התוכנה.
עברית הכן את סביבת העבודה .הנח את המדפסת על משטח יציב באזור מאוורר היטב .ודא שפתחי האוורור אינם חסומים ושניתן לפתוח בחופשיות את כל הדלתות. הקפד על סביבת עבודה מבוקרת .אין להניח את המדפסת באור שמש ישיר ,או באזור המתאפיין בשינויים חדים בטמפרטורה ובלחות. הסר את כל סרטי האריזה .בדוק את ההתקן ביסודיות והסר את כל סרטי האריזה. פתח את הדלת הקדמית . הוצא את תכולת האריזה ובדוק אותה.
© 2006 Hewlett-Packard Development Company, L.P. www.hp.