HP Color LaserJet 2700 Series printers
Copyright Information Informations Copyright © 2006 Copyright Hewlett-Packard Development Company, L.P. © 2006 Copyright Hewlett-Packard Development Company, L.P. Reproduction, adaptation or translation without prior written permission is prohibited, except as allowed under the copyright laws. La reproduction, l'adaptation ou la traduction, sans autorisation écrite préalable, sont interdites sauf dans le cadre des lois sur le copyright.
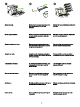
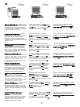
229 mm (9.5 in) m 89 m ) (3.5 in m 89 m ) (3.5 in 178 mm (7 i n) 356 mm (14 in) 17° - 25°C (62.6° - 77°F) Regulate the environment. Do not place the printer in direct sunlight or in an area that has abrupt temperature and humidity changes. Unpack and check the contents of the box. Préparez l'emplacement. Placez l'imprimante sur une surface résistante et plane située dans une zone bien ventilée.
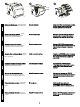
1 2 3 4 Open the front door. Remove the FOUR print cartridges by holding the blue handles on both sides of each cartridge and then pulling straight out. Retirez toute la bande adhésive. Vérifiez attentivement le périphérique et retirez l'ensemble de la bande adhésive. Ouvrez le capot avant. Retirez les QUATRE cartouches d'encre en prenant appui sur le support bleu situé de chaque coté des cartouches puis en tirant. Отстранете опаковъчните ленти.
1 2 3 4 Remove the strip. Remove the two shipping locks and pull the tape completely out of the four print cartridges. Reinstall the four print cartridges and close the front door. Retirez la bande adhésive. Retirez le dispositif de sécurité d'expédition et la bande adhésive des quatre cartouches d’impression. Réinsérez les quatre cartouches d'impression puis refermez le capot avant. Извадете предпазната лента.
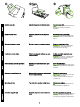
Adjust the tray guides and then load paper. Plug in the power cord. NOTE Do not plug in the USB cable until you are prompted to during the software installation. Installez le bac de sortie. Ajustez les guides du bac puis chargez le papier. Branchez le cordon d’alimentation. Remarque Ne branchez pas le câble USB avant d'y être invité lors de l'installation du logiciel. Поставете изходящата касета. Нагласете водачите и заредете с хартия. Включете захранващия кабел.
2 3 1 Turn on the printer. Familiarize yourself with control panel features. 1) Use the < or > button to select menu options. 2) Use the OK button to accept selections. 3) Use the CANCEL button to return to the READY screen. If prompted, select a language and location for the printer. Press OK to accept selections. Mettez l’imprimante sous tension. Familiarisez-vous avec les fonctions du panneau de commande. 1) Appuyez sur les boutons < ou > pour sélectionner les options de menu.
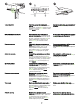
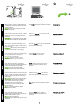
Network USB Windows 19 Macintosh 21 Windows 26 Macintosh 32 (HP Color LaserJet 2700n only) USB Installation. To install software for Windows using a direct connection (USB), go to step 19. To install software for Macintosh using a direct connection (USB), go to step 21. Network installation. To install software for Windows using a network connection, go to step 26. To install software for Macintosh using a network connection, go to step 32.
Windows Windows Windows Windows USB installation. Install the software from the CD. Do not plug in the USB cable until you are prompted to during the installation. If New Hardware Found appears, insert the CD. Follow the onscreen instructions. On the welcome screen, click Install. If the welcome screen does not appear, click Start, click Run, type X:Setup, where X is the CDROM drive letter, and then click OK. Follow the onscreen instructions.
Windows Windows Windows Click Finish. If prompted, restart the computer. Go to step 41. English Lorsque vous y êtes invité, branchez un câble USB de moins de 2 m entre l'imprimante et l'ordinateur. Remarque HP recommande de ne pas utiliser de concentrateurs USB avec cette imprimante. Cliquez sur Terminer. Si vous y êtes invité, redémarrez l’ordinateur. Passez à l'étape 41. При подкана, свържете USB кабел, не подълъг от 2 метра (6,5 фута) към принтера и към компютъра.
Macintosh Macintosh Macintosh Macintosh USB installation. Install the software from the CD. Run the Installer. Complete an Easy Install. Click Quit when the installation is finished. Installation pour Macintosh. Installez le logiciel à partir du CD. Exécutez le programme d’installation. Effectuez une installation standard. Cliquez sur Quitter lorsque l'installation est terminée. Macintosh инсталиране при използване на USB свързване. Инсталирайте софтуера от компактдиска. Стартирайте Installer.
Macintosh Connect the USB cable. Connect a USB cable that is no longer than 2 meters (6.5 feet) to the printer and the computer. Restart the computer. HP does not recommend using USB hubs with this printer. Go to HD/Applications/Utilities/Printer Setup Utility or Print Center. If the printer name displays in the Printer List, the installation is complete. If the printer name does not display in the Printer List, go to the next step.
Macintosh Macintosh Windows 41 From the Printer Model drop-down list, select HP. Under Printer Name, select the printer, and then click Add. Go to step 41. Windows network installation. Connect the network cable to the printer. NOTE Ensure that all cables are HPcompliant. Dans la liste déroulante Modèle d’imprimante, sélectionnez HP. Sous Nom de l'imprimante, sélectionnez l'imprimante, puis cliquez sur Ajouter. Passez à l'étape 41. Installation réseau pour Windows.
Windows On the printed report you will see the IP Address under Product Settings. NOTE You might need to assign an IP address depending on the type of network that is installed. See step 28. Configure an IP address, if necessary. At the printer control panel, press OK, press the < or > buttons to select Network Config, and then press OK. Press the < or > buttons to select TCP/IP Config, and then press OK. Obtenez l'adresse IP en imprimant une page de configuration.
Windows Windows Windows Press the < or > buttons to select Manual, use the control-panel buttons to specify an IP address, and then press OK. Prepare for the software installation. Quit all programs (including terminate-and-stay resident [TSR], antivirus, and firewall programs) on the print server or on each computer that will use the printer. Install the software from the CD.
Українська Türkçe Русский Казак Ελληνικά Български Français English Windows Windows Windows On the welcome screen, click Install. If the welcome screen does not appear, click Start, click Run, type X:Setup, where X is the CDROM drive letter, and then click OK. Follow the onscreen instructions. When prompted, select Through the Network., and then click Next. The installer shows available printers. Select the appropriate IP address. Click Finish. If prompted, restart the computer.
Windows Macintosh Macintosh 41 Go to step 41. Macintosh network installation. Connect the network cable to the printer. NOTE Ensure that all cables are HPcompliant. Find the IP address or the Bonjour printer name by printing a Network Report. At the control panel, press OK to select Main Menu, and then press OK. Select Network Report, and then press OK. Passez à l'étape 41. Installation du réseau pour Macintosh. Connectez le câble réseau à l’imprimante.
Macintosh Українська Türkçe Русский Казак Ελληνικά Български Français English Macintosh Macintosh On the report, the IP Address or Bonjour printer name appears under Product Settings. NOTE Depending on the network type, you might need to assign an IP address. Go to step 34. Configure an IP address, if necessary. At the printer control panel, press OK, press the < or > buttons to select Network Config, and then press OK. Press the < or > buttons to select TCP/IP Config, and then press OK.
Macintosh Macintosh Macintosh Prepare for the software installation. Quit all programs (including terminate-and-stay resident [TSR], antivirus, and firewall programs) on the print server or on each computer that will use the printer. Install the software from the CD. Run the Installer. Complete an Easy Install. Préparation à l’installation du logiciel.
Macintosh Macintosh Macintosh 39 IP Printer 41 40 Bonjour Add the printer. Go to HD/Applications/ Utilities/Printer Setup Utility or Print Center, and then click Add. To add the printer using the IP address go to Step 39. To add the printer using the Bonjour printer name, go to Step 40. Add the printer using the IP address. On the next page, click IP Printer. Type the IP address in the address field, and then click Add. Go to Step 41. Cliquez sur Quitter lorsque l'installation est terminée.
Macintosh 41 Add the printer using the Bonjour printer name. On the next page, click the drop-down menu, and then select Bonjour. Under Printer Name, select the printer, and then click Add. Go to Step 41. Print a test page. Print a page from any program to make sure that the software is correctly installed. Congratulations! The printer is ready to use. The user guide is located on the CD and in the HP ToolboxFX. Save the boxes and the packing materials in case you need to transport the printer.
Ελληνικά Εγγράψτε τον εκτυπωτή στη διεύθυνση www.register.hp.com. Η εγγραφή μέσω Διαδικτύου είναι ο πιο γρήγορος κι εύκολος τρόπος για να λαμβάνετε ενημερώσεις τεχνικής υποστήριξης, επιλογές εξειδικευμένης υποστήριξης και ιδέες και τρόπους χρήσης του εκτυπωτή σας HP. Казак English Français Български Регистрирайте принтера на www.register.hp.com.
22
23
24
25
26
27
28
أﺿﻒ اﻟﻄﺎﺑﻌﺔ ﺑﺎﺳﺘﺨﺪام اﺳﻢ اﻟﻄﺎﺑﻌﺔ ﻓﻲ .Bonjour ﻓﻲ اﻟﺼﻔﺤﺔ اﻟﺘﺎﻟﻴﺔ ،اﻧﻘﺮ ﻓﻮق اﻟﻘﺎﺋﻤﺔ اﻟﻤﻨﺴﺪﻟﺔ ،ﺛﻢ ﺣﺪد .Bonjourﺿﻤﻦ ،Printer Nameﺣﺪد اﻟﻄﺎﺑﻌﺔ، ﺛﻢ اﻧﻘﺮ ﻓﻮق .Addاﻧﺘﻘﻞ إﻟﻰ اﻟﺨﻄﻮة .٤١ ﻗﻢ ﺑﻄﺒﺎﻋﺔ ﺻﻔﺤﺔ اﺧﺘﺒﺎر .ﻗﻢ ﺑﻄﺒﺎﻋﺔ ﺻﻔﺤﺔ ﻣﻦ أي ﺑﺮﻧﺎﻣﺞ ﻟﻠﺘﺤﻘﻖ ﻣﻦ أﻧﻪ ﻗﺪ ﺗﻢ ﺗﺜﺒﻴﺖ ﻫﺬا اﻟﺒﺮﻧﺎﻣﺞ ﺑﺸﻜﻞ ﺻﺤﻴﺢ. ﺗﻔﻀﻞ ﺑﺘﺴﺠﻴﻞ اﻟﻄﺎﺑﻌﺔ ﻋﻠﻰ اﻟﻌﻨﻮان ّ .www.register.hp.
ﻋﺮﺑﻲ ﻋﺮﺑﻲ ﺣﻀﺮ ﻟﺘﺜﺒﻴﺖ اﻟﺒﺮاﻣﺞ .ﻗﻢ ﺑﺈﻧﻬﺎء ﻛﻞ اﻟﺒﺮاﻣﺞ )ﺑﻤﺎ ﻓﻲ ّ ذﻟﻚ اﻟﺒﺮاﻣﺞ اﻟﺘﻲ ﺗﻨﺘﻬﻲ وﻟﻜﻨﻬﺎ ﺗﻈﻞ ﻓﻲ اﻟﺬاﻛﺮة ] ،[TSRﺑﺮاﻣﺞ اﻟﺤﻤﺎﻳﺔ ﺿﺪ اﻟﻔﻴﺮوﺳﺎت وﺑﺮاﻣﺞ ﺟﺪار اﻟﺤﻤﺎﻳﺔ( اﻟﻤﻮﺟﻮدة ﻋﻠﻰ ﻣﻠﻘﻢ اﻟﻄﺒﺎﻋﺔ أو ﻋﻠﻰ ﻛﻞ ﺟﻬﺎز ﻛﻤﺒﻴﻮﺗﺮ ﺳﻴﺴﺘﺨﺪم اﻟﻄﺎﺑﻌﺔ. ﺛﺒّﺖ اﻟﺒﺮاﻣﺞ ﻣﻦ اﻟﻘﺮص اﻟﻤﻀﻐﻮط. ﺷﻐﻞ ﺑﺮﻧﺎﻣﺞ اﻟﺘﺜﺒﻴﺖ .اﺳﺘﻜﻤﻞ ﻋﻤﻠﻴﺔ ﺗﺜﺒﻴﺖ ﺳﻬﻠﺔ. ّ اﻧﻘﺮ ﻓﻮق Quitﻋﻨﺪ اﻧﺘﻬﺎء ﻋﻤﻠﻴﺔ اﻟﺘﺜﺒﻴﺖ. أﺿﻒ اﻟﻄﺎﺑﻌﺔ .اﻧﺘﻘﻞ إﻟﻰ HD/Applications/Utilities/ Printer Setup Utilityأو ،Print Centerﺛﻢ اﻧﻘﺮ ﻓﻮق .
اﻧﺘﻘﻞ إﻟﻰ اﻟﺨﻄﻮة .٤١ اﻟﺘﺜﺒﻴﺖ ﻣﻦ ﺧﻼل ﺷﺒﻜﺔ اﻻﺗﺼﺎل ﻟـ .Macintoshﻗﻢ ﺑﺘﻮﺻﻴﻞ ﻛﺎﺑﻞ ﺷﺒﻜﺔ اﻻﺗﺼﺎل ﺑﺎﻟﻄﺎﺑﻌﺔ. ﻣﻼﺣﻈﺔ ﺗﺄﻛﺪ ﻣﻦ ﻣﻄﺎﺑﻘﺔ ﻛﻞ اﻟﻜﺎﺑﻼت ﻟﻤﻮاﺻﻔﺎت .HP اﺑﺤﺚ ﻋﻦ ﻋﻨﻮان IPأو اﺳﻢ اﻟﻄﺎﺑﻌﺔ ﻓﻲ Bonjour وذﻟﻚ ﺑﻄﺒﺎﻋﺔ .Network Reportﻓﻲ ﻟﻮﺣﺔ ﺗﺤﻜﻢ اﻟﻄﺎﺑﻌﺔ ،اﺿﻐﻂ OKﻟﺘﺤﺪﻳﺪ ،Main Menuﺛﻢ اﺿﻐﻂ .OKﺣﺪد ،Network Reportﺛﻢ اﺿﻐﻂ .OK ﺗﺠﺪ ﻓﻲ اﻟﺘﻘﺮﻳﺮ IP Address ،واﺳﻢ اﻟﻄﺎﺑﻌﺔ ﻓﻲ Bonjourﺿﻤﻦ .
ﻓﻲ ﺷﺎﺷﺔ اﻟﺘﺮﺣﻴﺐ ،اﻧﻘﺮ ﻓﻮق ﺗﺜﺒﻴﺖ .إذا ﻟﻢ ﺗﻈﻬﺮ ﺷﺎﺷﺔ اﻟﺘﺮﺣﻴﺐ ،ﻓﺎﻧﻘﺮ ﻓﻮق اﺑﺪأ ،ﺛﻢ اﻧﻘﺮ ﻓﻮق ﺗﺸﻐﻴﻞ واﻛﺘﺐ ،Setup:Xﺣﻴﺚ ﻳﻈﻬﺮ ﺣﺮف Xﻛﺤﺮف ﻣﻤﻴﺰ ﻟﻤﺤﺮك اﻷﻗﺮاص اﻟﻤﻀﻐﻮﻃﺔ ،ﺛﻢ اﻧﻘﺮ ﻓﻮق . OK اﺗﺒﻊ اﻹرﺷﺎدات اﻟﺘﻲ ﺗﻈﻬﺮ ﻋﻠﻰ اﻟﺸﺎﺷﺔ .ﻋﻨﺪﻣﺎ ﺗﺘﻢ ﻣﻄﺎﻟﺒﺘﻚ ،ﺣﺪد ﻋﺒﺮ اﻟﺸﺒﻜﺔ ،.ﺛﻢ اﻧﻘﺮ ﻓﻮق اﻟﺘﺎﻟﻲ. ﻳﻌﺮض ﺑﺮﻧﺎﻣﺞ اﻟﺘﺜﺒﻴﺖ اﻟﻄﺎﺑﻌﺎت اﻟﻤﺘﺎﺣﺔ .ﺣﺪد ﻋﻨﻮان IP اﻟﻤﻨﺎﺳﺐ. اﻧﻘﺮ ﻓﻮق إﻧﻬﺎء .إذا ﺗﻤﺖ ﻣﻄﺎﻟﺒﺘﻚ ،أﻋﺪ ﺗﺸﻐﻴﻞ ﺟﻬﺎز اﻟﻜﻤﺒﻴﻮﺗﺮ.
ﻓﻲ اﻟﻘﺎﺋﻤﺔ اﻟﻤﻨﺴﺪﻟﺔ ،Printer Modelﺣﺪد .HPﺿﻤﻦ ،Printer Nameﺣﺪد اﻟﻄﺎﺑﻌﺔ ،ﺛﻢ اﻧﻘﺮ ﻓﻮق .Add اﻧﺘﻘﻞ إﻟﻰ اﻟﺨﻄﻮة .٤١ ﺗﺜﺒﻴﺖ ﻣﻦ ﺧﻼل ﺷﺒﻜﺔ اﻻﺗﺼﺎل ﻟـ .Windowsﻗﻢ ﺑﺘﻮﺻﻴﻞ ﻛﺎﺑﻞ ﺷﺒﻜﺔ اﻻﺗﺼﺎل ﺑﺎﻟﻄﺎﺑﻌﺔ. ﻣﻼﺣﻈﺔ ﺗﺄﻛﺪ ﻣﻦ ﻣﻄﺎﺑﻘﺔ ﻛﻞ اﻟﻜﺎﺑﻼت ﻟﻤﻮاﺻﻔﺎت .HP اﺑﺤﺚ ﻋﻦ ﻋﻨﻮان IPوذﻟﻚ ﺑﻄﺒﺎﻋﺔ Configuration .Pageﻓﻲ ﻟﻮﺣﺔ ﺗﺤﻜﻢ اﻟﻄﺎﺑﻌﺔ ،اﺿﻐﻂ OKﻟﺘﺤﺪﻳﺪ ،Main Menuﺛﻢ اﺿﻐﻂ .OKاﺿﻐﻂ زر > أو < ﻟﺘﺤﺪﻳﺪ ،Network Reportﺛﻢ اﺿﻐﻂ .OK ﺗﺠﺪ IP Addressﻓﻲ اﻟﺘﻘﺮﻳﺮ اﻟﻤﻄﺒﻮع ،ﺿﻤﻦ Product .
ﻗﻢ ﺑﺘﻮﺻﻴﻞ ﻛﺎﺑﻞ .USBﻗﻢ ﺑﺘﻮﺻﻴﻞ ﻛﺎﺑﻞ USBﻻ ﻳﺘﺨﻄﻰ ﻃﻮﻟﻪ اﻟﻤﺘﺮﻳﻦ ) ٦‚٥أﻗﺪام( ﺑﻴﻦ اﻟﻄﺎﺑﻌﺔ وﺟﻬﺎز اﻟﻜﻤﺒﻴﻮﺗﺮ .أﻋﺪ ﺗﺸﻐﻴﻞ ﺟﻬﺎز اﻟﻜﻤﺒﻴﻮﺗﺮ .ﺗﻮﺻﻲ HPﺑﻌﺪم اﺳﺘﺨﺪام ﻟﻮﺣﺎت وﺻﻞ USBﻣﻊ ﻫﺬه اﻟﻄﺎﺑﻌﺔ. اﻧﺘﻘﻞ إﻟﻰ HD/Applications/Utilities/Printer Setup Utilityأو .Print Centerإذا ﻇﻬﺮ اﺳﻢ اﻟﻄﺎﺑﻌﺔ ﻓﻲ ﻗﺎﺋﻤﺔ اﻟﻄﺎﺑﻌﺎت ،Printer Listﻓﻴﻜﻮن ﻗﺪ ﺗﻢ ﺗﺜﺒﻴﺖ اﻟﻄﺎﺑﻌﺔ .وإذا ﻟﻢ ﻳﻈﻬﺮ اﺳﻢ اﻟﻄﺎﺑﻌﺔ ﻓﻲ ﻗﺎﺋﻤﺔ اﻟﻄﺎﺑﻌﺎت ،Printer Listﻓﺎﻧﺘﻘﻞ إﻟﻰ اﻟﺨﻄﻮة اﻟﺘﺎﻟﻴﺔ. أﺿﻒ اﻟﻄﺎﺑﻌﺔ .
ﺗﺜﺒﻴﺖ USBﻟـ .Windowsﺛﺒّﺖ اﻟﺒﺮاﻣﺞ ﻣﻦ اﻟﻘﺮص ﺗﻮﺻﻞ ﻛﺎﺑﻞ USBﺣﺘﻰ ﻳُﻄﻠﺐ ﻣﻨﻚ ذﻟﻚ اﻟﻤﻀﻐﻮط .ﻻ ّ أﺛﻨﺎء ﺗﺜﺒﻴﺖ اﻟﺒﺮاﻣﺞ .إذا ﻇﻬﺮت اﻟﺮﺳﺎﻟﺔ اﻟﻌﺜﻮر ﻋﻠﻰ ﺟﻬﺎز ﺟﺪﻳﺪ ،ﻓﺄدﺧﻞ اﻟﻘﺮص اﻟﻤﻀﻐﻮط .اﺗﺒﻊ اﻹرﺷﺎدات اﻟﺘﻲ ﺗﻈﻬﺮ ﻋﻠﻰ اﻟﺸﺎﺷﺔ. ﻓﻲ ﺷﺎﺷﺔ اﻟﺘﺮﺣﻴﺐ ،اﻧﻘﺮ ﻓﻮق ﺗﺜﺒﻴﺖ .إذا ﻟﻢ ﺗﻈﻬﺮ ﺷﺎﺷﺔ اﻟﺘﺮﺣﻴﺐ ،ﻓﺎﻧﻘﺮ ﻓﻮق اﺑﺪأ ،ﺛﻢ اﻧﻘﺮ ﻓﻮق ﺗﺸﻐﻴﻞ واﻛﺘﺐ ،Setup:Xﺣﻴﺚ ﻳﻈﻬﺮ Xﻛﺤﺮف ﻣﻤﻴﺰ ﻟﻤﺤﺮك اﻷﻗﺮاص اﻟﻤﻀﻐﻮﻃﺔ ،ﺛﻢ اﻧﻘﺮ ﻓﻮق .OK اﺗﺒﻊ اﻹرﺷﺎدات اﻟﺘﻲ ﺗﻈﻬﺮ ﻋﻠﻰ اﻟﺸﺎﺷﺔ .
ﺣﺪد ﺣﺠﻢ اﻟﻮﺳﺎﺋﻂ وﻧﻮﻋﻬﺎ ﻓﻲ أدراج اﻹدﺧﺎل .ﻓﻲ ﻟﻮﺣﺔ اﻟﺘﺤﻜﻢ ،اﺿﻐﻂ ) OKﻣﻮاﻓﻖ( ،ﺣﺪد SYSTEM ) SETUPإﻋﺪاد اﻟﻨﻈﺎم( ،ﺛﻢ اﺿﻐﻂ .OKﺣﺪد PAPER ) SETUPإﻋﺪاد اﻟﻮرق( ،واﺿﻐﻂ ،OKﺛﻢ ﺣﺪد ﺣﺠﻢ اﻟﻮﺳﺎﺋﻂ وﻧﻮﻋﻬﺎ ﻟﻜﻞ درج ﻣﻦ اﻷدراج. ﺗﺜﺒﻴﺖ .USBﻟﺘﺜﺒﻴﺖ ﺑﺮاﻣﺞ ﻟـ Windowsﺑﺎﺳﺘﺨﺪام اﺗﺼﺎل ﻣﺒﺎﺷﺮ ) (USBاﻧﺘﻘﻞ إﻟﻰ اﻟﺨﻄﻮة .١٩ﻟﺘﺜﺒﻴﺖ ﺑﺮاﻣﺞ ﻟـ Macintoshﺑﺎﺳﺘﺨﺪام اﺗﺼﺎل ﻣﺒﺎﺷﺮ )(USB اﻧﺘﻘﻞ إﻟﻰ اﻟﺨﻄﻮة .٢١ ﺗﺜﺒﻴﺖ ﺷﺒﻜﺔ اﻻﺗﺼﺎل .
اﻧﺰع اﻟﺸﺮﻳﻂ. اﻧﺰع اﻟﻘﻔﻠﻴﻦ اﻟﻤﺴﺘﺨﺪﻣﻴﻦ أﺛﻨﺎء اﻟﺸﺤﻦ واﺳﺤﺐ اﻟﺸﺮﻳﻂ ﺑﺸﻜﻞ ﻛﺎﻣﻞ ﻧﺤﻮ ﺧﺎرج ﺧﺮاﻃﻴﺶ اﻟﻄﺒﺎﻋﺔ اﻷرﺑﻊ. أﻋﺪ ﺗﺮﻛﻴﺐ ﺧﺮاﻃﻴﺶ اﻟﻄﺒﺎﻋﺔ اﻷرﺑﻊ وأﻏﻠﻖ اﻟﺒﺎب اﻷﻣﺎﻣﻲ. ﺛﺒّﺖ ﺣﺎوﻳﺔ اﻹﺧﺮاج. ﺣﻤﻞ اﻟﻮرق. اﺿﺒﻂ ﻣﻮﺟﻬﺎت اﻟﺤﺎوﻳﺔ ﺛﻢ ّ وﺻﻞ ﺳﻠﻚ اﻟﺘﻴﺎر اﻟﻜﻬﺮﺑﺎﺋﻲ. ّ ﺗﻮﺻﻞ ﻛﺎﺑﻞ USBﺣﺘﻰ ﻳُﻄﻠﺐ ﻣﻨﻚ ذﻟﻚ أﺛﻨﺎء ﻣﻼﺣﻈﺔ ﻻ ّ ﺗﺜﺒﻴﺖ اﻟﺒﺮاﻣﺞ.
ﻋﺮﺑﻲ ﻋﺮﺑﻲ ﺣﻀﺮ اﻟﻤﻮﻗﻊ .ﺿﻊ اﻟﻄﺎﺑﻌﺔ ﻋﻠﻰ ﺳﻄﺢ ﻣﺴﺘ ٍﻮ ﺛﺎﺑﺖ ،ﻓﻲ ّ ﻣﻜﺎن ﺟﻴﺪ اﻟﺘﻬﻮﻳﺔ .ﺗﺄﻛﺪ ﻣﻦ ﻋﺪم ﺳﺪ ﻣﻨﺎﻓﺬ ﻣﺮاوح اﻟﺘﻬﻮﻳﺔ وﻣﻦ أن ﻛﺎﻓﺔ اﻷﺑﻮاب ﻗﺎﺑﻠﺔ ﻟﻠﻔﺘﺢ ﺑﺴﻬﻮﻟﺔ. اﺿﺒﻂ اﻟﺒﻴﺌﺔ اﻟﻤﺤﻴﻄﺔ .ﻻ ﺗﻀﻊ اﻟﻄﺎﺑﻌﺔ ﻓﻲ ﻣﻜﺎن ﺗﺘﻌﺮّض ﻓﻴﻪ ﻷﺷﻌﺔ اﻟﺸﻤﺲ اﻟﻤﺒﺎﺷﺮة أو ﻓﻲ ﻣﻜﺎن ﺗﺘﻐﻴّﺮ ﻓﻴﻪ اﻟﺤﺮارة واﻟﺮﻃﻮﺑﺔ ﺑﺸﻜﻞ ﻣﻔﺎﺟﺊ. وﺗﻔﺤﺼﻬﺎ. ّ اﻓﺮغ ﻣﺤﺘﻮﻳﺎت اﻟﺼﻨﺪوق ﺗﻔﺤﺺ اﻧﺰع ﻛﻞ اﻟﺸﺮﻳﻂ اﻟﻼﺻﻖ اﻟﻤﺴﺘﺨﺪم ﻟﻠﺸﺤﻦّ . اﻟﺠﻬﺎز ﺑﻌﻨﺎﻳﺔ واﻧﺰع ﻛﻞ اﻟﺸﺮﻳﻂ اﻟﻼﺻﻖ اﻟﻤﺴﺘﺨﺪم ﻟﻠﺸﺤﻦ. اﻓﺘﺢ اﻟﺒﺎب اﻷﻣﺎﻣﻲ.
© 2006 Hewlett-Packard Development Company, L.P. www.hp.