HP LaserJet M5025/M5035 MFP Getting Started Guide µ Başlangıç Kılavuzu
Copyright and License © 2006 Copyright Hewlett-Packard Development Company, L.P. Reproduction, adaptation or translation without prior written permission is prohibited, except as allowed under the copyright laws. The information contained herein is subject to change without notice. The only warranties for HP products and services are set forth in the express warranty statements accompanying such products and services. Nothing herein should be construed as constituting an additional warranty.
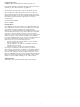
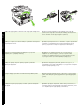
% • Προετοιµάστε το χώρο • % • Yeri hazırlama • ! % ! " 775 mm (31 in) • Prepare the site • To position the device, select a sturdy, well-ventilated, dust-free area that is out of direct sunlight. , . , , . English Make sure there is enough space to position the device.
• Unpack the device • ' • Αποσυσκευάστε τη συσκευή • ' • Aygıtı paketinden çıkarma • ' # 2) Place the device on a sturdy surface. 1) & . : , . 2) . English 1) Remove the contents from the box. Note: The handles are on the left, right, and back of the device. 1) Αφαιρέστε τα περιεχόµενα από τη συσκευασία.
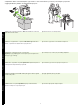
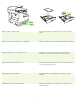
• Prepare the hardware • % • Προετοιµάστε το υλικό • • Donanımı hazırlama • ! % % 3) Remove all of the orange tape and cardboard packaging. 4) Remove the orange tray locks from tray 2 (callout 1) and tray 3 (callout 2). 3) & 4) & 2 ( . 1) 3 ( . 2). . 3) Αφαιρέστε όλες τις ταινίες πορτοκαλί χρώµατος και τη χάρτινη συσκευασία.
) Remove the print cartridge from its packaging, remove the strip (callout 1) and orange tape, insert the print cartridge (callout 2) into the device, and then close the upper-right door (callout 3). 5) / % . 6) & , ( . 1) , ( . 2) ( . 3).
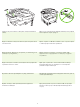
) Open each tray to load the media. 7) / , % 8) Adjust the tray guides to match the media size, and then load the media. . 8) 0 % % . 7) Ανοίξτε κάθε δίσκο για να τοποθετήσετε το µέσο. 8) Ρυθµίστε τους οδηγούς του δίσκου ώστε να αντιστοιχούν στις διαστάσεις του µέσου και, στη συνέχεια, τοποθετήστε το µέσο. 7) / % .
10) Move the scanner carriage shipping lock toward the back of the device so it unlocks. 9) . 10) # , . 9) Κλείστε όλους τους δίσκους. 10) Μετακινήστε την ασφάλεια αποστολής του σαρωτή προς την πίσω πλευρά της συσκευής ώστε να απασφαλιστεί. 9) . 10) + - . 9) Tüm tepsileri kapatın. 10) Tarayıcının nakliye kilidini aygıtın arkasına doğru çekerek serbest kalmasını sağlayın.
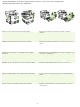
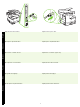
11) If necessary, remove the two control-panel overlays and install new overlays. 12) If you are connecting using a USB cable, wait until you are prompted at the computer in step 22 on page 15. 11) . 12) 4 USB , , # 22 " 15. 11) Εάν απαιτείται, αφαιρέστε τις δύο ζελατίνες του πίνακα ελέγχου και τοποθετήστε τις νέες ζελατίνες.
14) Connect the power cable. 13) + 14) + . English 13) Connect the network cable. . 14) Συνδέστε το καλώδιο τροφοδοσίας. 13) 14) Ελληνικά 13) Συνδέστε το καλώδιο δικτύου. # . # . 14) Güç kablosunu bağlayın. 13) ! ’8 14) ! ’8 . Türkçe 13) Ağ kablosunu bağlayın. .
• Set up the control panel • 0 • Ρυθµίστε τον πίνακα ελέγχου • 0 • Kontrol panelini ayarlama • 0 ! 15) Turn on the device. 16) Wait for the device to initialize (this might take a few minutes). If you are prompted at the control panel, enter the language, date, and time. 15) $ # . 16) & " ( ).
English Note: Many networks provide IP addresses automatically. If the IP address shows a series of zeros, make sure that you are connected to the network and go to step 18. 17) 4 , " IP . 0 Network Address (: ) Print ( ). IP “TCP/IP”. 4 $ IP , 19 " 13.
18) Configure the IP address (if necessary). On the control panel, scroll to and touch Administration. Scroll to and touch Initial Setup, and then Networking and I/O. Touch Embedded Jetdirect, TCP/IP, and IPV4 Settings. Touch Manual Settings, and then enter the IP Address, Subnet Mask, and Default Gateway. 18) IP ( ! ). 0 Administration (4 " ). & Initial Setup ( ) Networking and I/O (: $ /& ).
• Install the software • & - • Εγκαταστήστε το λογισµικό • % • Yazılımı yükleme • $ % % For Macintosh software installation instructions, go to step 24 on page 16. - . 19) HP - . " - Macintosh 24 " 16.
To install a USB connection, go to step 20. USB , Windows with a direct connection (USB). 20) Install the software from the CD before connecting the cable to the device. Note: If the New Hardware Found message appears, insert the CD. Follow the onscreen instructions, accept the default selections, and then go to step 31 on page 19. 20. Windows - (USB). 20) & - , .
Türkçe Ελληνικά English Windows 21) On the welcome screen, click Install Printer. The Setup Wizard appears. Note: If the welcome screen does not appear, click Start, and then click Run. Type X:SETUP (replace X with CD-ROM drive letter), and click OK. 22) Follow the onscreen instructions. When prompted, connect a USB cable between the device and the computer. Note: HP does not recommend using USB hubs. Use a USB cable that is no longer than 2 meters (6.5 feet).
23) Click Finish. If prompted, restart the computer. Go to step 31 on page 19. Connect to a Macintosh computer. 24) Place the CD in the CD-ROM drive and run the installer. Complete an easy install. Note: Install the software before connecting the USB cable. 23) 0 Finish (W ). 4 , # . 31 " 19. - *, Macintosh. 24) CD-ROM % .
English 26) From Apple System Preferences (available in the Apple drop-down menu) click Print & Fax, and then click the Printing tab at the top of the window. 27) To add your device, click the “+” icon to launch the Printer Browser. By default, the Printer Browser displays devices that are connected through USB, Bonjour, and AppleTalk networking. 25) + USB # . : HP USB " .
28) From the Printer Browser window, select the HP device. Note: If HP software is installed, the software should automatically be configured for Macintosh OS X V 10.4. 29) Click Add to create a printer queue, and then follow the prompt to manually configure the device’s installable options. Note: Macintosh OS X V 10.2 and V 10.3 might require you to manually select the printer model from the Printer Model drop-down menu. 30) Under Model Name, select the device, click Add, and go to step 31.
English Ελληνικά Türkçe Test the software installation. 31) Print a page from any program to make sure that the software is correctly installed. Note: If the page failed to print, reinstall the software. If the page fails to print after reinstalling, go to www.hp.com/support/M5035mfp. Y . 31) / " % , , - . : 4 " , - .
• Set up digital send • 0 - " " - • Ρυθµίστε την ψηφιακή αποστολή • 0 - " # " - • Dijital göndermeyi ayarlama • 0 " - % ! 32) Open a web browser. 33) Type the device IP address (found on the Jetdirect configuration page). 34) Select the Digital Sending tab. 35) Complete General Settings information, such as name and e-mail address. 36) Select E-mail Settings from the left navigation menu. 37) Type the SMTP server address.
For the M5035 MFP only. 39) To scan a document to your computer or shared network folder, use the Send To Folder feature (on the left navigation bar) to set up one or more folder destinations. Note: See the embedded Web server (EWS) guide for more information on configuring the Send To Folder feature. 38) & The E-mail Address Book (' % ) % " , " . - M5035 MFP.
• Register the device • ' % • Εγγράψτε τη συσκευή • % • Aygıtı kaydettirme • ' 8 "! # Congratulations! The device is ready to use. The user guide is located on the CD. See www.hp.com/support/M5035mfp for more information or support. Note: Save the boxes and the packing materials in case you need to transport the device. Register your device. Register at www.register.hp.com.
Troubleshooting Area Control-panel display Print Copy Symptom Cause/Remedy Blank 1) Make sure that the power cable is connected to a working power outlet. 2) Make sure that the device is turned on. See page 10 for more information. 3) If the status lights on the left side of the control panel are functioning, adjust the contrast by using the dial in the upper left of the control panel. 4) Turn off the device, reseat the formatter, and then turn on the device.
Troubleshooting Area E-mail Other Symptom Cause/Remedy Digital sending tab in the embedded Web server (EWS) does not appear An administrative password might be configured. Select Log On in the upper right corner of the EWS. Email Gateway Not Responding appears on the control-panel display when attempting to send an e-mail 1) The SMTP gateway address might be incorrect. Contact your IT administrator to obtain the correct address.
> $ * / 9 + /0 1) , # . 2) , # . $ . 10 - " . 3) A , % . 4) & # , - # .
> $ * / & % + /0 $ EWS ( % ) " - $ . & Log On (& - " ) % % EWS ( % ). 0 Email Gateway Not Responding, % 1) 4 SMTP . / , .
Αντιµετώπιση προβληµάτων Περιοχή Οθόνη του πίνακα ελέγχου Εκτύπωση Φωτοαντίγραφα Σύµπτωµα Αιτία/Επίλυση Κενή 1) Βεβαιωθείτε ότι το καλώδιο τροφοδοσίας είναι συνδεδεµένο σε µια πρίζα που να λειτουργεί. 2) Βεβαιωθείτε ότι ο εκτυπωτής είναι αναµµένος. Για περισσότερες πληροφορίες, ανατρέξτε στη σελίδα 10.
Αντιµετώπιση προβληµάτων Περιοχή Ηλεκτρονικό ταχυδροµείο Σύµπτωµα Αιτία/Επίλυση ∆εν εµφανίζεται η καρτέλα ψηφιακής αποστολής στον ενσωµατωµένο διακοµιστή web (EWS). Θα πρέπει να δηµιουργηθεί κωδικός πρόσβασης από τον διαχειριστή. Επιλέξτε Σύνδεση στην επάνω δεξιά γωνία του ενσωµατωµένου διακοµιστή web (EWS).
* / 9 & - / # " 1) , 6 . 2) , # . . . 10. 3) ? - " # , % .
* / v / # $ , . $ / % EWS , . " - - (EWS) 6 " ; ,- [ * % 1) $ , # SMTP. / &q % .
Sorun Giderme Yer Kontrol paneli ekranı Belirti Neden/Çözüm Boş 1) Güç kablosunun sağlam bir prize takılı olduğundan emin olun. 2) Aygıtın açık olduğundan emin olun. Daha fazla bilgi için bkz: sayfa 10. 3) Kontrol panelinin sol tarafındaki durum ışıkları çalışıyorsa, kontrol panelinin sol üstünde bulunan çevirmeli düğmeyi kullanarak kontrastı ayarlayın. 4) Aygıtı kapatın, formatlayıcıyı yeniden yerine oturtun ve aygıtı açın.
Sorun Giderme Yer E-posta Diğer Belirti Neden/Çözüm Yönetici parolası yapılandırılmış olabilir. EWS’nin sağ üst köşesinde Oturum Katıştırılmış Web sunucusunda (EWS) dijital Aç’ı seçin. gönderme sekmesi görünmüyor E-posta göndermeye çalışıldığında kontrol panelinde E-posta Ağ Geçidi Yanıt Vermiyor görüntüleniyor 1) SMTP ağ geçidi adresi yanlış olabilir. Doğru adresi almak için BT yöneticinize başvurun.
$ * / ! : 9 !# /$ ! 1) ! , ! ’8 ( !. 2) ! , ! ! . ! ! ! ! . 10. 3) 7 ! ! ! "## , ! ! % # ! ! ! ! ! . 4) $ ! ! , ! - , ! % ! ! ! .
$ * / ? @ /$ ! ! ! % - (EWS) ’ 8 " - % ! : , ! ! ! . $ ! Log On ( ! ) ! EWS. ! ! # # ( ! ’ 8 ! Email Gateway Not Responding ( # ( ! ! 8) 1) : , # SMTP.
© 2006 Hewlett-Packard Development Company, L.P. www.hp.