
Setup Guide


HP Photosmart C5200 All-in-One series
2
1
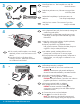
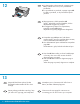
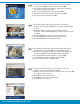
Remove all tape, tabs, and protective fi lm from the lid
and from the front and back of the device.
Lift the color graphics display and remove the
protective fi lm. You can adjust the angle of the display
to a position suitable for viewing.
a.
b.
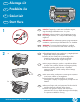
Start Here
WARNING: To ensure that the software is installed
correctly, do not connect the USB cable until step 14.
BRĪDINĀJUMS! Lai nodrošinātu pareizu programmatūras
instalēšanu, nepievienojiet USB kabeli līdz 14. darbībai.
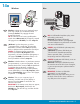
No ierīces vāka, priekšpuses un aizmugures noņemiet
visas lentes, mēlītes un aizsargplēves.
Paceliet krāsaino grafi sko displeju un noņemiet
aizsargplēvi. Displeju var pagriezt tā, lai tajā būtu ērti
skatīties.
a.
b.
Sāciet šeit
Pradėkite čia
ĮSPĖJIMAS: siekiant užtikrinti, kad programinė įranga
būtų įdiegta tinkamai, iki 14 etapo USB kabelio jungti
negalima.
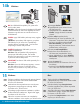
Nuo įrenginio dangčio, priekio ir užpakalinės dalies
nuimkite visas juosteles, etiketes ir apsauginę plėvelę.
Pakelkite spalvotą grafi nį ekraną ir nuplėškite
apsauginę plėvelę. Galite nustatyti ekrano kampą,
tinkamą žiūrėti.
a.
b.
Alustage siit
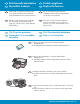
Eemaldage kaanelt ning seadme esi- ja tagaküljelt kõik
kleeplindid, kleepsud ja kaitsekile.
Tõstke värviline näidik üles ja eemaldage sellelt
kaitsekile. Saate näidiku asendit reguleerida,
et see oleks vaatamiseks mugava nurga all.
a.
b.
HOIATUS. Tagamaks, et tarkvara installitakse õigesti,
ärge ühendage USB-kaablit enne 14. juhist.
a
b
LV
LV
LV
ET
ET
ET
LT
LT
LT
EN
EN
EN