QLogic iSCSI Boot for HP FlexFabric Adapters User Guide Abstract This document is for the person who installs, administers, and troubleshoots servers and storage systems. HP assumes you are qualified in the servicing of computer equipment and trained in recognizing hazards in products with hazardous energy levels.
© Copyright 2013 Hewlett-Packard Development Company, L.P. The information contained herein is subject to change without notice. The only warranties for HP products and services are set forth in the express warranty statements accompanying such products and services. Nothing herein should be construed as constituting an additional warranty. HP shall not be liable for technical or editorial errors or omissions contained herein. Microsoft® and Windows® are U.S. registered trademarks of Microsoft Corporation.
Contents Introduction .................................................................................................................................. 4 Overview ................................................................................................................................................. 4 Installing iSCSI in Linux, ESXi, and Windows ................................................................................................
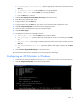
Introduction Overview This section describes the driver and agent installation, configuration, operation, and troubleshooting of the NC526 series CNA iSCSI function. Installing iSCSI in Linux, ESXi, and Windows For information about specific operating system support, see the QLogic website (http://driverdownloads.qlogic.com).
Setup Setting up QCC on a management server Set up QCC on only one management server in your network to manage all CNAs, and complete the QCC installation before installing drivers or updating firmware. Use QCC to manage CNAs instead of SANsurfer (QLogic HBA management application). Downloading and installing QCC Download and install QCC on Windows and Linux operating systems. To locate and download the QCC application: 1. Go to the HP website (http://www.hp.com/go/support). 2.
d. IP_Subnet_Mask [255.255.255.0]: Type the appropriate subnet mask, and then press the Enter key. e. IP_Gateway [0.0.0.0]: Press the Enter key to accept the default. f. Enable IPv6 [off]: Press the Enter key to accept the default. g. Press the Enter key to continue. 9. Select 3: Save changes and reset HBA (if necessary) on the options menu. 10. Enter Yes at the prompt for both ports. 11. Type p, and then press the Enter key. 12. Type p, and then press the Enter key.
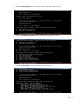
3. Select 1: CNA Configuration on the Adapter Type Configuration Selection menu. 4. Select 1: CNA iSCSI Configuration on the CNA Protocol Type Selection menu. 5. Select 3: Port IP Settings on the CNA iSCSI Configuration menu.
6. Select the converged network port you want to configure. 7. Select 2: Configure IP Settings if you need to configure IP Settings. If you have configured this using Fast!UTIL, the IP address field is already populated. 8. Complete the interactive list of settings as follows: a. Enable IPv4 [on]: Press the Enter key to accept the default. b. DHCP to obtain IPv4 Network Information: [off]: Enter ON, and then press the Enter key. Select DHCP, and then press the Enter key. c.
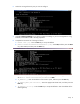
g. Press the Enter key to continue. 9. Select 3: Save changes and reset HBA (if necessary) on the options menu. 10. Enter Yes at the prompt for both ports. After you have saved the configuration, press the Enter key to continue. 11. Type p, and then press the Enter key. 12. Type p, and then press the Enter key. This returns you to the CNA iSCSI Configuration menu. 13. Select 4: Target Configuration on the CNA iSCSI Configuration menu. 14.
15. Select 6: Add a Target. 16. Complete the interactive list of settings as follows: a. IPv6 Target? [off]: Press the Enter key to accept the default. b. TGT_iSCSI_Name []: Enter the IQN of the iSCSI target to connect to, and then press the Enter key. c. TGT_Port [3260]: Press the Enter key to accept the default. d. TGT_TargetIPAddress [0.0.0.0]: Enter the IP address of the target, and then press the Enter key. 17. Select 12: Save Target/CHAP Changes on the options menu.
2. Select a server. 3. Click the Configuration tab. 4. Click Storage Adapters in the Hardware panel. 5. Select the iSCSI initiator you want to configure from the list of available storage adapters, and then click Properties. The General Properties dialog box shows the initiator status, default name, and alias. 6. Click Configure. 7. (Optional) Type a new name to change the default iSCSI name for your initiator.
5. Select an ISP82xx 10GBe iSCSI PCI Express CNA port. The system displays the information for the port in the Details pane.
6. Click Properties. 7. Click Configure. The General Properties dialog box shows the initiator status, default name, and alias.
8. (Optional) Enter an iSCSI Name and iSCSI Alias. 9. Enter a static IP address under Hardware Initiator Properties. If you configured the static IP address using the Fast!UTIL, the system displays that IP address, as well as the DHCP address. 10. Click OK.
11. Click the Dynamic Discovery tab. 12. Click Add, and then enter the IP address of the SAN portal. 13. Verify the port number, and then click OK. After the adapter connects to the SAN, the address of the SAN should appear under iSCSI Server Location.
14. Click the Static Discovery tab. This screen lists any targets assigned to the server, along with the target IP address, port, and name. 15. Click Close to close the iSCSI Initiator Properties. 16. Click Yes at the prompt to rescan the host bus adapter.
. Return to the Configuration tab, and then select the adapter you configured. 18. Verify that the system indicates the correct number of targets in Connected Targets under Details. 19. Check Devices and Paths in View under Details to verify that the targets are listed. 20. When the rescan completes, you can create the datastores on the targets.
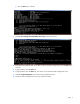
The Function Configuration utility opens. 2. Select the Type for Function 4, and then press the Enter key. 3. Select iSCSI, and then press the Enter key. 4. Select the Type for Function 5, and then press the Enter key. 5. Select iSCSI, and then press the Enter key. 6. Press the Escape key, and then select Save Changes at the prompt.
7. Select Reboot System from the Exit Setup Menu prompt when the system has finished saving the configuration. iSCSI boot setup using Fast!UTIL Fast!UTIL is the QLogic iSCSI BIOS Configuration utility used to configure iSCSI. Use Fast!UTIL to program the QLogic iSCSI adapter to boot from the SAN. You must enable iSCSI before you complete the iSCSI boot setup. See iSCSI function configuration (on page 17) for details. With iSCSI enabled, launch the QLogic NC526 Series Adapters BIOS.
• Loopback Test • Reinit Adapter • Select Host Adapter • Exit Fast!UTIL Fast!UTIL prompts you to select the adapter you want to configure. After changing the settings, exit and reboot your system to load the new Fast!UTIL parameters. Configuring Host Adapter settings 1. Press Ctrl+Q at the second CTRL+Q prompt: Press or for Fast!UTIL 2. Select the port to configure using the arrow keys on the keyboard, and then press the Enter key. 3.
4. Select Configuration Settings, and then press the Enter key. 5. Select Host Adaptor Settings, and then press the Enter key.
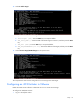
1. Select Initiator IP Settings, from the Host Adapter Settings screen, and then press the Enter key. The Initiator IP Settings menu opens.
With DHCP set to Yes, the system ignores any IPv4 or IPv6 settings. The following image shows the DHCP configuration settings. With DHCP set to No, continue with the next step to set the IPv4 and IPv6 addresses.
2. Select the IPv4 Address, and then press the Enter key. 3. Enter the IPv4 Address in the New field, and then press the Enter key. 4. Select the Subnet Mask, and then press the Enter key. 5. Enter the Subnet Mask in the New field, and then press the Enter key. 6. Select the Gateway IPv4 Address, and the press the Enter key. 7. Enter the Gateway IPv4 address in the New field, and then press the Enter key. 8. Press the Escape key to return to the Host Adapter Settings menu.
1. Select the Initiator iSCSI Name, and then press the Enter key. The Initiator iSCSI Name defaults to the name shown, including a date, the manufacturer name, the model number, and the MAC address. 2. Enter the new iSCSI name in the New: field, and then press the Enter key.
The initial CHAP name defaults to a blank space. If your site uses CHAP, set the CHAP name as follows: 1. Select the Initiator CHAP Name, and then press the Enter key. 2. Enter the Initiator CHAP name in the New: field, and then press the Enter key. Make sure that the name matches the Initiator CHAP name configured on the SAN. 3. Select Initiator CHAP secret, and then press the Enter key. 4. Enter the CHAP secret, and then press the Enter key.
5. Enter the CHAP secret again at the Confirm New Secret prompt, and then press the Enter key. 6. Select Save Changes at the Configuration Settings Modified Prompt, and then press the Enter key. This returns you to the Fast!UTIL Options screen.
7. Repeat the configuration for the other adapter port. Configuring iSCSI boot settings Obtain the SAN target iSCSI name and IP address. 1. Select the adapter, and then press the Enter key.
2. Select Configuration Settings, and then press the Enter key. 3. Select iSCSI Boot Settings, and then press the Enter key.
1. Select the Adapter Boot Mode:, and then press the Enter key. The boot mode defaults to Disable. 2. Select the appropriate boot mode, and then press the Enter key. Setting the Primary Boot Device Settings (CHAP) 1. Select Primary Boot Device Settings to configure the boot volume, and then press the Enter key.
2. If your site uses CHAP, select Security Settings to set the boot device to use CHAP. 3. Press the Enter key. CHAP defaults to Disabled, and CHAP name defaults to a blank space. 4. Select CHAP:, and then press the Enter key to change the setting from Disabled to Enabled. 5. Select CHAP Name:, and then press the Enter key to open the dialog box.
6. Enter the CHAP name into the dialog box, and then press the Enter key. Make sure that the CHAP name you enter is the same as the CHAP name configured in the SAN. 7. Select CHAP Secret:, and then press the Enter key. 8. Enter the CHAP secret, and then press the Enter key. Make sure that the CHAP secret you enter is the same as the CHAP secret configured in the SAN. 9. Enter the CHAP secret again, and then press the Enter key at the Confirm New Secret prompt. 10.
3. Select iSCSI Name:, and then press the Enter key. 4. Enter the name of the target configured on the SAN, and then press the Enter key. 5. Press the Escape key to return to the Primary Boot Device Settings screen.
1. Select Alternate Boot Device Settings to set up a second volume. 2. Press the Enter key. 3. Configure the same fields you configured for the primary boot device using the alternate boot device information.
1. Select IPv4 DHCP Boot Settings, and then press the Enter key. 2. Select Vendor ID:, and then press the Enter key. 3. Enter the vendor ID information, and then press the Enter key. 4. Select the Alternate Client ID:, and then press the Enter key. 5. Enter the alternate client information, and then press the Enter key. 6. Press the Escape key to exit the configuration screen. 7. Select Save Changes at the prompt, and then press the Enter key.
8. Repeat the procedures in this section to configure additional iSCSI boot devices. When you are finished, press the Escape key to return to the Fast!UTIL Options screen. 9. Select Exit Fast!Util, and then press the Enter key. 10. Reboot the system, and then install the operating system on the boot volume following the appropriate procedures for your operating system. Configuration options Option Description TCP/IP parameters Specific to IPv4.
Option Description CHAP Authentication Controls whether the iSCSI boot host software uses CHAP authentication when connecting to the iSCSI target. With CHAP authentication enabled, enter the CHAP ID and CHAP secret through the iSCSI Initiator Parameters Configuration screen. DHCP Vendor ID Controls how the iSCSI boot host software interprets the Vendor Class ID field used during DHCP.
iSCSI boot setup QCC CLI For information about iSCSI boot setup using QCC GUI, see "Configuring Boot Settings" in the QConvergeConsole Help System. Configuring iSCSI boot with QCC CLI For information about configuring iSCSI boot with the QCC GUI, see "Configuring Boot Settings" in the QConvergeConsole Help System. Configuring iSCSI DHCP boot options For information about configuring iSCSI DHCP boot options, see "Configuring Boot Settings" in the QConvergeConsole Help System.
Troubleshooting iSCSI diagnostics iSCSI diagnostics using QCC GUI For information about iSCSI diagnostics using QCC GUI, see QConvergeConsole Help System: Pinging an iSCSI Port Target available from the QLogic website (http://driverdownloads.qlogic.com). iSCSI diagnostics using interactive QCC CLI For information about iSCSI diagnostics using the interactive QCC CLI, see QConvergeConsole CLI User's Guide available from the QLogic website (http://driverdownloads.qlogic.com).
iSCSI troubleshooting diagram Troubleshooting 40
Support and other resources Before you contact HP Be sure to have the following information available before you call HP: • Active Health System log (HP ProLiant Gen8 or later products) Download and have available an Active Health System log for 3 days before the failure was detected. For more information, see the HP iLO 4 User Guide or HP Intelligent Provisioning User Guide on the HP website (http://www.hp.com/go/ilo/docs).
Acronyms and abbreviations CHAP Challenge Handshake Authentication Protocol CNA Converged Network Adaptor DHCP Dynamic Host Configuration Protocol HBA host bus adapter HDD hard drive IPv4 Internet Protocol version 4 IPv6 Internet Protocol version 6 IQN iSCSI qualified name iSCSI Internet Small Computer System Interface LUN logical unit number PCI peripheral component interconnect PXE preboot execution environment Acronyms and abbreviations 42
QCC QConvergeConsole RFC request for comments VLAN virtual local-area network Acronyms and abbreviations 43
Documentation feedback HP is committed to providing documentation that meets your needs. To help us improve the documentation, send any errors, suggestions, or comments to Documentation Feedback (mailto:docsfeedback@hp.com). Include the document title and part number, version number, or the URL when submitting your feedback.
Index A M agent installation 5 alternate boot device 28 application, installation 5 managing network adapters 5 B problem diagnosis 39 pxelinux.