Setup and Troubleshooting HP xw4200, xw6200, xw8200, and xw9300 Workstations Part number: 361756-002 First edition: 02/2005
Legal and notice information © Copyright 2004-2005 Hewlett-Packard Development Company, L.P. The information contained herein is subject to change without notice. Microsoft and Windows are U.S. registered trademarks of Microsoft Corporation. Linux is a registered trademark of Linus Tolvalds. Intel is a trademark of Intel Corporation in the U.S. and other countries. Adobe, Acrobat, and Acrobat Reader are trademarks or registered trademarks of Adobe Systems Incorporated.
1 Locating HP Resources Using the Documentation and Diagnostics CD . . . . . . . . . . . . . . . . . . . . . . . . . . . . . . . . . . . . . . . . . . . . 8 2 Hardware Setup Quick Setup . . . . . . . . . . . . . . . . . . . . . . . . . . . . . Front Panel Components . . . . . . . . . . . . . . . . . . . . Rear Panel Components. . . . . . . . . . . . . . . . . . . . . Keyboard . . . . . . . . . . . . . . . . . . . . . . . . . . . . . . Special Mouse Functions . . . . . . . . . . . . . . . . . . . .
Contents
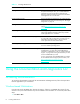
Locating HP Resources Table 1-1 Locating HP Resources What Do You Need Help With? Where to Find It? Locating additional information. For online access to technical support information and tools, visit www.hp.com/support. Support resources include web-based troubleshooting tools, technical knowledge databases, driver and patch downloads, online communities, and proactive notification services.
Table 1-1 Locating HP Resources What Do You Need Help With? Where to Find It? Locating information about the system board. The inside of the access panel contains an illustration of the system board layout. Also, you can find additional information by reviewing the Service and Technical Reference Guide that can be found on the Documentation and Diagnostics CD or on the Web. Locating diagnostics tools. The Documentation and Diagnostics CD contains the HP Insight Diagnostics utility.
2. Type: X:\index.htm (where X is the drive letter designator for the CD-ROM drive) 3. Click OK. Linux-based Workstations If the workstation is running a Linux operating system, browse the CD and click on the index.htm file to launch the CD interface. To view the documents on the CD, download and install Adobe® Acrobat® Reader for Linux from www.adobe.com. To use the HP Insight Diagnostics utility, insert the Documentation and Diagnostics CD into your system and reboot.
Locating HP Resources
2 Hardware Setup Quick Setup Figure 2-1 Cable Connections NOTE: Connect other components, such as a printer, according to the instructions included with the device.For more information on your workstation, refer to the Documentation and Diagnostics CD or visit www.hp.com/go/workstationsupport. Quick Setup 11 Hardware Setup After unpacking your workstation, locate an accessible workspace to set up the workstation and connect the mouse, keyboard, monitor(s), and power cables to your workstation.
Ventilation Proper ventilation for your system is very important. Refer to the following notes and illustrations to properly position your system for maximum airflow • Place the computer in an area that is relatively cool with adequate ventilation. • Operate the computer on a sturdy, level surface. Leave a 10.2-cm (4-inch) clearance on all vented sides of the computer and above the monitor to permit the required airflow. • Never restrict the airflow into the computer by blocking any vents or air intakes.
Front Panel Components xw4200 Front Panel Components 1 7 2 3 8 9 4 5 10 11 6 12 13 14 Table 2-2 Hardware Setup Figure 2-3 xw4200 Front Panel Components xw4200 Front Panel Components Item Description Item Description 1 Optical Drive* 8 Power On Light 2 Optical Drive Activity Lights 9 Power Button 3 5.
xw6200 Front Panel Components 1 2 3 5 6 4 7 8 9 10 11 12 Figure 2-4 xw6200 Front Panel Components Table 2-3 xw6200 Front Panel Components Item Description Item Description 1 Optical Drive* 7 Power Button 2 Optical Drive Activity Lights 8 Hard Drive Activity Light 3 5.
xw8200 and xw9300 Front Panel Components 1 2 3 4 5 6 7 8 9 10 11 Figure 2-5 xw8200 and xw9300 Front Panel Components xw8200 and xw9300 Front Panel Components Item Description Item Description 1 Optical Drive* 7 Hard Drive Activity Light 2 Optical Drive Activity Lights 8 USB Ports (2) 3 5.
Rear Panel Components xw4200 Rear Panel Components 1 8 2 3 9 10 4 11 5 6 12 13 7 14 Figure 2-6 xw4200 Rear Panel Components Table 2-5 xw4200 Rear Panel Components Item Description Item Description 1 Power Cord Connector 8 Universal Chassis Clamp Opening 2 Keyboard Connector (purple) 9 Mouse Connector (green) 3 Serial Connector (teal) 10 Parallel Connector (burgundy) 4 USB Ports (6) 11 Audio Line-In Connector (light blue) 5 Microphone Connector (pink) 12 RJ-45 Network Conne
xw6200 Rear Panel Components 6 7 8 9 10 1 11 2 3 12 13 4 5 14 15 Figure 2-7 xw6200 Rear Panel Components xw6200 Rear Panel Components Item Description Item Description 1 Keyboard Connector (purple) 9 Mouse Connector (green) 2 Serial Connector (teal) 10 Parallel Connector (burgundy 3 USB Ports (6) 11 RJ-45 Network Connector 4 Microphone Connector (pink) 12 Audio Line-In Connector (light blue) 5 Audio Line-Out Connector (lime) 13 Graphics Adapter (blue) 6 Power Cord Connector
xw8200 Rear Panel Components 8 1 9 10 11 12 13 2 3 4 5 14 15 6 16 7 Figure 2-8 xw8200 Rear Panel Components Table 2-7 xw8200 Rear Panel Components Item Description Item Description 1 Power Cord Connector 9 Access Panel Key 2 Keyboard Connector 10 Padlock Loop 3 Serial Connector (teal) 11 Cable Lock Slot 4 USB Ports (6) 12 Mouse Connector (green) 5 IEEE 1394 Connector 13 Parallel Connector (burgundy) 6 Microphone Connector (pink) 14 RJ-45 Network Connector 7 Audio Line-O
xw9300 Rear Panel Components 8 1 9 10 11 2 3 4 12 13 5 14 6 15 7 Figure 2-9 xw9300 Rear Panel Components xw9300 Rear Panel Components Item Description Item Description 1 Power Cord Connector 9 Access Panel Key 2 Serial Connector (teal) 10 Padlock Loop 3 Keyboard Connector 11 Cable Lock Slot 4 USB Ports (4) 12 Mouse Connector (green) 5 IEEE 1394 Connector 13 RJ-45 Network Connector 6 Microphone Connector (pink) 14 Audio Line-In Connector (light blue) 7 Audio Line-Out Co
Keyboard 1 8 7 6 8 2 3 5 4 Figure 2-10 Standard Keyboard Table 2-9 Item Standard Keyboard Key Descriptions Component Description 1 Function Keys Perform special functions, depending on the software application being used. 2 Editing Keys Includes Insert, Home, Page Up, Delete, End, and Page Down. 3 Status Lights Indicate the status of the workstation and keyboard settings (Num Lock, Caps Lock, and Scroll Lock). 4 Numeric Keys Used like a calculator keypad.
Using the Windows Logo Key Use the Windows Logo key in combination with other keys to perform certain functions available in the Windows operating system. The Windows logo key does not function on Linux systems.
Serial Number and COA Label Location Figure 2-11 Each workstation has two unique serial number labels 1 and a certificate of authentication (COA) label 2 (for Windows-preinstalled systems only). In general, the serial number labels can be found on the top panel or on the side of the unit and at the rear of the unit. Keep this number available for use when contacting customer service for assistance. The COA label is generally located on the top panel or access panel near the serial number label.
3 Software Setup CAUTION: Do not add optional hardware or third-party devices to the workstation until the operating system is successfully installed. Doing so may cause errors and prevent the operating system from installing correctly. Installing and Customizing Windows XP Workstations If your unit is a Windows–preinstalled workstation, follow the instructions in this section to setup up your OS and software.
Restoring the Software Restore the original operating system and factory-installed software by using the Restore Plus! CD and the OS CD(s) that came with the workstation. Carefully read and follow the instructions provided with the Restore Plus! CD. NOTE: If you are restoring on a 64-bit operating system, you will be prompted for the second restore CD.
NOTE: For more information on Energy Star, refer to the Service and Technical Reference Guide web link located on the Documentation and Diagnostics CD (www.hp.com/support/workstation_manuals). Accessibility HP is committed to designing products, services, and programs with improved usability and accessibility for all customers. HP products with Microsoft Windows XP preinstalled are designed for accessibility, and these products are tested with industry-leading Assistive Technology products.
Starting up the Linux Operating System The first time the workstation is booted, the Red Hat First Boot utility displays. This program allows you to enter your password, network, graphics, time, and keyboard settings for your workstation. CAUTION: Once the automatic installation has begun, DO NOT TURN OFF THE WORKSTATION UNTIL THE PROCESS IS COMPLETE. Turning off the workstation during the installation process may damage the software that runs the workstation or prevent its proper installation.
5. Reboot the workstation. 6. Follow the prompts to set up your system with the Red Hat First Boot utility. 7. When prompted in First Boot to add additional CDs, insert the HP Driver CD into the CD-ROM tray of the workstation. 8. Click Install next to “Additional CDs.” The HP Driver CD window opens. 9. Click Press to begin install... 10.When the install is done, you will have two options, “Reboot now...” on the left-side and “Press to continue, reboot later...” on the right-side. 11.Click Reboot now...
Upgrading Device Drivers If you need to upgrade a Linux device driver, visit the HP website at: www.hp.com/go/workstationsupport After First-Boot After successfully booting your system for the first time, HP recommends you do the following: • Verify you have the latest system BIOS loaded by visiting http://welcome.hp.com/country/us/en/ support.html. See Upgrading the BIOS later in this chapter for more details. • Verify you have the latest drivers for your system by visiting http://welcome.hp.
Turning off the Workstation To properly turn off the workstation, first shut down the operating system software. CAUTION: Manually forcing the workstation off can cause loss of data. To manually turn off power to the workstation, press and hold the power button for four seconds. However, manually turning off the power bypasses the standby state and can result in loss of data. To reconfigure the power button to work in On/Off mode, run Computer Setup (F10).
Subscribing to Software Support You can also obtain the latest support software through a subscription to the Support Software CD Kit using the Support Software Management order form available at the following website: http://h18007.www1.hp.com/support/files/workstations/us/purchase.
4 Troubleshooting Self Troubleshooting This section provides some self-help tools and troubleshooting tables that you can use to troubleshoot your system. HP Insight Diagnostics HP Insight Diagnostics is an offline diagnostic utility that allows you to perform system testing. With this utility, you can test your system hardware and view the hardware configuration information for your system.
High Performance Tuning Framework HP Performance Tuning Framework enables optimal configuration of HP Personal Workstations delivering stability and best performance. HP Performance Tuning Framework will guide your system setup allowing a “custom” configuration that best matches the workstation to user requirements. This customization ensures availability of the latest graphics cards and drivers and removes some memory restraints.
Customer Advisories Customer advisories provide clients important information about their system. To search for applicable customer advisories for your system, visit www.hp.com and use the search tool. To maximize your search efforts, use the “+” symbol to locate valid words. For example, to search for customer advisories for the xw8200, enter “+xw6000 +customer +advisory” and hit Enter. You can also use the “-” (minus) symbol to exclude certain words.
• Be sure that all the needed device drivers have been installed. For example, if you have connected a printer, you need to install a printer driver. • If you are working on a network, plug another workstation with a different cable into the network connection. There may be a problem with the network plug or cable. • If you recently added new hardware, remove the hardware and see if the workstation functions properly.
Table 4-11 Troubleshooting General Problems Problem Cause Solution First, reset the date and time using Computer Setup (F10). If the problem persists, replace the RTC battery. See NOTE: Connecting the workstation to the Service and Technical Reference a live AC outlet prolongs the life of the Guide for instructions on installing a new battery, or contact an authorized RTC battery. dealer or reseller for RTC battery replacement.
Table 4-11 Troubleshooting General Problems Problem Cause Workstation powered off automatically and the Power LED blinks Red two times, once every second, followed by a two second pause. (On the xw4200 and xw9300, two audible beeps will also be emitted.) Processor thermal protection activated: Solution 1. Ensure that the workstation air vents are not blocked and the cooling fan is running. A fan may be blocked or not turning. 2. Open hood, press power button, OR and see if the processor fan spins.
Hardware Installation Problems You may need to reconfigure the workstation when you add or remove hardware, such as an additional diskette drive. If you install a plug and play device, some operating systems automatically recognize the device and configure the workstation. If you install a non–plug and play device, you must reconfigure the workstation after installing the new hardware.
Diagnostic Lights and Audible (Beep) Codes This section covers the front panel light (LED) error and operation codes as well as the audible codes that may occur before or during the Power-On Self-Test (POST). Table 4-13 Diagnostic Lights and Audible Codes Activity Beeps Possible Cause Recommended Action Green Power LED On. None Workstation on. None Green Power LED blinks every None two seconds.** Workstation in Suspend to RAM None mode (select models only) or normal Suspend mode.
Table 4-13 Diagnostic Lights and Audible Codes Activity Beeps Possible Cause Recommended Action NOTE: For the following LED activity and beeps, the beeps will be heard through the on–board speaker and not the chassis speaker. Blinks and beeps will be repeated for 5 cycles, after that, only the blinks will continue to repeat. Red Power LED blinks four times once every second, followed by a two-second pause.(only on xw4200 and xw9300) 4 Power failure (power supply is overloaded) 1.
Table 4-13 Diagnostic Lights and Audible Codes Activity Beeps Possible Cause Recommended Action NOTE: For the following LED activity and beeps, the beeps will be heard through the on–board speaker and not the chassis speaker. Blinks and beeps will be repeated for 5 cycles, after that, only the blinks will continue to repeat. Red Power LED blinks eight times, once every second, followed by a two-second pause. 8 Invalid ROM based on bad checksum. 1. Reflash the ROM using a ROMPaq diskette.
Calling Technical Support At times you may encounter an issue that requires technical support. If after using the self-troubleshooting tools you still cannot resolve your issue, note the following to help you locate the necessary information that will assist technical support in resolving the situation. • Be in front of your workstation when you call.
34 Troubleshooting
Features and Accessories A A Features and Accessories Security Features The following security features are available for your workstation. • solenoid hood lock—this is an optional software-controllable cover lock, controlled by the setup password, that prevents unauthorized access to the internal components. NOTE: This feature is not available on the xw8200 or xw9300. • cable lock provision—your workstation is equipped with a cable lock slot for an optional cable lock.
Accessories The HP xw series workstations can be enhanced with several HP accessories. Some of these options include: • graphics cards • memory • diskette drives • optical drives • hard drives • processors • audio cards Visit www.hp.com/workstations/pws/options for more information on available workstation options. HP also tests certain options that are available from supported third-party suppliers.
Index I access panel key 17, 18, 19 accessibility 25 accessories 44 audible codes 38 IEEE-1394 connector location 13, 14, 15, 18, 19 C cable lock description 43 slot location 16, 17, 18, 19 CD-ROM drive See optical drive COA label location 22 K keyboard connecting 11 connector location 16, 17, 18, 19 L device drivers Linux 26, 27, 28 Windows 24 diagnostic lights 38 diskette drive activity light 13 eject button 13 location 13, 14 DVD-ROM drive See optical drive line-in connector location 16, 17, 18, 1
U universal chassis clamp description 43 opening location 16, 17, 18, 19 USB ports front panel location 13, 14, 15 rear panel location 16, 17, 18, 19 W Windows operating system additional information 23 language selection 23 preinstalled 23 restoring 24 46 Index