Pointing Devices and Keyboard Document Part Number: 396854-001 March 2006 This guide explains the pointing devices and keyboard.
Contents 1 Pointing devices and fingerprint reader Identifying pointing devices and fingerprint reader. . . . . Using the fingerprint reader (select models only) . . . . . . Set up the fingerprint reader . . . . . . . . . . . . . . . . . . . Use your registered fingerprint to log on to Windows . . . . . . . . . . . . . . . . . . . . . . . . . . . . . . . . Using the TouchPad . . . . . . . . . . . . . . . . . . . . . . . . . . . . . Using the pointing stick controls (select models only) . .
Contents Setting tiling preferences . . . . . . . . . . . . . . . . . . . . . Setting Zoom preferences . . . . . . . . . . . . . . . . . . . . Setting the ambient light sensor. . . . . . . . . . . . . . . . Setting other preferences . . . . . . . . . . . . . . . . . . . . .
1 Pointing devices and fingerprint reader The following sections provide information on the fingerprint reader and the pointing device features of the computer, which vary by model. computer may look slightly different from the ✎ Your illustrations in this section.
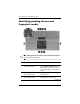
Pointing devices and fingerprint reader Identifying pointing devices and fingerprint reader pointing stick (select models only) and TouchPad controls ✎ The can be used interchangeably. Component Description 1 Fingerprint reader Allows a fingerprint logon to Microsoft® Windows® instead of a password logon. On select models, a center button replaces the fingerprint reader.
Pointing devices and fingerprint reader Component Description 4 Center pointing stick button Functions like the center button on an external mouse. (select models only) 5 Right pointing stick button (select models only) Functions like the right button on an external mouse. 6 TouchPad scroll zone* Scrolls up or down. 7 Right TouchPad button Functions like the right button on an external mouse. 8 Center TouchPad button Functions like the center button on an external mouse.
Pointing devices and fingerprint reader Using the fingerprint reader (select models only) The fingerprint reader allows you to log on to Microsoft Windows using a registered fingerprint in ProtectTools Security Manager instead of using a Windows password. Two steps are required for your first logon to Windows using the fingerprint reader: 1. Set up the fingerprint reader. 2. Use your registered fingerprint to log on to Windows. Set up the fingerprint reader To set up the fingerprint reader: 1.
Pointing devices and fingerprint reader 5. On the “My Services and Applications” page, click Register Fingerprints. default, Credential Manager requires registration of ✎ By at least 2 different fingers. 6. When the Credential Manager Registration Wizard opens, slowly swipe your finger downward over the fingerprint reader. right index finger is the default finger for enrolling the ✎ The first fingerprint.
Pointing devices and fingerprint reader 8. Click a different finger on the screen to register, and then repeat steps 6 and 7. must register at least 2 fingers in order to complete the Ä You setup. you click Finish before registering at least 2 fingers, an ✎ Iferror message is displayed. Click OK to continue. 9. After you have registered at least 2 fingers, click Finish, and then click OK. 10.
Pointing devices and fingerprint reader Using the TouchPad To move the pointer, slide your finger across the TouchPad surface in the direction you want the pointer to go. Use the TouchPad buttons as you would the corresponding buttons on an external mouse. To scroll up and down using the TouchPad vertical scroll zone, slide your finger up and down over the lines. using the TouchPad to move the pointer, you must ✎ Ifliftyouyourarefinger off the TouchPad before moving it to the scroll zone.
Pointing devices and fingerprint reader Setting TouchPad preferences Mouse Properties in Microsoft® Windows® allows you to customize pointing device settings, including: ■ TouchPad tapping, which enables you to tap the TouchPad once to select an object or twice to double-click an object (enabled by default). ■ Edge motion, which enables you to continue to scroll even though your finger has reached the edge of the TouchPad (disabled by default).
2 Keyboard The following sections provide information on the keyboard features of the computer. Hotkeys Hotkeys are preset combinations of the fn key 1 and either the esc key 2, or one of the function keys 3. The icons on the f3, f4, and f8 through f11 keys represent the hotkey functions. Hotkey functions and procedures are discussed in the following sections. computer may look slightly different from the ✎ Your illustrations in this section.
Keyboard Hotkey quick reference 2–2 To perform this function Press Initiate standby fn+f3 Resume from standby Power button Alternate between computer display and external display fn+f4 View/clear battery information fn+f8 Decrease screen brightness fn+f9 Increase screen brightness fn+f10 Turn on and off ambient light sensor fn+f11 Display system information fn+esc Clear system information fn+esc or press OK Pointing Devices and Keyboard
Keyboard Hotkey procedures To use a hotkey command on the computer keyboard, either ■ Briefly press the fn key, and then briefly press the second key of the hotkey command. – or – ■ Press and hold down the fn key, briefly press the second key of the hotkey command, and then release both keys at the same time. Initiate standby (fn+f3) Press fn+f3 to initiate standby. When standby is initiated, your work is stored in random access memory (RAM), the screen is cleared, and power is conserved.
Keyboard Switch the screen image (fn+f4) Press fn+f4 to switch the screen image among display devices connected to the system. For example, if a monitor is connected to the computer, each time you press fn+f4, the image switches among the computer display, the monitor display, and a simultaneous display on both the computer and the monitor. Most external monitors receive video information from the computer using the external VGA video standard.
Keyboard View battery pack charge information (fn+f8) Press fn+f8 to display charge information for all installed battery packs. The display indicates which battery packs are charging and reports the amount of charge remaining in each battery pack. Battery pack locations are indicated by number: ■ Location 1 is the primary battery pack. ■ Location 2 is the optional accessory battery pack. Decrease screen brightness (fn+f9) Press fn+f9 to decrease screen brightness.
Keyboard Display and clear system information (fn+esc) The fn+esc hotkey displays information about system hardware components and the system BIOS version numbers In the Windows fn+esc display, the version of the system BIOS (basic input-output system) is displayed as the BIOS date. On some computer models, the BIOS date is displayed in decimal format. The BIOS date is sometimes called the system ROM version number. To clear the fn+esc display, press esc, or press enter.
Keyboard Component Description 1 Info Center button Launches Info Center, which enables you to open various software solutions. You can also reprogram this button to perform one of the following actions: ■ Open a program, folder, file, or Web site. ■ Open Presentation feature or the Q Menu. ■ Open an e-mail editor. ■ Open a search box that allows you to search for a Web site. For more information, refer to “Setting button preferences” and “Info Center button.
Keyboard 2–8 Component Description 2 Presentation button Starts the Presentation feature. This feature opens a program, folder, file, or Web site, and simultaneously displays it on both the computer screen and on an external device. Refer to “Presentation button” for more information. The presentation button can be reprogrammed to perform one of the following actions: ■ Open the Q Menu or Info Center. ■ Open an e-mail editor. ■ Open a search box that allows you to search for a Web site.
Keyboard Presentation button When you press the presentation button the first time, the Presentation Settings dialog box opens. In this dialog box, you can set the button to perform any of the following actions: ■ Open a program, folder, file, or Web site that you specify. ■ Choose a power scheme. ■ Choose a display setting.
Keyboard The image simultaneously displays on the computer screen and on an external device connected to one of the following: ■ The external monitor port ■ The S-Video-out jack on the rear panel ■ Ports and jacks on an optional docking device If you choose not to use the presentation button default settings, you can reprogram the button to perform one of the following actions: 2–10 ■ Open the Q Menu or the Info Center. ■ Open an e-mail editor.
Keyboard Info Center button When you press the Info Center button the first time, the Info Center opens, enabling you to open preset software solutions. If you choose not to use this default setting for the Info Center button, you can reprogram the button to perform one of the following actions: ■ Open the Q Menu or start the presentation feature. ■ Open an e-mail editor. ■ Open a search box that allows you to search for a Web site.
Keyboard HP Quick Launch Buttons control panel of the preferences listed in the HP Quick Launch Buttons ✎ Some control panel may not be supported by your computer. You can use the HP Quick Launch Buttons control panel to ■ Program the presentation button and the Info Center button, and change the settings for each button. ■ Add, modify, and remove items on the Q Menu. ■ Set preferences for tiling windows on the Windows desktop. ■ Adjust operating system and program font and icon settings.
Keyboard Opening the HP Quick Launch Buttons control panel You can open the HP Quick Launch Buttons control panel in any of the following ways: ■ Select Start > Control Panel > Printers and Other Hardware > HP Quick Launch Buttons. ■ Double-click the HP Quick Launch Buttons icon in the notification area, at the far right of the taskbar. ■ Right-click the HP Quick Launch Buttons icon, and select Adjust HP Quick Launch Buttons Properties. Setting button preferences 5.
Keyboard ❏ To open a program, folder, file, or Web site when the button is pressed: a. Click the down arrow next to the button you want to set, and click Presentation. b. Click the Configure button. c. In the box under Program to Start, type the name of the program, folder, or file, or the URL of the Web site. – or – Click Browse to search for available programs, folders, files, or Web sites, and then click to select one. d.
Keyboard e. To select a display setting for the presentation feature, click Internal Only, Dual Display, or Extended Desktop. default the Internal Only display setting is selected. ✎ By When you choose the Extended Desktop setting, you can select the option that allows the computer to determine optimal resolution. Click the Allow system to determine optimum resolution check box, and then click Apply.
Keyboard Displaying the Q Menu The Q Menu provides quick access to many of the system tasks accessed with the buttons, keys, or hotkeys found on most computers. To display the Q Menu on the desktop: » Right-click the HP Quick Launch Buttons icon and select Launch Q Menu. Setting Q Menu preferences The Q Menu can display up to 40 items. Several system-defined items are displayed by default. You can choose to display these items or choose not to display them.
Keyboard Removing a Q Menu item To remove an item from the Q Menu: 1. In the HP Quick Launch Buttons control panel, click the Q Menu tab. 2. On the Items to display on Q Menu list, clear the check box for each item you want to remove. 3. To save your preferences and close the control panel, click OK. Adding a listed item to the Q Menu To add an item from the Items to display on Q Menu list to the Q Menu: 1. In the HP Quick Launch Buttons control panel, click the Q Menu tab. 2.
Keyboard Adding a user-defined item to the Q Menu To add an item to both the Items to display on Q Menu list and to the Q Menu when it is not on the Items to display on Q Menu list—for example, an item on a drive, network, or the Internet: 1. In the HP Quick Launch Buttons control panel, click the Q Menu tab. 2. Click Add. 3.
Keyboard Changing a user-defined item User-defined items can be changed, but system-defined items cannot be changed. If you select a system-defined item on the Items to display on Q Menu list, the Modify button is unavailable. To change the display name and/or file name of a user-defined item: 1. In the HP Quick Launch Buttons control panel, click the Q Menu tab. 2. Click the item on the Items to display on Q Menu list. 3. Click Modify.
Keyboard Repositioning a Q Menu item To change the location of an item on the Q Menu: 1. In the HP Quick Launch Buttons control panel, click the Q Menu tab. 2. Select the item on the Items to display on Q Menu list. Then ❏ To move the item up in the list, click the Move Up button. ❏ To move the item down in the list, click the Move Down button. 3. To save your preferences and close the control panel, click OK.
Keyboard Setting tiling preferences To set tiling preferences on the Windows desktop: 1. In the HP Quick Launch Buttons control panel, click the Quick Tile tab. 2. Click Vertical Tile or Horizontal Tile, and then click the programs you want to be tiled in the Applications currently running box. 3. To save your preferences and close the control panel, click OK. Setting Zoom preferences To change operating system and program font and icon settings: 1.
Keyboard Setting the ambient light sensor The computer features a built-in light sensor that automatically adjusts the display brightness based on the lighting conditions in your environment. You can turn the ambient light sensor on and off in 3 ways: ■ By pressing the fn+f11 hotkey. ■ Through the Quick Launch Buttons software. ■ Using the Quick Launch Buttons software icon in the notification area.
Keyboard Setting other preferences You can set other preferences from the HP Quick Launch Buttons Preferences tab. of the preferences listed on the Preferences tab may not ✎ Some be supported by your computer. To set a preference: 1. In the HP Quick Launch Buttons control panel, click the Preferences tab. 2. To display or enable a preference, click the check box next to the item. – or – To clear or disable a preference, clear the check box next to the item. 3.
Index A H alternating displays 2–4 ambient light sensor 2–2 hotkey commands alternate displays 2–4 battery charge information 2–5 decrease display brightness 2–5 display system information 2–6 increase display brightness 2–5 initiate standby 2–1, 2–3 hotkeys identifying 2–1 Quick Reference 2–1 B battery charge, displaying information 2–5 biometric readers 1–4 buttons Center pointing stick 1–3 Center TouchPad 1–3 Info Center 2–7 presentation 2–8, 2–9, 2–11 Quick Launch 2–6, 2–12 TouchPad 1–3 C Calculato
Index presentation button 2–8, 2–9, 2–11 presentation feature preferences, setting 2–13 Presentation mode preferences, setting 2–13 Q Quick Launch buttons 2–6, 2–12 S scrolling zone, TouchPad 1–3 system information, displaying 2–6 T tiling, setting preferences 2–21 TouchPad described 1–3 setting preferences 1–8 Index–2 Pointing Devices and Keyboard
© Copyright 2006 Hewlett-Packard Development Company, L.P. Microsoft and Windows are U.S. registered trademarks of Microsoft Corporation. The information contained herein is subject to change without notice. The only warranties for HP products and services are set forth in the express warranty statements accompanying such products and services. Nothing herein should be construed as constituting an additional warranty. HP shall not be liable for technical or editorial errors or omissions contained herein.