
dc7600 Series Personal Computer Service Reference Guide (2nd Edition)


Service Reference Guide, dc7600 390742-002 8–19
Removal and Replacement Procedures - Ultra-Slim Desktop (USDT) Chassis
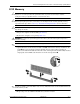
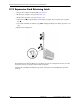
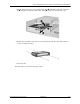
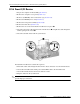
7. Pull the drive release lever away from the hard drive 1, then lift the cable-end of the drive
up 2 and pull it towards the center of the chassis 3 to remove it from the drive cage.
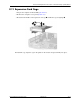
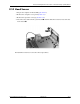
8. Remove the four guide screws (two on each side) from the old drive. You will need these
screws to install a new drive.
9. Store the removed drive in anti-static packaging.
To install a drive, reverse the removal procedure.