
Technical data


Managing nPartitions
Assigning (Adding) Cells to an nPartition
HP System Partitions Guide: Administration for nPartitions, rev 5.1
271
You can optionally specify the parmodify command’s -B option to require
that the modified nPartition be rebooted.
• When you specify -B to modify an inactive nPartition, the inactive
nPartition completes partition rendezvous and becomes active if
possible.
• When you specify -B to modify an active nPartition, you must
perform a reboot for reconfig of the nPartition before any other cell
assignment changes can be made within the server complex.
The parmodify -p1 -a0:base:y:ri -a2:base:y:ri command adds
cell 0 and cell 2 to partition number 1. This command also sets a “y”
use-on-next-boot value for both cells, meaning that they will be active
members of the nPartition following the next time all cells boot (for
example, when reboot for reconfig is performed on the nPartition.
Because this example command does not include the -B option, if
partition 1 were an inactive nPartition, it would remain inactive; if
partition 1 were an active nPartition the new cells would be assigned, but
they would remain inactive cells until a reboot for reconfig is performed.
See the parmodify (1M) manpage for details on all options.
Step 4. As needed, perform a reboot for reconfig (shutdown -R) on the modified
nPartition.
See the Reboot for Reconfig Guidelines for Adding Cells on page 269 for
details on when to perform a reboot for reconfig.
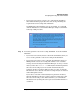
Adding Cells to an nPartition [Partition Manager]
This procedure (the Partition —> Modify Partition menu, Add/Remove Cells
tab) adds cells to an nPartition from Partition Manager.
Step 1. Run Partition Manager (/opt/parmgr/bin/parmgr) or access it from
SAM or a Web browser.
Step 2. In the Partition Manager primary window, select the nPartition to which
you want to add cells, then select the Partition —> Modify Partition menu
item.
Step 3. In the Modify Partition window, click the Add/Remove Cells tab.