
Hardware Reference Guide - dc7700 CMT


Table Of Contents
- Product Features
- Hardware Upgrades
- Serviceability Features
- Warnings and Cautions
- Unlocking the Smart Cover Lock
- Removing the Computer Access Panel
- Replacing the Computer Access Panel
- Removing the Front Bezel
- Replacing the Front Bezel
- Removing Bezel Blanks
- Installing Additional Memory
- Removing or Installing an Expansion Card
- Drive Positions
- Removing a Drive from a Drive Bay
- Installing Additional Drives
- Changing from a Minitower to a Desktop Configuration
- Changing from a Desktop to a MinitowerConfiguration
- Specifications
- Battery Replacement
- External Security Devices
- Electrostatic Discharge
- Computer Operating Guidelines, Routine Care and Shipping Preparation
- Index
Drive Positions
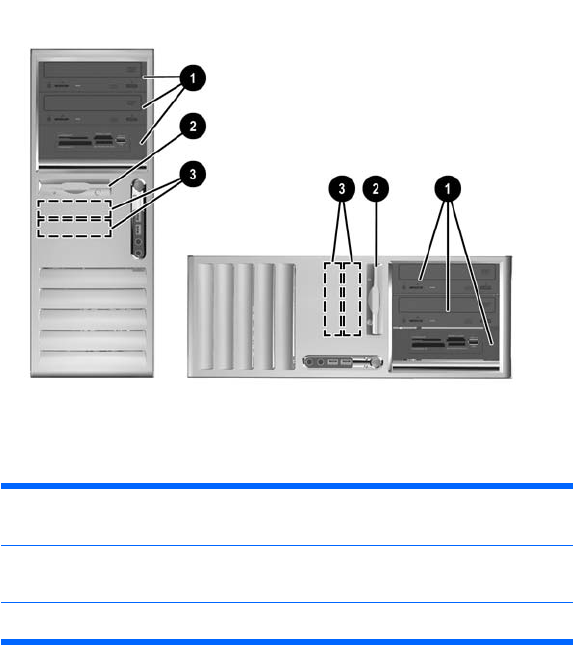
Figure 2-15 Desktop and Minitower Drive Positions
1 Three 5.25-inch external drive bays for optional drives (optical drives and
media card reader shown)
1
2 One 3.5-inch external drive bay for optional drives (diskette drive
shown)
2
3 Two 3.5-inch internal hard drive bays
1
An optional hard drive mounting bracket for these drive bays is available from
HP.
2
Depending on the computer configuration, you may have a bezel blank in this
position. If you do not have a drive in this slot, you may choose to install a 3.5-
inch drive (such as a diskette drive, hard drive, or media card reader) later on.
To verify the type and size of the storage devices installed in the computer, run Computer Setup. Refer
to the Computer Setup (F10) Utility Guide on the Documentation and Diagnostics CD for more
information.
26 Chapter 2 Hardware Upgrades ENWW