
User's Manual
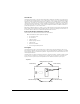
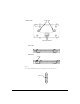
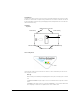
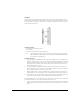

Table Of Contents

8
Wall Mount
Wall mounting consists of hanging the ProCurve Radio Port 220 along its width or length using the pair of wide-
shoulder mounting screws provided, and mounting slots on the bottom of the unit. The ProCurve Radio Port 220 can
be mounted onto any wood, plaster, or cement wall surface using the provided wall anchors when necessary. The
illustration shows a vertical mount.
Wall Mount Hardware
• Two Phillips pan head self-tapping screws
• Two wall anchors
• Safety wire (recommended) and security cable (optional)
Note: In the event that the original mounting screws are lost, the following screws can be used instead:
ANSI Standard) #6-18 X 0.875in. Type A or AB Self-Tapping Screw, or (ANSI Standard Metric) M3.5 X
0.6 X 20mm Type D Self-Tapping Screw
Wall Mount Procedure
1. If the antennas being used with the Radio Port 220 require special mounting provisions or mounting locations,
mount these antennas in their desired locations first, using the appropriate mounting hardware provided with
the antenna. Antenna mounting position is the most critical element of Radio Port installation. If necessary,
the mounting location of the Radio Port 220 should be adjusted to ensure that the antenna leads from the
antenna mounting location can reach it.
2. For a horizontal Radio Port installation, lightly mark a horizontal line on the wall at the location where the
midline of the Radio Port is to be located. For a vertical installation, lightly mark a vertical line on the wall at
the location where the midline of the Radio Port is to be located.
3. Using the alignment arrows on one edge of the Radio Port case as guides, place the edge of the Radio Port
along the midline from step 1. and mark the two points on the midline for the location of the mounting screws.
4. At each of the two points, drill a hole in the wall, insert an anchor (if required), screw the wall mounting screw
into the anchor and stop when there is 1mm remaining between the screw head and the wall.
Note: When pre-drilling holes, the recommended hole size is 3mm (0.125 or 1/8 in.) if the screws are going directly
into the wall and 6mm (0.25 or 1/4 in.) if the provided wall anchors are being used.
5. If required, loop a safety wire, between 1.5mm (.06in.) and 2.5mm (.10in.) in diameter, around the safety wire
tie post on the Radio Port and secure the loop. Attach the opposite end of the safety wire to a secure point on
the wall.