
User's Manual
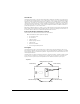
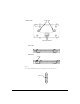
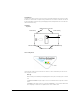
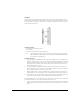

Table Of Contents

9
6. If required, install and attach a security cable to the Radio Port's lock port. The lock port, compatible with
laptop-style security cables, is on the side of the case. Attach the opposite end of the security cable to a secure,
stationary point.
7. Attach the appropriate antennas to the Radio Port's antenna connectors. Pay close attention to ensure that the
appropriate antenna for each frequency band is attached to the appropriate antenna connector for that
frequency band on the Radio Port. For single (non-diversity) antennas, attach the antenna to the Radio Port
connector marked as Primary for that frequency band.
8. Plug the Ethernet cable into the Radio Port's RJ-45 port and connect the opposite end of the cable to a switch
with an 802.3af-compatible power source.
9. Place the large corner of each of the case's mounting slots over the mounting screw heads.
10. Slide the case down along the mounting surface to hang the Radio Port mounting slots on the mounting screw
heads.
11. Verify the unit has power by observing that the LEDs are lit or flashing.
Suspended Ceiling Tile (Plenum) Mount
Mounting the Radio Port 220 above a suspended ceiling (in the plenum) consists of placing the ProCurve Radio Port
220 above a suspended ceiling and making the appropriate safety wire, antenna, and Ethernet connections. If
desired, the light pipe extender provided with the Radio Port can be used to make the Radio Port's location and status
visible from below the suspended ceiling. The procedure below outlines the installation using the light pipe extender
WARNING: Do not mount the ProCurve Radio Port 220 directly to any suspended ceiling tile with a thickness less than
12.7mm (0.5in.) or a suspended ceiling tile with an unsupported span greater than 660mm (26in.).
WARNING: The Radio Port 220 case is equipped with a safety wire tie point. To prevent accidental damage or injury,
HP strongly recommends that installers secure the ProCurve Radio Port 220 with a safety wire suitable for the specific
installation. The safety wire should be a standard ceiling suspension cable or equivalent steel wire between 1.59mm
(.062in.) and 2.5mm (.10in.) in diameter.
Ceiling Mount Hardware
• Light pipe extender
• Badge for light pipe extender
• Label for light pipe badge
• Safety wire (recommended) and security cable (optional)
Alignment Arrows