S1931a, S2031/S2031a, S2231/S2231a, S2331/ S2331a , S2321a , LCD Monitors User Guide
© 2010 Hewlett-Packard Development Company, L.P. Microsoft, Windows, and Windows Vista are either trademarks or registered trademarks of Microsoft Corporation in the United States and/or other countries. The only warranties for HP products and services are set forth in the express warranty statements accompanying such products and services. Nothing herein should be construed as constituting an additional warranty. HP shall not be liable for technical or editorial errors or omissions contained herein.
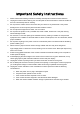
Important Safety Instructions 1. 2. 3. 4. 5. 6. 7. 8. 9. 10. 11. 12. 13. Please read all the following instructions carefully and keep this manual for future reference. Unplug this monitor before cleaning. Do not use liquids or aerosol cleaners to clean the surface of the LCD. Use a damp cloth for cleaning. Do not push the surface of the LCD screen with your hands or any hard article. It may cause damage to the circuit or liquid crystal molecules inside the monitor.
Chapter I. Introduction 1.1 Features Multilingual OSD adjustment Compatible with IBM VGA, extended VGA, VESA VGA, SVGA, XGA, and SXGA modes Wide range of applicable voltages (AC 100-240V 50/60Hz ) enables direct use without any setting. Plug-and-play VESA DDC1/ 2B Standard. Compatible with Windows 9x / 2000 / xp / Vista operation systems 1.
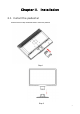
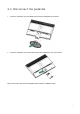
Chapter II. Installation 2.1 Install the pedestal Please follow the steps illustrated below to install the pedestal.
2.2 Connect your monitor to your computer 1. Power off and unplug your computer. 2. Connect the 15-Pin or 24-Pin ends of the signal cable to the VGA or DVI port of your monitor and the VGA or DVI OUT jack on the back of your computer. Secure the screws on both ends of the signal cable. Connect the power cords of your computer and monitor to the nearest electrical outlet. Power on your computer and monitor. If your monitor displays an image, the installation has been successfully done.
2.3 Disconnect the pedestal 1. Press the clip button on the pedestal and remove the pedestal from the stand. 2. Press the clip button on the stand and remove the pedestal from your LCD monitor. Note: This monitor uses VESA-compatible 100mmx100mm installation ports.
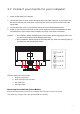
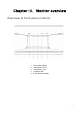
Chapter III. Monitor overview Overview of front panel controls 1. 2. 3. 4. 5.
Chapter IV. Operational Instruction 4.1 Power ON/OFF Switch Press this button to power on/off your monitor. Note: The ON/OFF switch does not disconnect your monitor from the main voltage. To completely disconnect the main voltage, please remove the power plug from the socket. 4.2 Power indicator This indicator lights up in blue when the monitor operates normally. If the monitor runs in power-saving mode, this indicator changes to amber. When the monitor is turned off, this indicator is unlit. 4.
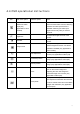
4.4 OSD operational instructions Icon Main menu option Submenu option Note When the monitor is connected to two active and valid video sources, switching between the video input sources is available. Switching the video input signal sources may take you several seconds. Switch the video input (only applicable to some models) Brightness To adjust the brightness level of the screen. Contrast To adjust the contrast level of the screen. Image control To adjust the image on the screen.
Color Custom color sRGB Languages Management Volume To select the color displayed on the screen. The factory default setting is “6500 K” or “Custom color”, depending on the model of your monitor. To select and adjust the color range: R – to set the level of red G – to set the level of green B – to set the level of blue To set the color of the screen to comply with color standards used in the imaging industry. To select the language displayed on the OSD menu. The factory default setting is “English”.
Management (Continued) The resolution, refresh rate and frequency information will be displayed when the OSD Mode Display main menu is accessed. Please select “On” or “Off” as the factory default on-off setting, depending on the model of your monitor. The operational status of your monitor will be displayed when you power on your monitor.
Default video input Information Restore factory settings When the monitor is connected to two active and valid video sources, select one of them as the default video input. The default signal input is DVI. The change you made will be activated after your computer is restarted. To select and display important information about your monitor. The factory default settings will be restored.
Chapter V. Technical Information 5.1 Factory preset display mode S1931a Model Criteria Resolution Horizontal frequency Vertical frequency 1 640X480 @60 Hz 31.469 59.94 2 720X400 @70 Hz 31.469 70.087 3 800X600 @60 Hz 37.879 60.317 4 1024X768 @60 Hz 48.363 60.004 5 1280X720 @60 Hz 45 60 6 1280X960 @ 60 Hz 60 60.00 7 1280X1024 @60 Hz 63.98 60.02 8 1366X768 @60Hz 47.71 59.
5.2 Product specifications S1931a Model Size 18.5” wide screen Max. resolution 1366x 768 @ 60 Hz Recommended resolution 1366x768 @ 60 Hz Horizontal frequency 24-83 kHz Vertical frequency 50-76 Hz Viewable size 409.8x 230.
S2031 / S2031a Models Size 20” wide screen Max. resolution 1600 x 900 @ 60 Hz Recommended resolution 1600 x 900 @ 60 Hz Horizontal frequency 24-83 kHz Vertical frequency 50-76 Hz Viewable size 442.8x 249.08 mm Viewable angle 170 Pitching angle -5º to 15º Pixel frequency 170 MHz OSD functions Brightness, Contrast, Image Control, Languages, Color, Management, Information, Restore Factory Setting, Exit, OSD Control Size (Packing) 362x 130 x 533 mm Net weight/ Gross weight 4.08KG / 5.
S2231 / S2231a Models Size 21.5” wide screen Max resolution 1920 X 1080 @60 Hz Recommended resolution 1920 X 1080 @60 Hz Horizontal frequency 24-94 kHz Vertical frequency 50-76 Hz Viewable size 476.64*268.11 mm Pitching angle -5º to 15º Viewable angle 160 Pixel frequency 170 MHz OSD functions Brightness, Contrast, Image Control, Languages, Color, Management, Information, Restore Factory Setting, Exit, OSD Control Size (Packing) 572*120*383 mm Net weight/ Gross weight 4.12 KG / 5.
S2331 / S2331a Models Size 23” wide screen Max. resolution 1920 X 1080 @60 Hz Recommended resolution 1920 X 1080 @60 Hz Horizontal frequency 24-94 kHz Vertical frequency 50-76 Hz Viewable size 509.18 × 286.42 mm Pitching angle -5º to 15º Viewable angle 160 Pixel frequency 170 MHz OSD functions Brightness, Contrast, Image Control, Languages, Color, Management, Information, Restore Factory Setting, Exit, OSD Control Size (Packing) 405 x 610 x 122 mm Net weight/ Gross weight 4.66KG / 6.
S2321a Model Size 23” wide screen Max. resolution 1920 X 1080 @60 Hz Recommended resolution 1920 X 1080 @60 Hz Horizontal frequency 24-94 kHz Vertical frequency 50-76 Hz Viewable size 509.18 × 286.42 mm Pitching angle -5º to 15º Viewable angle 160 Pixel frequency 170 MHz OSD functions Brightness, Contrast, Image Control, Languages, Color, Management, Information, Restore Factory Setting, Exit, OSD Control Size (Packing) 405 x 610 x 122 mm Net weight/ Gross weight 4.67 KG / 6.
5.3 Signal cable connector PIN No.
PIN Signal 1 Red Signal 2 Green Signal 3 Blue Signal 4 Ground 5 Cable testing 6 Red Signal Ground 7 Green Signal Ground 8 Blue Signal Ground 9 5 VDC 10 Null 11 Ground 12 SDA (for DDC) 13 Horizontal synchronization 14 Vertical synchronization 15 SCL (for DDC) VGA Interface 5.4 Panel testing The ratio of valid pixels on each LCD screen reaches 99.99% or higher. However, less than 0.01% of the pixels may cause dark dots displayed on the screen.
A Safety and Maintenance Guidelines Important Safety Information A power cord is included with the monitor. If another cord is used, use only a power source and connection appropriate for this monitor. For information on the correct power cord set to use with the monitor, refer to the "Connecting the Power Cable" section in Setting Up the Monitor WARNING! To reduce the risk of electric shock or damage to the equipment: • Do not disable the power cord grounding feature.
Safety Precautions ł Use only a power source and connection compatible with this monitor, as indicated on the label/ back plate of the monitor. ł Be sure the total ampere rating of the products connected to the outlet does not exceed the current rating of the electrical outlet, and the total ampere rating of the products connected to the power cord does not exceed the rating of the power cord. Look on the power label to determine the ampere rating (Amps or A) for each device.
Maintenance Guidelines To enhance the performance and extend the life of the monitor: ł Do not open the monitor cabinet or attempt to service this product yourself. Adjust only those controls that are covered in the operating instructions. If the monitor is not operating properly or has been dropped or damaged, contact an authorized HP dealer, reseller, or service provider. ł Use only a power source and connection appropriate for this monitor, as indicated on the label/ back plate of the monitor.
B Agency Regulatory Notices Federal Communications Commission Notice This equipment has been tested and found to comply with the limits for a Class B digital device, pursuant to Part 15 of the FCC Rules. These limits are designed to provide reasonable protection against harmful interference in a residential installation.
Hewlett Packard Company P. O. Box 692000, Mail Stop 530113 Houston, Texas 77269-2000 Or, call 1-800-HP-INVENT (1-800 474-6836) For questions regarding this FCC declaration, contact: Hewlett Packard Company P. O. Box 692000, Mail Stop 510101 Houston, Texas 77269-2000 Or, call (281) 514-3333 To identify this product, refer to the Part, Series, or Model number found on the product. Canadian Notice This Class B digital apparatus meets all requirements of the Canadian Interference-Causing Equipment Regulations.
The official EU CE declaration of conformity for this device may be found at http://www.hp.eu/ certificates. The point of contact for regulatory matters is Hewlett-Packard GmbH,HQ-TRE,Herrenberger Strasse 140,71034 Boeblingen,Germany. German Ergonomics Notice HP products which bear the "GS" approval mark, when forming part of a system comprising HP brand computers, keyboards and monitors that bear the "GS" approval mark, meet the applicable ergonomic requirements.
Japanese Power Cord Requirements For use in Japan, use only the power cord received with this product. CAUTION: Do not use the power cord received with this product on any other products. Product Environmental Notices Materials Disposal This HP product contains mercury in the fluorescent lamp in the display LCD that might require special handling at end-of-life. Disposal of this material can be regulated because of environmental considerations.
HP Recycling Program HP encourages customers to recycle used electronic hardware, HP original print cartridges, and rechargeable batteries. For more information about recycling programs, go to http://www.hp.com/ recycle. Restriction of Hazardous Substances (RoHS) A Japanese regulatory requirement, defined by specification JIS C 0950, 2005, mandates that manufacturers provide Material Content Declarations for certain categories of electronic products offered for sale after July 1, 2006.
Turkey EEE Regulation In Conformity with the EEE Regulation EEE Yönetmeliğine Uygundur 28
C Troubleshooting Solving Common Problems The following table lists possible problems, the possible cause of each problem, and the recommended solutions: Problem Solution Power LED is not on. Make sure the Power button is on, and the power cord is properly connected to a grounded power outlet and to the monitor. Screen is blank. Connect the power cord. Turn on the power. Connect the video cable properly. See “Connect your monitor to your computer"for more information.
Problem Solution Unable to hear audio from built-in speakers (Select models). Do the following: No Plug and Play. ł Ensure the source signal is good by using headphones at the source. ł Press the Menu button to access the OSD menu. Select Management, and then select Volume to adjust the volume. ł Turn up the volume. ł Ensure speaker volume is not muted or too low: Click the Windows start button™, Control Panel, and Hardware and Sound. Under Audio Devices and Sound, click Adjust system volume.
ł Conditions under which the problem occurred ł Error messages received ł Hardware configuration ł Name and version of hardware and software you are using Locating the Rating Label The rating label on the monitor provides the product number and serial number. You may need these numbers when contacting HP about your monitor model. The rating label is on the back of the monitor.