
Console Management Controller Kit Quick Installation Guide
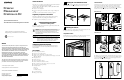


Hardware Installation is Complete.
A
2 3 4
10
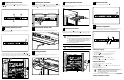
Connect the main input power cord to the rear of the unit in socket . If a UPS will
be used for main power, connect the power jumper cord to the unit in socket .
Connect the fan input power/voltage monitor cord to the rear of the unit in socket .
Use the tie wraps (included with the CMC kit) to secure the cables to the cord
retention bracket.
The CMC mounts directly to the rack in a 1U configuration. Use two screws on each
side to secure the unit to the rack.
Plug the main power input cord into the UPS (recommended) or into an AC power
outlet. Plug the input voltage monitor/fan power input into an AC power outlet.
The network cable is connected to the rear of the unit via the RJ-45 socket..
WARNING: Power grounds for the main AC input and the voltage
monitor input are tied common within the CMC.
4
Connecting Input Power Cords
Connecting Fan Assemblies
5
Connecting the network cable
6
Securing the Cables
7
Mounting the CMC in the Rack
8
Connecting to AC Power
9
1 2
2
1
WARNING: To reduce the risk of personal injury resulting from
electric shock, do not remove the cover from the Console
Management Controller. There are no field-serviceable or
user-serviceable components
6
75
8
Use the front panel for basic configuration of the unit. The CMC is fully localized to
allow for complete functionality of the front panel in multiple languages.
10
Power the unit On by pressing the Power button .
Make sure the Power button is in the Off position before connecting the input
power cord to the rear of the unit.
The fan assemblies should be connected to the fan power output sockets & . The
input voltage monitor/fan power input should be connected to AC power, not the
UPS. The cable is connecting the fan assemblies in the second rack.
A
The sensors connect to the rear of the CMC unit as shown below. The
temperature sensor connects into port and the intrusion sensors connect into
ports & .
7
8
17
WARNING: To reduce the risk of electric shock or damage to the
equipment, take these precautions:
n Plug the input line cord into a grounded (earthed) electrical outlet
that is installed near the equipment and is easily accessible.
n Do not disable the grounding plug on the input line cord. The
grounding plug is an important safety feature.
n Do not use extension cords.
Powering on the CMC
10
Setting the Configuration
11
Use the CMC front panel controls to select the appropriate language.
To select the language:
1. Press the Scroll Up key to select the appropriate language.
2. Press the Enter key to save the language selection.
Selecting the Language
Setting the IP Address
Use the CMC front panel controls to set the CMC IP address.
To set the IP address:
Use the Scroll Up key and the Enter key to set the IP address.
Setting the Subnet Mask
Use the CMC front panel controls to set the Subnet Mask.
To set the Subnet Mask:
Use the Scroll Up key and the Enter key to set the Subnet Mask address. The
default setting is 0.0.0.0.
n The CMC will automatically reboot.
Connecting Sensors to the CMC
3