
Installation Manual


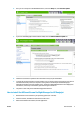

3. Click the Printers tab.
4. Click the Add Printer button.
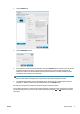
5. Give the printer a name and enter its IP address, then press Continue. You can choose any name you like
to assign to the printer; it will be used only in the printers pane. If you do not know the printer’s IP
address, the printer’s own documentation will tell you how to find it. It is normally available from the
Connectivity menu in the printer’s front panel.
NOTE: Only supported printers are detected (see Supported printers on page 1), and only licensed
printers can be added to the application; any attempt to add an unlicensed printer will fail.
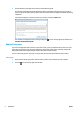
6. The application downloads a set of color profiles for the new printer, and a window appears with the
progress bar. When the profiles have been downloaded, press the Finish button.
The name you have given the new printer should now appear in the printers pane.
You can add more printers, in which case their names all appear in the printers pane. If the pane is too small
to show all of the printers, you can move up and down the list by clicking the
and buttons at the bottom
of the pane.
ENWW How to install 5