
Installing Microsoft Windows on an HP ProBook or EliteBook Notebook PC and creating an image 2011 Business Notebook Models - White Paper


8
– Microsoft .NET (refer to Table 1 for .NET version requirements)
3. Copy the i386 folder from the Windows XP installation DVD to the root of %SystemDrive%.
4. Extract deploy.cab from the SUPPORT\TOOLS\ folder of the install DVD to the
%SystemDrive%\sysprep folder.
5. Copy all device drivers to a common folder location (i.e. %SystemDrive%\DRV).
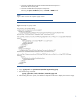
6. Run setupmgr.exe from the %SystemDrive%\sysprep folder to create a sysprep.inf file.
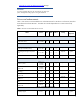
7. As shown in Figure 1, make the following changes to the sysprep.inf file.
– In the [Unattended] section –
Change InstallFilesPath to %SystemDrive%\i386.
The OemPnPDriversPath should include paths for all .inf installed drivers.
– In the [SetupMgr] section –
Change DistFolder to %SystemDrive%\i386
NOTE
Figure 1 does not show the complete sysprep.inf file.
Figure 1. Updating the sysprep.inf file
8. Run the following command:
sysprep –mini –shutdown –reseal
9. After shutting down the system, use hard-drive duplication software to deploy the common image.
Windows Vista Business / Windows 7 Professional
1. Install Windows Vista Business on a supported platform.
2. Install the following and then reboot the system:
– Essential System Updates for Windows Vista SP2
– Vista Default Settings
3. Copy all device drivers to the %SystemDrive%\DRV folder.
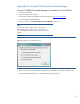
4. Run Windows System Image Manager to create the sysprep.xml file.
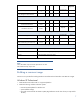
5. As shown in Figure 2, make the following changes to the sysprep.xml file: