
Maintenance and Service Guide: 8200 Elite Series Convertible Minitower, 8200 Elite Series Microtower, 8200 Elite Series Convertible Small Form Factor, 8200 Elite Series Convertible Ultra-slim Desktop, 6200 Pro Series Microtower
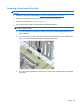

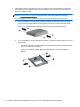


No. Guide Screw Device
1 Black M3 Metric Screws 5.25-inch Drives
2 Silver 6-32 Standard Screws 3.5-inch Hard Drive in the Top Drive Bay (Bay 4)
3 Silver and Blue 6-32 Isolation Mounting Screws 3.5-inch Hard Drives in the Middle and Bottom Drive Bays
(Bays 5 and 6)
CAUTION: To prevent loss of work and damage to the computer or drive:
If you are inserting or removing a drive, shut down the operating system properly, turn off the
computer, and unplug the power cord. Do not remove a drive while the computer is on or in standby
mode.
Before handling a drive, ensure that you are discharged of static electricity. While handling a drive,
avoid touching the connector. For more information about preventing electrostatic damage, refer to
Electrostatic Discharge Information on page 60.
Handle a drive carefully; do not drop it.
Do not use excessive force when inserting a drive.
Avoid exposing a hard drive to liquids, temperature extremes, or products that have magnetic fields
such as monitors or speakers.
If a drive must be mailed, place the drive in a bubble-pack mailer or other protective packaging and
label the package “Fragile: Handle With Care.”
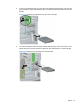
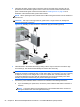
Installing a 5.25-inch Drive into a Drive Bay
1. Prepare the computer for disassembly (Preparation for Disassembly on page 73).
2. Remove the computer access panel (
Computer Access Panel on page 74).
3. Remove the front bezel (
Front Bezel on page 75).
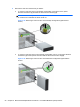
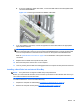
4. If you are installing a drive in a bay covered by a bezel blank, remove the bezel blank. See
Bezel
Blanks on page 77 for more information.
Drives 93