
Maintenance and Service Guide: 8200 Elite Series Convertible Minitower, 8200 Elite Series Microtower, 8200 Elite Series Convertible Small Form Factor, 8200 Elite Series Convertible Ultra-slim Desktop, 6200 Pro Series Microtower
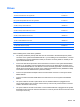
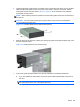
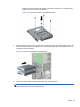

4. Release the drive by pulling the release tab away from the drive (1) and sliding the drive out of
the bay (2).
Figure 7-20 Removing a Hard Drive
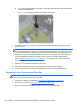
5. Remove the four guide screws (two on each side) from the old drive. You will need these screws
to install a new drive.
Installing a Hard Drive into an Internal Drive Bay
NOTE: The system does not support Parallel ATA (PATA) hard drives.
1. Prepare the computer for disassembly (Preparation for Disassembly on page 125)
2. Remove the access panel (
Computer Access Panel on page 126)
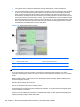
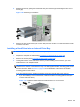
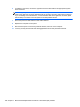
3. Install guide screws on the sides of the drive. If you are installing a 2.5-inch drive, you must
install the drive in an adapter bracket.
NOTE: The hard drive uses 6-32 isolation mounting guide screws. Four extra guide screws are
installed on the exterior of the hard drive bays. The HP-supplied isolation mounting guide screws
are silver and blue. Refer to
Drives on page 139 for an illustration of the extra 6-32 isolation
mounting guide screws location.
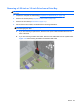
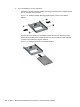
If you are replacing a drive, transfer the guides screws from the old drive to the new one.
●
If you are installing a 3.5-inch hard drive, install four isolation mounting guide screws (two
on each side of the drive).
Figure 7-21 Installing Isolation Mounting Guide Screws in a 3.5-inch Drive
Drives 145