
User's Manual


25218a
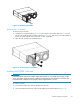
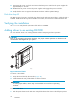
Figure 19 Enclosure thumbscrews
3. Replace the EMU, I/O modules, and power supply/blower assemblies that you removed to lessen
the weight of the enclosure, reversing the procedures that you used to remove them.
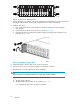
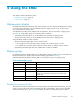
4. Install the disk drives:
1. Push in the ejector button on the disk drive and pull the release lever down to the full
open position.
2. Insert the drive into the enclosure as far as it will go (Figure 20-1).
3. Close the release lever until the ejector button engages and the disk drive engages in the
backplane (Figure 20-2).
Figure 20 Installing a disk drive
5. Instal
l disk blanks in all bays that do not contain a disk drive.
6. Connect a power cord to each power supply and engage the cord locks.
7. Plug the power cords into separate AC power receptacles.
TIP:
Using separate power receptacles provides no single point of failure (NSPOF).
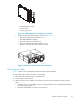
8. After the disks spin up, check the following for operational status.
a. The disk drives indicators
b. The EMU alphanumeric display for error status (Figure 21-1).
If Er is displayed, resolve the error before continuing.
32
Installation