HP StorageWorks DAT 72x10 1U Tape Autoloader user guide Part number: AE313-90006 Second edition: Revised June 2007
Legal and notice information © Copyright 2006-2007 Hewlett-Packard Development Company, L.P. The information contained herein is subject to change without notice. The only warranties for HP products and services are set forth in the express warranty statements accompanying such products and services. Nothing herein should be construed as constituting an additional warranty. HP shall not be liable for technical or editorial errors or omissions contained herein.
Contents About this guide . . . . . . . . . . . . . . . . . . . . . . . . . . Intended audience . . . . . . . . Related documentation . . . . . . Document conventions and symbols Rack stability . . . . . . . . . . HP technical support . . . . . . . Product warranties . . . . . . . . Subscription service . . . . . . . HP websites . . . . . . . . . . . Documentation feedback . . . . . . . . . . . . . . . . . . . . . . . . . . . . . . . . . . . . . . . . . . . . . . . . . . . . . . . . . . . . . . . .
Labeling tape cartridges . . . . Write-protecting tape cartridges . Backward read compatibility . . Magazines . . . . . . . . . . . . Inserting cartridges in a magazine 4 Autoloader administration . . . . . . . . . . . . . . . . . . . . . . . . . . . . . . . . . . . . . . . . . . . . . . . . . . . . . . . . . . . . . . . . . . . . . . . . . . . . . . . . . . . . . . . . . . . . . . . . . . . . . . . . . . . . . . . . . . . . . . . . . . . . . . . . . . . . . . . . . . . . . . .
6 Technical specifications . . . . . . . . . . . . . . . . . . . . . Physical HP StorageWorks DAT 72X10 1U autoloader specifications . . . . . . . . . . . . . . . Autoloader operation specifications . . . . . . . . . . . . . . . . . . . . . . . . . . . . . Environmental specifications . . . . . . . . . . . . . . . . . . . . . . . . . . . . . . . . .
Figures 6 1 ..Front panel overview . . . . . . . . . . . . . . . . . . . . . . . . . . . . . . 17 2 ..Back panel overview . . . . . . . . . . . . . . . . . . . . . . . . . . . . . . 18 3 ..Shipping lock . . . . . . . . . . . . . . . . . . . . . . . . . . . . . . . . . 21 4 ..Shipping lock storage location . . . . . . . . . . . . . . . . . . . . . . . . . . 21 5 ..Removing the plastic feet . . . . . . . . . . . . . . . . . . . . . . . . . . . . 23 6 ..Installing the autoloader cover . . . . . . .
Tables 1 ..Document conventions . . . . . . . . . . . . . . . . . . . . . . . . . . . . . . 9 2 ..DAT 72x10 1U Tape Autoloader specifications . . . . . . . . . . . . . . . . . . . 13 3 ..Supported SCSI bus types . . . . . . . . . . . . . . . . . . . . . . . . . . . . 14 4 ..Location criteria . . . . . . . . . . . . . . . . . . . . . . . . . . . . . . . . 5 ..Operator control panel buttons . . . . . . . . . . . . . . . . . . . . . . . . . . 19 29 6 ..LEDs . . . . . . . . . . . . . . . . . . . . . . . . .
About this guide This guide provides information about: • Installing the HP StorageWorks DAT 72X10 1U Tape Autoloader • Configuring and operating the HP StorageWorks DAT 72X10 1U Tape Autoloader • Troubleshooting the HP StorageWorks DAT 72X10 1U Tape Autoloader Intended audience This guide is intended for system administrators and general users who need physical and functional knowledge of the HP StorageWorks DAT 72X10 1U Tape Autoloader.
CAUTION: Indicates that failure to follow directions could result in damage to equipment or data. IMPORTANT: Provides clarifying information or specific instructions. NOTE: Provides additional information. TIP: Provides helpful hints and shortcuts. Rack stability Rack stability protects personnel and equipment. WARNING! To • • • • • reduce the risk of personal injury or damage to equipment: Extend leveling jacks to the floor. Ensure that the full weight of the rack rests on the leveling jacks.
Subscription service HP recommends that you register your product at the Subscriber’s Choice for Business website: http://www.hp.com/go/e-updates After registering, you will receive e-mail notification of product enhancements, new driver versions, firmware updates, and other product resources. After signing up, you can quickly locate your products by selecting Business support and then Storage under Product Category. HP websites For additional information, see the following HP websites: • • • • http://www.
About this guide
1 The HP StorageWorks DAT 72x10 1U Tape Autoloader Features and requirements The HP StorageWorks DAT 72x10 1U Tape Autoloader provides a compact, high-capacity, low-cost solution for simple, unattended data backup. This unique design houses up to 10 tape cartridges in a compact 1U form factor with easy access to tape cartridges via two removable magazines. Each magazine can hold up to five cartridges. The autoloader supports one HP StorageWorks DAT 72 tape drive.
• Multi-mode rated SCSI cabling and terminators. Multi-mode terminators allow both LVD and single-ended devices to be connected to the same bus. They detect the type of bus and automatically supply the correct termination. The LVD interface enables the data to be transferred at the drive’s maximum rate. The autoloader is also supported on SE SCSI, but this will limit cable length and may degrade performance.
• Make sure that LUN scanning is enabled on the SCSI host adapter, see also “LUN scanning” on page 14. NOTE: HP StorageWorks DAT 72x10 autoloaders do not have termination power enabled, termination must be supplied by the host. Drivers and Backup Software Installing drivers on Windows Two drivers are required in order to use HP StorageWorks DAT Tape Autoloaders. • hpdat: This is the driver that works with all HP DAT tape products. • hpdatchg: This is the driver for the autoloader robotics.
Installing drivers on UNIX The recommended backup applications use the operating system’s standard, built-in device drivers. To upgrade drivers we recommend that you patch to the latest version of the operating system or configure device files, as described in the UNIX Configuration Guide on the CD-ROM. NOTE: The UNIX Configuration Guide also describes how to install and verify installation on Linux. Installing drivers on IA64 If you are installing on an IA64 system, such as an HP Integrity server, check www.
HP StorageWorks DAT 72x10 1U Tape Autoloader overview Front panel overview The front panel of the HP StorageWorks DAT 72x10 1U Tape Autoloader provides access to the power button, operator control panel, left and right magazines, and LEDs.
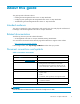
Back panel overview The back panel of the autoloader provides access to SCSI connectors, the tape drive bay and the power connector. Figure 2 shows the back panel of a autoloader. 8 1 2 3 4 5 6 7 Figure 2 Back panel overview Number Description 1 Power connector. The autoloader requires a 110/220 volt AC power connection 2 Fan vent for power supply fan. The fan for the power supply is controlled by a thermal sensor.
2 Installing the autoloader Location criteria The autoloader is suitable for both tabletop and rackmounted operation. Choose a location that meets the following general criteria: Table 4 Location criteria Criteria Definition Operating temperature 5-40º C (41-104º F) Power source AC power voltage: 100-127 VAC; 200-240 VAC Line frequency: 50-60 Hz Place the autoloader near an AC outlet. The AC power cord is the product’s main AC disconnect device and must be easily accessible at all times.
Unpacking the autoloader Before you begin, clear a work surface to unpack the autoloader. Make sure you have easy access to the host server and an easily accessible power outlet (and the rack, if you are installing the unit in a rack).
• Data Protector Express CD Removing the shipping lock CAUTION: You must remove the shipping lock before you power up the unit. If you do not, the robotic transport mechanism will not be able to move. The shipping lock prevents the robotic transport mechanism from moving during shipment. The shipping lock is held in place with a piece of tape and is located in the top center of the autoloader (see Figure 3).
NOTE: If the robotics have failed, it may not be possible to return the unit to the home position and you will be unable to fit the shipping lock. Fitting the autoloader cover (optional) WARNING! The HP StorageWorks DAT 72x10 Tape Autoloader weighs 10.45 kg (23.4 lb.) without media, and 12 kg (26.46 lb.) when both magazines are full (10 cartridges).
Rackmounting the autoloader (optional) WARNING! The HP StorageWorks DAT 72x10 Tape Autoloader weighs 10.45 kg (23.4 lb.) without media, and 12 kg (26.46 lb.) when both magazines are full (10 cartridges).
Figure 8 Installing the rails into the rack (example shows an HP Rack10000 Series) Number Description 1 Use the screws (x8) from the screw pack for your rack type. To install the autoloader on the rails and into the rack: 1. Locate the captive screws on the front mounting brackets of the autoloader (see Figure 9). 2. Slide the back edge of the autoloader onto the rails. Push the autoloader back until the front bezel is flush with the front rack columns.
Figure 9 Securing the autoloader to the rack Number Description 1 Slide the back edge of the autoloader onto the rails. Push until the front bezel is flush with the rack columns. 2 Tighten the captive screws on the front brackets of the autoloader. Connecting the SCSI and power cord NOTE: The DAT 72x10 Tape Autoloader tape drive is an Ultra160 SCSI LVD/SE device. Only cables and terminators specified for Ultra160 use or labeled as Multimode should be used.
To HBA Figure 10 Attaching the SCSI cable to the tape drive 3. Attach the other end of the SCSI cable to the connector on the SCSI host bus adapter or to the connector on the previous device on the SCSI bus. NOTE: The host bus adapter should be LVDS. A SE SCSI host bus adapter will work, but will degrade performance, and limit cable length. If there are any SE devices on the same SCSI bus, the entire SCSI bus will negotiate down to SE speed and degrade performance. 4.
Figure 12 Attaching the power cord CAUTION: To disconnect all power from the autoloader, remove the power cord from the outlet. The power button only puts the power on stand-by. 7. Turn on the autoloader using the power button. Check the LCD screen to make sure the autoloader is receiving power. If it is not, check the power connections and your power source. During the Power-On Self Test (POST), all four LEDs are illuminated briefly, followed by a flashing Ready LED.
Installing the autoloader
3 Operating the autoloader The autoloader can be operated by the following methods: • Operator control panel - operate manually to insert and eject cartridges and to unload magazines • Host backup software - the SCSI bus connects the autoloader to the host server and the backup software. You can perform any functions contained in the backup software. This chapter provides an overview of the operator control panel, OCP, and information about tape cartridges and magazines.
LED indicators The operator panel includes four LEDs that provide a variety of information as detailed in Table 6. Table 6 LEDs LED Button Description Ready Steady Green Illuminated when power is on. Autoloader is online and ready for operation. Flashing Green Tape drive or robotics activity. Off Autoloader is offline. Clean Steady Amber Tape drive has determined that a cleaning cartridge should be used.
• You can order data and cleaning cartridges at www.hp.com/go/storagemedia. • Clean the tape drive weekly and when the Clean Drive LED is illuminated. • Be sure to use only HP DDS cleaning cartridges. • Do not drop a cartridge. Excessive shock can damage the internal contents of the cartridge, or the cartridge case itself, making that cartridge unusable. • Do not expose your data cartridges to direct sunlight or sources of heat, including portable heaters and heating ducts.
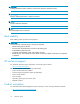
Figure 13 Write-protecting the DAT 72 data cartridge Number Description 1 Write-enabled, tab closed 2 Write-protected, tab open 3 Label area Backward read compatibility For optimum performance and storage capacity, use tape cartridges that match your drive’s format. Look for the DAT 72 or DDS logo on the cartridge. HP DAT 72 and DDS data cartridges are fully supported and compatible with HP StorageWorks DAT tape products (see Table 8). CAUTION: Use only DAT 72 or DDS cartridges in the drive.
Table 8 Backward read compatibility DAT 72, 170 meter DDS-4, 150 meter DDS-3, 125 meter 72 GB*1, C8010A 40 GB1 , C5718A 24 GB1 , C5708A Read/Write Read/Write Read/Write 1assumes 2:1 compression NOTE: Although HP DAT 72x10 Tape Autoloaders are fully backward compatible, old tape formats are more abrasive than later generations and using older tape formats can reduce the life expectancy of the device. Magazines The HP StorageWorks DAT 72x10 1U Tape Autoloader has two removable magazines.
Operating the autoloader
4 Autoloader administration Autoloader home screen Four menu options are accessed through the operator control panel by using the Previous and Next buttons: • • • • Status/Information, page 36 Configuration, page 39 Operations, page 41 Support, page 46 The second line of the home screen displays a brief status of the drives. Status definitions are listed in Table 9.
Understanding the menu structure DAT 72x10 ATLDR Drive Ready Next Status / Information Next Configuration Next Operations Next Support Enter Enter Enter Enter View Inventory SCSI ID Unlock Left Magazine Run Demo Next Previous Autoloader Information Next Previous Drive Information Next Previous Component Status Next Previous Autoloader Behavior Next Previous Autoloader Date/Time Next Previous Language Next Previous Restore Defaults Next Previous Unlock Right Magazine Next P
• Component status, page 38 To access the Status/Information menu: 1. From the Home screen, press Previous or Next until the screen displays Status/Information. Press Enter to select. 2. Press Previous or Next until the screen displays your selected function. Press Enter to select. Inventory This option provides information on which slots have cartridges and which are empty.
4. Select Left or Right Magazine. The OCP will display the contents of the lowest numbered slot in the magazine. The display will either show Full or Empty. 5. Use Previous or Next to scroll through the remaining 4 slots for the magazine. Autoloader information To obtain information about your autoloader, do the following: 1. From the Home screen press Previous or Nextt until the screen displays Status/Information. Press Enter to select. 2.
Configuration The Configuration menu provides access to the following autoloader configuration options: • • • • Setting the language, page 39 Changing the drive SCSI ID, page 39 Setting autoloader behaviors, page 40 Setting the autoloader date and time, page 41 To access the Configuration menu: 1. From the Home screen, press Previous or Next until the screen displays Configuration. Press Enter to select. 2. Press Previous or Next until the screen displays your selected function. Press Enter to select.
Setting autoloader behaviors This option allows the setting of the autoloader mode to Automatic, Sequential or Random. The operating mode is set based on whether you have automation software controlling cartridges in the autoloader. By default, the autoloader automatically detects the required mode (automatic mode); however, you can also change the modes from the Configuration menu. Automatic mode The default setting is Automatic mode.
1. From the Home screen, press Previous or Next until the screen displays Configuration. Press Enter to select. 2. Press Previous or Next until the screen displays Autoloader Behavior. Press Enter to select. 3. The display shows Autoloader Mode on the first line with the current status on the second line (normally Automatic, which is the default status). Press Enter if you wish to change this. 4. The screen displays Set Autoloader Mode.
• • • • Moving cartridges within the autoloader, page 43 Updating tape cartridge inventory, page 44 Resetting the autoloader, page 44 Activating OBDR mode, page 44 To access the Operations menu: 1. From the Home screen, press Previous or Next until the screen displays Operations. Press Enter to select. 2. Press Previous or Next until the screen displays your selected function. Press Enter to select.
IMPORTANT: If the cleaning cartridge is not a valid cleaning cartridge, the LCD screen will display Invalid Cartridge and the cartridge will be put back into the slot from which it originated. IMPORTANT: If the Clean drive LED, or the Media Attention LED (on load or unload) occurs when inserting the same cartridge after you have cleaned the drive, there may be a problem with that cartridge. Make sure there is a cleaning cartridge in one of the magazines before beginning the cleaning steps.
1. Use Previous or Next to select from the three possible destinations as follows: • Right Magazine • Left Magazine • Drive 2. When the correct destination is displayed, press Enter to select. 3. If the destination selected is Left Magazine, use Previous or Next to display the slot. Only empty slots will be listed. Once the correct slot is displayed, press Enter to select. The autoloader will now move the cartridge from the selected source to the selected destination.
For more specific information concerning the benefits of OBDR and the latest new features please refer to our World Wide Web site www.hp.com/go/obdr. If your system does not support HP One-Button Disaster Recovery, you can still use your autoloader normally to back up and restore data. However, you must remember to create a separate set of emergency recovery disks for your operating system whenever you change your system configuration.
• Hard disk failures, as long as the replacement hard disk is the same size or larger than the original and uses the same interface (for example, replace a SCSI hard disk with another SCSI disk) • Hardware failures where the server is replaced by an identical component • File corruption because of an operating system error • File corruption because of an application software error • Viruses that prevent you from booting your system correctly • User errors that stop you from booting your system correctly Whe
Using a firmware upgrade cartridge and the OCP This option from the Operator Control Panel allows the updating of drive code using a firmware upgrade cartridge. To use this command, you must first select the drive or drives to be upgraded and then select where you want to load the firmware upgrade cartridge from. To update the drive code: 1. Before beginning the firmware upgrade, load a firmware upgrade cartridge into any open slot.
To run the Wellness test: 1. From the Home screen, press Previous or Next until the screen displays Support. Press Enter to select. 2. Press Previous or Next until the screen displays Run Wellness test. Press Enter to select. 3. Press Previous or Next until the screen displays Select Number of Loops. Use Previous or Next to select 1, 10, 100 or Infinite. Press Enter. 4. While the test is running, the screen will display progress as shown: Running test.
Enter for text where: Err : indicates the position in the sequence list, 0 being the most recent. XX XX shows the error codes. See also “Autoloader error codes” on page 58. 4. Press Enter to display textual information about the error. Press Next to display subsequent text until the associated timestamp is displayed: yyyy-MM-dd hh:mm where: yyyy: year MM: month dd: days hh: hours mm: minutes NOTE: The timestamp uses a 24-hour clock, where 13:00 = 1 p.m. 5.
Autoloader administration
5 Troubleshooting Using HP Library & Tape Tools to diagnose problems With HP Library & Tape Tools installed on the host server • • • • Identify all SCSI devices connected to your system View detailed configuration, identification, inventory, and drive information for the autoloader Easily update autoloader and drive firmware Run advanced diagnostic tests, including connectivity, read/write, media validation, and testing the functionality of the autoloader • View autoloader and drive error logs • Generate a de
Check all SCSI and power connections and confirm that the unit is attached to a valid SCSI SE or LVDS bus. • Compatibility: Ensure that the autoloader is compatible with the SCSI host adapter and backup application you plan to use. For a list of compatible SCSI adapters and application software, check with your SCSI host adapter manufacturer, backup application vendor, or the HP support website at www.hp.com/go/connect or www.hp.com/support.
Problem Solution Tape stuck in drive. 1. Power cycle the autoloader, allow it to complete initialization, which in rare cases can take as long as 10 minutes, and then retry unloading the tape using the autoloader operator control panel. 2. Allow the tape drive to complete all operations. This may take as long as ten minutes if you reset or cycle power on the autoloader while the cartridge is positioned at the physical end of the media. 3.
Problem Solution Cannot load the cleaning cartridge. • Make sure you are using a DDS cleaning cartridge. (See “Cleaning the tape drive” on page 42.) • Contact your service representative. Errors Displayed on Front Panel “!” in autoloader operator panel inventory display Export the cartridge with the "!" and inspect it for damage. If it is damaged or if it has exceeded its usage life, then discard it. Otherwise, clean the drive and try to use the cartridge again.
Problem Solution Contamination by loose debris. Avoid contamination by ensuring that the autoloader is installed in a clean, contamination-free environment. Cartridges should be stored vertically in their plastic cases. Continue cleaning the tape drive as needed. Non-acclimated media A cartridge should be acclimated for at least 24 hours before being used, particularly if it has been stored at a substantially different temperature or level of humidity than the autoloader.
Removing stuck cartridges from slots In the event of a severe mechanical problem with the autoloader or if circumstances require you to remove tape cartridges, do the following: If the Operator Control Panel is still operational: 1. Move the cartridges from the drive(s) to the magazines using the Move Cartridge command, or the Forced Drive Eject command. See“Moving cartridges within the autoloader” on page 43, or “Forcing the drive to eject a cartridge” on page 48.
IMPORTANT: You should not meet any resistance while removing the magazine. However, if there has been a power failure, a cartridge may be not be fully seated in the magazine slot. If it feels as if there is an obstruction, stop. Do not try to pull the magazine out by force; you may damage the autoloader. Contact your HP support representative.
10. Replace the cartridge in the magazine making sure that it is fully inserted. 11. Reinstall the autoloader in the rack. 12. Power on the autoloader. If the magazine inserted was the right magazine 1. Power down the unit. 2. Remove the autoloader from the rack. 3. Tilt it so the right side of the autoloader is facing up. 4. Gently rock the autoloader and listen for the sound of a cartridge coming out of the magazine and or rattling around.
MM: month dd: days hh: hours mm: minutes NOTE: The timestamp uses a 24-hour clock, where 13:00 = 1 p.m. Summary of Main Error codes The following table provides general guidelines about main error codes and steps that you can take to remedy the problem. Using the above example, you would look up 8C in the table to see what action you could take. The table does not include any information about suberror codes, as this is mainly relevant for service engineers.
Description Solution DC Internal bus failure • Cycle power on the autoloader and attempt the operation again. F0 Drive over temperature condition • Check ambient temperature conditions to assure they are inline with operating specifications. • Check all fans to ascertain they are working properly. F1 Library controller lost communication with the drive • Cycle power on the autoloader and attempt the operation again.
6 Technical specifications Physical HP StorageWorks DAT 72X10 1U autoloader specifications Table 13 DAT 72X10 1U autoloader physical specifications Characteristics Product alone Packaged Height 53.4 mm (2.1 in.) 204 mm (8 in.) Width 444.5 mm (17.5 in.) 588 mm (23.1 in.) Depth 793 mm (31.2 in.) 999 mm (39.3 in.) Weight 10.45 kg (23.4 lb.) with empty magazines 12.61 kg (27.8 lb.
Environmental specifications Table 15 DAT 72X10 1U autoloader Environmental Specifications Characteristic Specification Temperature Operating 5º to 40º C Non-operating -30º to 60º C Temperature shock immunity - maximum rate of change 10º C per hour Miscellaneous Dust concentration less than 200 microgram/cubic meter Altitude 3050 meters (10,000 ft.