
Software Manual
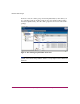
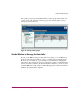

Table Of Contents
- Contents
- About this Guide
- NAS Data Path Manager
- Product Overview
- Data Path Concepts
- Install NAS Data Path Manager
- Monitor Data Paths
- Use Performance Monitor to Monitor HBAs
- View Volume Groups for Path Information
- Decide Whether to Manage the Data Paths
- Manage the Data Paths
- Text API Commands for NAS Data Path Manager
- Glossary
- Index

NAS Data Path Manager
24 hp StorageWorks NAS Data Path Manager Installation and User’s Guide
Create a New Volume Group
To create a new volume group:
1. In Command View NAS, click the Storage tab.
2. Navigate to Volume Groups.
3. Select Actions > Create New Volume Group to bring up the Create New
Volume Group dialog box.
4. Enter a name for your new volume group in the Volume Group Name field.
5. Select an appropriate LUN from the Available LUNs list and click OK to
move the name to the Allocated LUNs list.
6. Continue to select and move LUNs, as appropriate.
7. Click OK to create the volume group and return to the Volume Groups table
view.
Edit Selected Volume Group
To edit an existing volume group:
1. In Command View NAS, select the Storage tab
2. Select Volume Groups, then the View Volume Groups icon (first icon to the
right of Actions) to use the table view.
3. Select the volume group you want to rename by clicking the row.
4. Select Actions > Edit Selected Volume Group to bring up the Edit Volume
Group dialog box.
■ To change the volume group name, type in the corrected name in the
Volume Group Name field.
■ To add a LUN, select it from the Available LUNs field, click the Add
button. The LUN will move to the Allocated LUNs field.
To change your mind about adding a LUN, select it from the Allocated
LUNs field, click the Remove button. The LUN will move back to the
Available LUNs field.
Note: The Remove button will be inactive if there is only one array per volume group.
Also, you can not remove LUNs that are already part of the volume group.
5. Click OK to save changes and exit the dialog box.