
Software Manual
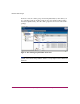
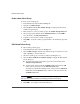
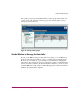

Table Of Contents
- Contents
- About this Guide
- NAS Data Path Manager
- Product Overview
- Data Path Concepts
- Install NAS Data Path Manager
- Monitor Data Paths
- Use Performance Monitor to Monitor HBAs
- View Volume Groups for Path Information
- Decide Whether to Manage the Data Paths
- Manage the Data Paths
- Text API Commands for NAS Data Path Manager
- Glossary
- Index

NAS Data Path Manager
30 hp StorageWorks NAS Data Path Manager Installation and User’s Guide
4. Click the Mode box of the path you wish to change.
5. Select the desired mode for the path (alternate or preferred) from the available
options that appear, then click OK.
Add Hardware
After adding arrays or LUNs to your system, you can configure the paths to them.
The recommended progression is as follows.
1. Accept the Default Settings.
2. Remove Hardware as described at on page 30.
3. Manage the Data Paths, if appropriate.
Continue making changes to your paths and monitoring performance until you
achieve improved performance.
Remove Hardware
When you add, maintain, remove, or exchange hardware (such as switches or
cables), you often know your paths will change. NAS Data Path Manager allows
you to plan the interruption of the normal flow of operations in order to make the
hardware change.
1. From the Storage tab, select Volume Groups, and use the tree view (second
icon to the right of Actions) to view path information. (You can go to either
the table view or tree view from the actions menu as well.)
2. Complete the hardware change.
3. Scan for new hardware, as discussed in the Accept the Default Settings
section on page 29.
4. Restore the paths you set to off-line, according to the section on page 29.
Note: Accept the default configuration and monitor performance before making any
changes to the path settings.