HP XP24000/XP20000 Thin Provisioning Software User Guide Abstract This guide describes how to use HP XP Thin Provisioning Software to create virtual storage pools on HP XP24000/XP20000 storage systems and dynamically allocate volumes as applications need them. Topics include how to monitor virtual capacity and add to the pool without downtime.
© Copyright 2007, 2011 Hewlett-Packard Development Company, L.P. Confidential computer software. Valid license from HP required for possession, use or copying. Consistent with FAR 12.211 and 12.212, Commercial Computer Software, Computer Software Documentation, and Technical Data for Commercial Items are licensed to the U.S. Government under vendor's standard commercial license. The information contained herein is subject to change without notice.
Contents 1 Overview of HP XP Thin Provisioning Software................................................5 XP Thin Provisioning Features......................................................................................................5 XP Thin Provisioning Benefits......................................................................................................5 Nondisruptive Addition of Physical Disks.................................................................................
Create V-VOL Confirmation Dialog Box......................................................................................43 Connect Pool Dialog Box.........................................................................................................44 Change Threshold Dialog Box..................................................................................................45 Associate V-VOL Groups with Pool Dialog Box............................................................................
1 Overview of HP XP Thin Provisioning Software This chapter describes the general features and functions of HP XP Thin Provisioning Software.
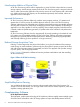
Nondisruptive Addition of Physical Disks An XP Thin Provisioning volume will be displayed as a Virtual LVI/LUN volume that has no actual storage capacity. Actual storage capacity from the XP Thin Provisioning pool is assigned when the data is written. Because the application only sees the amount of virtual capacity that is allocated to it, additional physical disk capacity can be installed transparently when needed, without an application service interruption.
recoverable without affecting service or performance levels. For more information about HP Replication Manager Software, HP XP Business Copy, HP XP Continuous Access, or HP XP Continuous Access Journal, see the respective product user guide. Performance Monitor Performance Monitor gives you detailed point-in-time reporting of the performance metrics of the storage system, so that you can promptly investigate threshold warnings and determine both your virtual and physical storage needs.
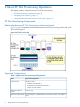
2 About XP Thin Provisioning Operations This chapter contains a technical overview of XP Thin Provisioning. • “XP Thin Provisioning Components” (page 8) • “Managing Pool Capacity” (page 11) • “Interoperability with Other Products and Functions” (page 17) XP Thin Provisioning Components Relationship between XP Thin Provisioning volumes and pools Figure 2 (page 8) illustrates the relationship between an XP Thin Provisioning volume and an XP Thin Provisioning pool.
Table 1 Supported XP Thin Provisioning Configurations (continued) Items Supported Configurations Maximum number of pool-VOLs 1024 per pool Capacity per Pool-VOL 8 GB to 4 TB Pools XP Thin Provisioning requires the use of pools. A storage system supports up to 128 pools, each of which can contain up to 1,024 pool-VOLs and 8,192 V-VOLs. Each pool requires a unique pool ID. XP Snapshot also uses pools.
Reclaiming Pages from a V-VOL A V-VOL used as a migration target from a traditional nondynamic provisioned volume may have large amounts of capacity dedicated to data that is all binary zeros. The XP Thin Provisioning pool capacity used for the binary zero data written to the V-VOL can be reclaimed and returned as available pool capacity. Capacity is provided to V-VOLs from the XP Thin Provisioning pool in 42-MB sized pages.
Table 2 How the V-VOL Management Table Is Stored When Data Is Lost From the Shared Memory (continued) Items Microcode Version 60–01–xx 60–02–xx or later Restoring the data from the dedicated area in the pool may take more time compared to restoring data from the SVP HDD. Therefore, mode 460 = ON is recommended. When mode 460 = ON, the data is stored in both the SVP HDD and the dedicated area in the pool.
Figure 3 Sample Pool Information You can use both XP Performance Advisor and Performance Monitor to collect I/O data on V-VOL and pool usage: • • Using XP Performance Advisor: ◦ The current used pool capacity and the chronological changes in the used pool capacity ◦ The current used V-VOL capacity (ratio of the stored data) and the chronological changes in the used V-VOL capacity Using Performance Monitor: ◦ Frequency of V-VOL access, read hit ratio, and write hit ratio ◦ Pool I/O rates in the par
The default method used during a full pool condition is to fail some read and write operations to V-VOLs using the pool. Read and write operations are handled in the following way: • Successfully read data that already exists in the V-VOL. Reads to Pool Pages already assigned to the V-VOL are successful. • Successfully update (write) data that already exists in the V-VOL. Writes to Pool Pages already assigned to the V-VOL are successful.
SNMP trap are reported. If the used capacity of the pool increases and it exceeds threshold 2 (80%), a SIM and an SNMP trap are reported again. Figure 5 Pool Capacity (When Pool Threshold 1 Is 50%) • V-VOL thresholds: The V-VOL threshold is the ratio (%) of the unassigned pool capacity to the unassigned V-VOL capacity. The threshold can be specified from 5% to 300%.
Figure 7 V-VOL Capacity and Pool Capacity (When V-VOL Threshold is 90%) SIM Reference Codes Table 3 (page 15) lists the SIM reference codes pertaining to XP Thin Provisioning. For more information on completing SIMs, see “Managing Pool-Related SIMs” (page 78). Table 3 SIM Reference Codes Codes (XXX is pool ID) Events 620XXX Pool usage level 5% to 95% in 5% exceeded pool threshold increments 1. Default: 70%.
Table 3 SIM Reference Codes (continued) Codes (XXX is pool ID) Events Thresholds or Values Various Types of Reports Completion report to Remote Web Console: Yes. Information to the operator: Yes with SOM741.
Interoperability with Other Products and Functions In certain cases, XP Thin Provisioning V-VOLs and pool-VOLs can be used in conjunction with other XP software products. Table 5 (page 17) lists the operations that are permitted and not permitted. Note that XP Thin Provisioning supports OPEN-V volumes only.
Table 5 Using XP Thin Provisioning with Other Products (continued) Option Name Permitted For more information, see the HP XP24000/XP20000 Continuous Access Software User Guide. XP Continuous Access Asynchronous Increasing the capacity of V-VOL used by this program product. None For more information, see HP XP24000/XP20000 Continuous Access Software User Guide. XP Continuous Access Journal For more information, see the XP24000/XP20000 Continuous Access Journal Software User Guide.
Using XP Continuous Access Software You can use XP Thin Provisioning in combination with XP Continuous Access to replicate V-VOLs. You can also use XP Continuous Access as a tool to move the data of the V-VOL for I/O load reasons. The recommended movement is between the P-VOL in pool A and S-VOL in pool B. Figure 8 (page 19) illustrates the interaction when the XP Continuous Access P-VOL and S-VOL are also XP Thin Provisioning V-VOLs. Table 6 (page 19) lists the specifics.
Figure 9 Using XP Thin Provisioning and XP Continuous Access Journal Table 7 Supported XP Continuous Access Journal and XP Thin Provisioning Combinations XP Continuous Access Journal P-VOL XP Continuous Access Journal S-VOL Explanation XP Thin Provisioning V-VOLs XP Thin Provisioning V-VOLs Supported At initial PAIR create time, pages in the S-VOL are freed if not needed for replicating the P-VOL.
NOTE: S-VOL. You cannot specify an XP Thin Provisioning pool-VOL as an XP Business Copy P-VOL or Zero page Reclaim (zero page discard) will not operate on a V-VOL being used as a P-VOL or S-VOL. Also you cannot make a P-VOL or S-VOL from a volume currently undergoing Zero Page Reclaim. Using XP Disk/Cache Partition You can assign V-VOLs and pool-VOLs to XP Disk/Cache Partition SLPRs and CLPRs, with the following restrictions: • All pool-VOLs in a pool must be allocated to the same CLPR.
3 Preparing for XP Thin Provisioning Operations This chapter describes the necessary environment for XP Thin Provisioning. • “Preparing the Storage System and Remote Web Console Computers” (page 22) • “Installing and Uninstalling XP Thin Provisioning” (page 26) Preparing the Storage System and Remote Web Console Computers Hardware and Software Requirements Before launching XP Thin Provisioning, you must take several preliminary steps. These include the following: • Install the storage system.
Table 9 Operating System and File System Capacity Operating System File System Metadata Writing Pool Capacity Consumed AIX JFS Writes metadata in 8 MB intervals. Size of V-VOL. If you change the Allocation Group Size settings when you create the file system, the metadata can be written to a maximum of 64 MB. Approximately 65% of the pool is used. HP-UX Linux JFS2 Writes metadata to first block. Small (one page). VxFS Writes metadata to first block. Small (one page).
Table 9 Operating System and File System Capacity (continued) Operating System File System Metadata Writing Pool Capacity Consumed NonStop NSK Writes metadata to first block. Small (one page). VMware (ESX Server) VMW Writes metadata to first block. Small (one page). VMware eager-zeroed thick formatting is not recommended because it forces the volume to fully allocate space in the pool. VMware thin formatting is not supported due to unpredictable results.
Table 10 Pool-VOL Requirements (continued) Item Requirement LDEV format You must perform LDEV formatting before the volume is registered in a pool. You cannot format pool-VOLs. Deleting pool-VOLs You cannot remove pool-VOLs registered in pools. You need to delete the pool in order to free the volumes. Path definition You cannot specify a volume with a path definition as a Pool-VOL.
Table 12 V-VOL Requirements (continued) Item Requirement Path definition Available. However, you cannot define paths unless you first associate the V-VOL with a pool. LDEV format Available. When you perform LDEV formatting on the V-VOLs, the storage system initializes data only in the consumed pool pages of the V-VOLs. However, after you perform an LDEV format, the free space in the pool does not increase because the pages are not released.
4 Using the XP Thin Provisioning GUI This chapter describes the XP Thin Provisioning windows and dialog boxes.
Figure 11 Pool Window Item Description Pool tree Shows the XP Thin Provisioning and XP Snapshot pools.
Item Description • Emulation: Emulation type. • RAID: RAID level. As a best practice, always specify the same RAID level for all pool-VOLs registered to the same pool. RAID-6 is recommended for large pools and where recovery time due to drive failure may be unacceptable. • Protection: Data protection level. If Data Retention Utility is installed, the Protection attribute is set using the Data Retention window in Remote Web Console.
Item Description • Threshold2: Fixed threshold compared to usage level. Threshold2 is always fixed at 80%. ◦ Warning: Usage level exceeds a threshold. ◦ Error: Usage level has reached 100%. • Threshold: Pool usage threshold (%). • Attribute: Program product that uses the pool. ◦ XP Thin Provisioning ◦ XP Snapshot • CLPR: CLPR number of the pool volume. Initialize or Optimize button If there is no pool in the storage system, this button initializes the entire V-VOL management area.
Item Description • Ext. VOL Info: Drive type of external volumes. ◦ Nothing appears for FC drives. ◦ An asterisk (*) indicates a SATA or BD drive. ◦ A dollar sign ($) indicates an SSD drive. ◦ Three consecutive hyphens (- - -) indicate an internal volume. • Cache Mode: if the volume is an external volume, cache mode appears. CAUTION: This cache mode is automatically specified when the external volume is mapped. Pool-VOLs with different cache modes cannot be intermixed in the same pool.
Item Description X1 = (remaining (GB) 1024) S1 = (X1 x 14 + (remaining (GB) - (X1 x 1024) ) S2 = ( ( Capacity of one V-VOL (GB) 84) 84) + 1) Total capacity of V-VOLs that can be associated with pools = (S1 Capacity of one V-VOL: S2) x ◦ indicates that the number enclosed by two downward arrows should be rounded down to the nearest whole number. ◦ indicates that the number enclosed by two upward arrows should be rounded up to the nearest whole number.
Item Description • Pool ID: Pool identifying number. • Usage Rate: Pool usage level as a percentage of the consumed V-VOL capacity to the total V-VOL capacity. • Used Page Num: Number of pages used in V-VOL. • Page Status: Current page status of V-VOL. ◦ Discarding Zero Data: Zero data is being discarded and the pages are being released. ◦ Discard Zero Data: XP Thin Provisioning is ready to discard zero data and release pages. This status appears in blue bold italics until Apply is clicked.
Table 14 V-VOL Window Pop-up Menu Commands Command Menu When you right-click the XP Thin Provisioning folder Function New V-VOL Group Opens the New V-VOL Group dialog box (see “Creating a New V-VOL Group (1)” (page 59)). Associate V-VOL Groups with Pool Opens the Associate V-VOL Groups with Pool dialog box (see “Associate V-VOL Groups with Pool Dialog Box” (page 46)). Associates V-VOLs in multiple V-VOL groups with a pool at the same time.
Figure 14 XP Thin Provisioning Window (LDKC:CU View) Figure 15 (page 36) shows the XP Thin Provisioning window with the Pool button selected.
Figure 15 XP Thin Provisioning Window (Pool View) Item Description LDKC:CU or Pool Use these options to filter the data to be displayed to view either LDKC:CU information or Pool information. V-VOL list Provides information about the selected V-VOL: • LDKC:CU:LDEV: Logical DKC (LDKC) number, CU number, and LDEV number. The icons can include the following: ◦ indicates a normal LDEV. ◦ indicates a secured volume. ◦ indicates a remote command device. ◦ indicates a command device.
Item Description ◦ Ready: You can perform an operation on the V-VOL. ◦ Processing: You cannot perform any operation on the V-VOL because another operation is being performed on the V-VOL. ◦ Discarding Zero Data: You cannot start a new operation for discarding zero data because discarding of zero data is currently taking place. ◦ Releasing: You cannot perform any operation on the V-VOL because another operation is being performed on the V-VOL. • Pool ID: Pool identifying number.
Item Description Do not use a number that is already in use as a pool ID number. Threshold Select the pool usage warning threshold, which is specified as a percentage. The range can be between 5 and 95. The default value is 70. If the pool usage level exceeds the threshold, the pool status changes to Warning status, when the pool is in Warning status, additional pool volumes should be added to the pool. Attribute XP Thin Provisioning should already be selected.
Item Description CLPR Select the cache logical partition. For more information on cache logical partitions, see the HP XP24000/XP20000 Disk/Cache Partition User Guide. Attribute Shows either XP Snapshot or XP Thin Provisioning Copy of V-VOL Groups Enter the number of V-VOL groups to be created. You can enter numbers from 0 to 63,231. This is the maximum per storage system. If you have any external volumes or XP Snapshot volumes, this maximum is decreased accordingly.
Item Description Capacity Enter the V-VOL capacity. • If you selected MB in the Capacity Unit drop-down list, you can enter numbers from 46 to 4,194,303. • If you selected block in the drop-down list, you can enter numbers from 96,000 to 8,589,934,592. • If you selected Cyl in the Capacity Unit drop-down list, you can enter numbers from 50 to 4,473,924. When you specify the Capacity Unit as MB or Cyl, the storage system optimally corrects the capacity.
Figure 20 Create V-VOL Dialog Box (2) Item Description V-VOL list Information about each V-VOL in the list: • No.: Number. • V-VOL Group: Group ID. • Emulation: Emulation type. • Capacity: Capacity. • LDCK:CU:LDEV: LDKC number, CU number, and LDEV number. XP Thin Provisioning LDEV numbers are followed by an X. XP Snapshot LDEV numbers are followed by a V. Select LDKC No. Select the LDKC. Select CU No. Select the CU.
Item Description Select LDEV No. The LDEV number grid. • The location on the grid indicates the LDEV number. The numbers across the top (CU number), combined with the numbers on the left side, indicate the LDEV number. For example, the LDEV number of the cell with a CU number of +2 and an LDEV number of +10 is 12. • Gray cells indicate LDEV numbers that are already in use. • White cells indicate unused LDEV numbers. • Blue cells indicate LDEVs that have been selected for the V-VOLs in this procedure.
Item Description from 00 to FF. A CU contains one or four boundary areas, which are fixed per CPU by factory settings. The parenthesized SSID is to the right of the boundary area. When SSID is not assigned to the boundary area, an exclamation point is added to the LDKC number, CU number, and boundary area icon, and “- - -” appears on the right side of the boundary area. : LDKC number or CU number. Indicates that SSID is assigned to the all boundary areas. : LDKC number or CU number.
Figure 22 Create V-VOL Confirmation Dialog Box Item Description V-VOL Group V-VOL group ID V-VOL information Information about each V-VOL in the group that you are creating: • VDEV: V-VOL group ID and VDEV number. • Emulation: Emulation type. • Capacity: Capacity. • LDKC:CU:LDEV: LDKC number, CU number, and LDEV number. Back Maintains the settings in this dialog box while returning you to the Create V-VOL Dialog box (2) (see “Create V-VOL Dialog Box (2)” (page 41)).
Figure 23 Connect Pool Dialog Box Item Description Pool ID Pool ID. Status Pool status (Normal or Blocked). Total Capacity The total pool capacity (value is truncated to 2 decimal places). Used Capacity Used pool capacity (value is truncated to 2 decimal places). Threshold Pool usage level threshold. Next Opens the Change Threshold dialog box, provided that you have selected a row. Cancel Cancels the operation and closes the dialog box.
Associate V-VOL Groups with Pool Dialog Box Access the Associate V-VOL Groups with Pool dialog box by opening the V-VOL window (see “V-VOL Window” (page 31)), right-clicking the XP Thin Provisioning icon, and then selecting Associate V-VOL Groups with Pool. Figure 25 Associate V-VOL Groups with Pool Dialog Box Item Description Attribute The name of the application that is going to use the V-VOL groups.
Item Description • Pool ID: Pool ID of the first LDEV in the V-VOL group. The following symbols are used to display status: ◦ If a V-VOL group is associated with a pool, a Pool ID is displayed in a blue bold italics. ◦ If a V-VOL group is released from a pool, a hyphen (-) is displayed. ◦ If the V-VOL group is not associated with a pool, a space is displayed. • Threshold: Threshold (5% to 300%) that applies to the first LDEV in the V-VOL group.
Figure 26 Release V-VOL Groups from Pool Dialog Box Item Description Attribute The name of the application that is going to use the V-VOL groups is displayed. This is the name of the application whose icon you right-clicked in order to display the Release V-VOL Groups from Pool dialog box. Pool ID Select the CLPR of the V-VOL group that you want to release from a pool. If All is selected, all V-VOL groups associated with a pool are displayed.
Item Description • Pool ID: Pool ID of the first LDEV in the V-VOL group. The following symbols are used to display status: ◦ If the V-VOL group is associated with a pool, the Pool ID is displayed in a blue bold italic. ◦ If the V-VOL group is released from pool, a hyphen (-) is displayed. ◦ If the V-VOL group is not associated with a pool, a space is displayed. • Threshold: Threshold (5% to 300%) that applies to the first LDEV in the V-VOL group.
Figure 27 Delete V-VOL Groups Dialog Box Item Description Attribute The name of the application that is going to use the V-VOL groups is displayed. This is the name of the application whose icon you right-clicked in order to display the Delete V-VOL Groups dialog box. CLPR Select the CLPR of the V-VOL groups. If All is selected, all V-VOL groups in all CLPRs are displayed. V-VOL information Information about the V-VOL groups that you are going to delete. • V-VOL Group: V-VOL group ID.
Item Description Set Specifies that the V-VOL groups selected in the V-VOL information setting list will be deleted. The V-VOL groups to be deleted appear in blue bold italics. Clear Clears each setting in the V-VOL information setting list. OK Closes the Delete V-VOL Groups dialog box and a confirmation message appears asking whether it is OK to apply the setting to the storage system. Cancel Cancels all the settings in the Delete V-VOL Groups dialog box.
5 Performing XP Thin Provisioning Operations This chapter gives instructions for performing XP Thin Provisioning operations. • “XP Thin Provisioning Flow Chart” (page 52) • “Managing Pools” (page 52) • “Managing V-VOLs and V-VOL Groups” (page 57) XP Thin Provisioning Flow Chart Only Storage Administrators can perform XP Thin Provisioning operations. Figure 28 (page 52) illustrates the XP Thin Provisioning functions.
Viewing Pool Information To view the pool information: 1. From the File menu, select Basic Information. The Report Display window opens. The Port tab is the default view. 2. Click the XP Thin Provisioning tab to display the XP Thin Provisioning window (see Figure 29 (page 53)). Select the LDKC:CU button to view information sorted by CU number. Select the Pool button to view information sorted by pool. Figure 29 Viewing the XP Thin Provisioning Information 3.
3. In the New Pool dialog box (see “Defining a New Pool” (page 54)), do the following: • In the Pool ID text box, enter the number for the pool ID. Use numbers from 0 to 127 and do not select a number that is already in use for any other pool (XP Thin Provisioning or XP Snapshot). • In the Threshold list, select the pool usage level threshold. This is expressed as a percentage of pool usage over pool capacity.
Associating the Pool-VOL with the Pool To associate one or more pool-VOLs to a pool: 1. Access the Pool window by selecting Go Volume Manager Pool (see “Accessing the Pool Window” (page 54)). 2. In the Pool tree, in the upper left corner of the Pool window, select a pool. 3. In the Free LDEVs list, in the bottom right corner of the window, select the volumes that you want to register in the pool as pool-VOLs. • If you select an LDKC number from the list, the CU list will contain CUs only within that LDKC.
Deleting a Single Pool A pool can be deleted only when there are no V-VOLs associated with the pool. Confirm that the pool usage is 0 and the pool association with V-VOL has been deleted, and then you can delete a single pool. To delete a pool: 1. Access the Pool window by selecting Go Volume Manager Pool (see “Accessing the Pool Window” (page 54)). 2. If the pool is associated with any V-VOL, disassociate it and confirm that the pool usage is 0 (see “Releasing a V-VOL from a Pool” (page 62)).
3. 4. Select Restore Pools, and then select OK on the confirmation message. The pool icon will change to indicate a normal pool. Pool icons are described in “Pool Window” (page 27). Click Apply, and then click OK to restore the pool. Recovering Multiple Blocked Pools To recover multiple blocked pools: 1. Access the Pool window by selecting Go Volume Manager Pool (see “Accessing the Pool Window” (page 54)). 2.
4. 5. • In CLPR, select the CLPR number. • In Copy of V-VOL Groups, enter the number of V-VOL groups to be created. You can enter numbers from 0 to 63,231. This is the maximum per storage system. If you have any external volumes or any XP Snapshot volumes, this maximum is decreased accordingly. If you enter 0, no V-VOL group will be created. Click Next. In the Create V-VOL dialog box (2) (see “Creating a New V-VOL Group (1)” (page 59)), do the following: • In Emulation Type, select OPEN-V.
9. In the Create V-VOL Group Confirmation dialog box (see “Confirming V-VOL Group Creation” (page 60)), verify that the settings are correct, and then click OK. The new V-VOLs appear in blue bold italics. 10. Click Apply, and then click OK to create the V-VOLs.
Figure 35 Creating a New V-VOL Group (3) Figure 36 Confirming V-VOL Group Creation Changing the V-VOL Settings Associating a V-VOL with a Pool To associate a V-VOL with a pool: 60 Performing XP Thin Provisioning Operations
1. 2. 3. 4. 5. 6. Access the V-VOL window by selecting Go Volume Manager V-VOL (see “Selecting the V-VOL Group” (page 61)). In the V-VOL Group–V-VOL tree on the left side of the window, select the V-VOL group that contains the V-VOLs that you want to associate with a pool. This will display the information for the individual V-VOLs on the right side of the window.
Figure 39 Changing the Threshold Releasing a V-VOL from a Pool If you release a V-VOL from the pool, the free space is added back into the pool. To release a V-VOL from a pool: 1. Release the path definitions to the V-VOLs to be deleted. For instructions, see the HP XP24000/XP20000 LUN Manager User Guide. 2. Access the V-VOL window by selecting Go Volume Manager V-VOL (see “Selecting the V-VOL Group” (page 61)). 3.
• HP-UX 11.31 • OpenVMS 8.3 • Red Hat Enterprise Linux 5.1 Do not increase the capacity of V-VOLs used online to any other host. Any V-VOL's capacity can be increased if the V-VOL is offline to all hosts. Always check that the host operating system, volume manager, and file system accept that a LUN’s capacity can be increased before attempting a V-VOL capacity increase. Also review and test the proper procedure documented by the hosts’s operating system concerning increasing a LUN’s capacity.
NOTE: • If system option mode 726 is enabled (not the default setting), you can set only one V-VOL in one V-VOL group. You can increase the size of the V-VOL without first migrating the V-VOL, but you cannot use the V-VOL as a custom-sized volume (CVS). • If system option mode 726 is disabled (the default setting), you can set more than one V-VOL in one V-VOL group.
Figure 41 Relation Between Increasing V-VOL Capacity and V-VOL Threshold Managing V-VOLs and V-VOL Groups 65
For more information on the raidvchkset command for increasing V-VOL capacity, see the HP XP RAID Manager User Guide. CAUTION: When increasing the V-VOL capacity, do not perform the following operations. When performing the following operations, do not increase the V-VOL capacity.
Zero data cannot be discarded if all the following conditions are satisfied: • The V-VOL status is normal. • The V-VOL is not associated with a pool. • Zero data in the V-VOL are already being discarded. To release the pages in a V-VOL: 1. In the Remote Web Console, access the V-VOL window by selecting Go Volume Manager V-VOL (see “Selecting the V-VOL Group” (page 61)). 2.
1. 2. 3. Access the V-VOL window (see “Selecting the V-VOL Group” (page 61)) by selecting Go Volume Manager V-VOL . Right-click XP Thin Provisioning in the V-VOL group tree of the V-VOL window, and then select Associate V-VOL Groups with Pool. The Associate V-VOL Groups with Pool dialog box opens (see Figure 42 (page 69)). Depending on your environment, it may take up to 30 seconds to open the Associate V-VOL Groups with Pool dialog box.
Figure 42 Associate V-VOL Groups with Pool Dialog Box Releasing Multiple V-VOL Groups from a Pool Before releasing V-VOL groups from a pool, confirm that the pool-VOLs added to the pool are not blocked. If the pool-VOLs are blocked, restore the volume status, then release the V-VOLs from a pool. Also, if the cache write pending rate exceeds 55%, the pool usage may not be 0, because the V-VOL cannot be released from the pool.
To release multiple V-VOL groups from a pool: CAUTION: Confirm that the pool-VOLs that are added to a pool are not blocked. If the pool-VOLs are blocked, restore the volume status, and then release the V-VOLs from a pool. 1. 2. 3. Access the V-VOL window by selecting Go Volume Manager V-VOL (see “Selecting the V-VOL Group” (page 61)). Right-click XP Thin Provisioning in the V-VOL group tree of the V-VOL window, and select Release V-VOL Groups from Pool.
Figure 43 Release V-VOL Groups from Pool Dialog Box Deleting V-VOL Groups Typically you specify and delete a single V-VOL group. If you choose to delete multiple V-VOL groups, all V-VOLs in multiple V-VOL groups will be deleted. Deleting a V-VOL Group You can delete a V-VOL group and all V-VOLs in the V-VOL group. V-VOL groups associated with a pool ID cannot be deleted. To delete such a group, first release the V-VOL group from a pool, then delete it. To delete a V-VOL group: 1.
1. 2. 3. 4. 5. 6. Access the V-VOL window by selecting Go Volume Manager V-VOL (see “Selecting the V-VOL Group” (page 61)). Right-click XP Thin Provisioning in the V-VOL group tree of the V-VOL window, and then select Delete V-VOL Groups. The Delete V-VOL Groups dialog box opens (see “Delete V-VOL Groups Dialog Box” (page 50)). Depending on your environment, it may take 30 seconds to open the Delete V-VOL Groups dialog box.
To delete selected V-VOLs: 1. Delete the selected V-VOLs using the Virtual LVI/LUN Volume to Space function. For more information, see the HP XP24000/XP20000 Virtual LVI/LUN (VLL) and Volume Shredder User Guide. 2. In the VLL tree in the upper left corner of the VLL window, select the XP Thin Provisioning folder and then select the parity group. 3. From the V-VOL list on the upper right, select the target V-VOL groups from the list of the V-VOL groups, and then select the LDEV to be deleted.
6 Troubleshooting This chapter describes how to troubleshoot XP Thin Provisioning problems. • “XP Thin Provisioning Troubleshooting” (page 74) • “Managing Pool-Related SIMs” (page 78) • “Troubleshooting when using XP RAID Manager” (page 79) • “Calling HP Technical Support” (page 80) XP Thin Provisioning Troubleshooting Table 15 (page 74) provides troubleshooting instructions for XP Thin Provisioning operations.
Table 15 Troubleshooting for XP Thin Provisioning (continued) Problems Causes and Solutions Solutions: • Add free LDEVs to another pool. See “Viewing Pool Information” (page 53). • Add a pool-VOL whose the CLPR number is same as the CLPR number of existing pool-VOLs. • Confirm that the pool-VOL meets the pool requirements. See “Volume and Pool Requirements” (page 24). • Ask HP technical support to solve the problem. Cannot assign a V-VOL to a pool. Causes: • The pool usage level is 100%.
Table 15 Troubleshooting for XP Thin Provisioning (continued) Problems Causes and Solutions A pool usage cannot be 0. Cause: • Because the cache write pending rate exceeds 55 %, the V-VOL cannot be disassociated from the pool. Solution: • Decrease the cache write pending rate to less than 55% by reducing the host I/O. I/O errors on some writes occur on V-VOLs Causes: • Free space for the pool is completely exhausted. The pool usage level is at 100%. • Something in the storage system is blocked.
Table 15 Troubleshooting for XP Thin Provisioning (continued) Problems Causes and Solutions Cannot discard zero data in a V-VOL. Cause: • Zero data in the V-VOL cannot be discarded from Remote Web Console because the V-VOL does not meet the conditions described in “Releasing Pages in a V-VOL” (page 66). Solution: • Make sure that the V-VOL meets the conditions described in “Releasing Pages in a V-VOL” (page 66). The V-VOL cannot not be released though Cause: zero data in the V-VOL is discarded.
If you are unable to solve a problem using the above suggestions, or if you encounter a problem not listed, contact HP technical support. If an error occurs during the operations, the error code and error message are displayed in the error message box. For more information about error messages, see the HP XP24000/XP20000 Remote Web Console Error Codes.
Troubleshooting when using XP RAID Manager If an error has occurs when increasing V-VOL capacity using XP RAID Manager, you may be able to identify the cause of the error by referring to the log displayed in the XP RAID Manager window or XP RAID Manager operation log file. The log file is stored in the following directory by default: /HORCM/log*/curlog/horcmlog_HOST/horcm.log Where: • * is the instance number. • HOST is the host name.
Table 16 Error Code and Error Contents When Operating XP RAID Manager (continued) Error Code (SSB1) Error Code (SSB2) Error Contents Solution 0xb96b 0xaf25 The operation was rejected because releasing pages in the specified volume has not been completed. Reexecute the operation after a brief interval. 0xb96b 0xaf29 Because the specified volume Makes sure that the volume is was not a V-VOL, the a V-VOL. operation was rejected.
• The Remote Web Console configuration information (use the FD Dump Tool) • The service information messages (SIMs), including reference codes and severity levels, displayed by Remote Web Console For worldwide technical support information, see the HP support website: http://www.hp.
7 Support and Other Resources Related Documentation • HP XP24000/XP20000 Cache Residency Manager User Guide • HP XP RAID Manager User Guide • HP XP24000/XP20000 Snapshot User Guide • HP XP24000/XP20000 Data Retention Utility User Guide • HP XP24000/XP20000 LUN Expansion User Guide • HP XP24000/XP20000 LUN Manager User Guide • HP XP24000/XP20000 Performance Monitor User Guide • HP XP24000/XP20000 Auto LUN Software User Guide • HP XP24000/XP20000 Performance Control User Guide • HP XP24000/
• 1 TB (terabyte) = 1,024 GB or 1,0244 bytes • 1 PB (petabyte) = 1,024 TB or 1,0245 bytes • 1 block = 512 bytes HP Technical Support For worldwide technical support information, see the HP support website: http://www.hp.
Glossary C CLPR Cache logical partition. CU Control unit. CV Custom-sized volume. CYL Cylinder. D DKA Disk adapter. DKC Disk controller. DKCMAIN Disk controller main. G G-ID Host group ID. L LD, LDEV Logical device. An LDEV is created when a RAID group is carved into pieces according to the selected host emulation mode (that is, OPEN-3, OPEN-8, OPEN-9). The number of resulting LDEVs depends on the selected emulation mode. The term LDEV is also known as term volume.
V V-VOL Virtual volume. VDEV Virtual device. VLL Virtual LVI/LUN. VMA Volume management area.
Index A P a V-VOL management area, 10 associating V-VOLs in multiple V-VOL Groups with a pool, 46 pool, 9 Pool and Virtual Volumes, 8 pool requirements, 24, 25 Pool Status, 16 pool window, 27, 31 pool-VOL requirements, 25 pool-VOLs, 9 pools, 27, 31 pop-up menu V-VOL group tree and the V-VOL list, 34 pop-up menus pool tree, 31 C changing the pool information, 55 Changing the V-VOL Information, 60 changing the V-VOL settings of multiple V-VOL groups, 67 changing threshold of the V-VOL, 62 conventions stor
W websites HP, 83 HP Subscriber's Choice for Business, 83 product manuals, 82 X XP XP XP XP XP Business Copy, 20 Disk/Cache Partition, 21 Thin Provisioning Components, 8 Thin Provisioning troubleshooting, 74 Thin Provisioning window, 34 87