HP Stream 7 Tablet Maintenance and Service Guide IMPORTANT! This document is intended for HP authorized service providers only.
© Copyright 2014 Hewlett-Packard Development Company, L.P. Bluetooth is a trademark owned by its proprietor and used by Hewlett-Packard Company under license. Intel is a trademark of Intel Corporation in the U.S. and other countries. Microsoft and Windows are U.S. registered trademarks of the Microsoft group of companies. SD Logo is a trademark of its proprietor. The information contained herein is subject to change without notice.
Safety warning notice WARNING! To reduce the possibility of heat-related injuries or of overheating the device, do not place the device directly on your lap or obstruct the device air vents. Use the device only on a hard, flat surface. Do not allow another hard surface, such as an adjoining optional printer, or a soft surface, such as pillows or rugs or clothing, to block airflow. Also, do not allow the AC adapter to contact the skin or a soft surface, such as pillows or rugs or clothing, during operation.
iv Safety warning notice
Table of contents 1 Product description ....................................................................................................................................... 1 2 External component identification ................................................................................................................. 2 3 Illustrated parts catalog ................................................................................................................................
Specifications ............................................................................................................................................. 29 7 Using HP PC Hardware Diagnostics (UEFI) ...................................................................................................... 30 Downloading HP PC Hardware Diagnostics (UEFI) to a USB device .................................................................... 30 8 Backup and recovery ..............................................
1 Product description Category Description Product Name HP Stream 7 Tablet Processor Intel® Atom Z3735G quad core 1.3 GHz/ 1.80 GHz burst mode processor Panel 7.
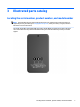
2 2 External component identification Item Component Item Component (1) Rear-facing webcamera (6) Volume control button (2) Micro USB 2.
3 Illustrated parts catalog Locating the serial number, product number, and model number NOTE: HP continually improves and changes product parts. For complete and current information on supported parts for your tablet, go to http://partsurfer.hp.com, select your country or region, and then follow the on-screen instructions. The model number (1), serial number (2), and product number (3) of your tablet are located on the back cover of the tablet.
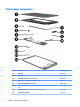
Tablet major components 4 Item Component Spare part number (1) Back cover 796782-001 (2) Mid-frame cover 796783-001 (3) Front-facing webcamera (includes cable) 796786-001 (4) Battery, 3000 mAh, USB-charging (includes cable) 795065-001 (5) Rear-facing webcamera (includes cable) 796787-001 (6) Speaker Kit (includes speaker and cables); the speaker is also spared with the system board 796788-001 (7) Antenna board (includes WLAN antenna cable and transceiver) 796789-001 (8) Speaker ru
Item Component (9) System board equipped with Atom Z3735G processor, 1 GB RAM memory, and 32 GB eMMC hard drive (includes microphone, audio-out (headphone)/audio-in (microphone) jack, micro USB 2.
Component Spare part number For use only in Germany 794637-041 For use only in Greece 794637-151 For use only in Hungary 794637-211 For use only in Israel 794637-BB1 For use only in Italy 794637-061 For use only in Latin America 794637-161 For use only in the Netherlands 794637-331 For use only in Nordic Regions 794637-DH1 For use only in the North America 794637-001 For use only in the People's Republic of China 794637-AA1 For use only in Poland 794637-241 For use only in Portugal
Spare part number Description 794637-031 HP Stream 7, equipped with Atom Z3735G processor, 1 GB RAM memory, and 32 GB eMMC hard drive, for use only in the United Kingdom 794637-041 HP Stream 7, equipped with Atom Z3735G processor, 1 GB RAM memory, and 32 GB eMMC hard drive, for use only in Germany 794637-051 HP Stream 7, equipped with Atom Z3735G processor, 1 GB RAM memory, and 32 GB eMMC hard drive, for use only in France 794637-061 HP Stream 7, equipped with Atom Z3735G processor, 1 GB RAM memory
8 Spare part number Description 794637-DL1 HP Stream 7, equipped with Atom Z3735G processor, 1 GB RAM memory, and 32 GB eMMC hard drive, for use only in Saudi Arabia 794637-DT1 HP Stream 7, equipped with Atom Z3735G processor, 1 GB RAM memory, and 32 GB eMMC hard drive, for use only in the Baltics 794637-F81 HP Stream 7, equipped with Atom Z3735G processor, 1 GB RAM memory, and 32 GB eMMC hard drive, for use only in the Adriatic Region 794637-FL1 HP Stream 7, equipped with Atom Z3735G processor, 1
4 Removal and replacement preliminary requirements Tools required You will need the following tools to complete the removal and replacement procedures: ● Magnetic screw driver ● Phillips P0 screw driver ● Plastic case utility tool Service considerations The following sections include some of the considerations that you must keep in mind during disassembly and assembly procedures.
An electronic device exposed to ESD may not be affected at all and can work perfectly throughout a normal cycle. Or the device may function normally for a while, then degrade in the internal layers, reducing its life expectancy. CAUTION: To prevent damage to the tablet when you are removing or installing internal components, observe these precautions: Keep components in their electrostatic-safe containers until you are ready to install them.
Packaging and transporting guidelines Follow these grounding guidelines when packaging and transporting equipment: ● To avoid hand contact, transport products in static-safe tubes, bags, or boxes. ● Protect ESD-sensitive parts and assemblies with conductive or approved containers or packaging. ● Keep ESD-sensitive parts in their containers until the parts arrive at static-free workstations. ● Place items on a grounded surface before removing items from their containers.
Equipment guidelines Grounding equipment must include either a wrist strap or a foot strap at a grounded workstation. ● When seated, wear a wrist strap connected to a grounded system. Wrist straps are flexible straps with a minimum of one megohm ±10% resistance in the ground cords. To provide proper ground, wear a strap snugly against the skin at all times. On grounded mats with banana-plug connectors, use alligator clips to connect a wrist strap.
5 Removal and replacement procedures Tablet component replacement procedures CAUTION: Tablet components described in this chapter should only be accessed by an authorized service provider. Accessing these parts can damage the tablet and void the warranty. NOTE: HP continually improves and changes product parts. For complete and current information on supported parts for your tablet, go to http://partsurfer.hp.com, select your country or region, and then follow the on-screen instructions.
3. Remove the back cover (3). Reverse this procedure to install the back cover. Mid-frame cover Description Spare part number Mid-frame cover 796783-001 1. Turn off the tablet. If you are unsure whether the tablet is off or in Hibernation, turn the tablet on, and then shut it down through the operating system. 2. Disconnect the power from the tablet by unplugging the power adapter cord from the tablet. 3. Disconnect all external devices from the tablet. 4.
2. Lift the mid-frame cover (2) from the battery area. Reverse this procedure to install the mid-frame cover. Battery Description Spare part number Battery, 3000 mAh, USB-charging (includes cable) 795065-001 Before removing the battery, follow these steps: 1. Turn off the tablet. If you are unsure whether the tablet is off or in Hibernation, turn the tablet on, and then shut it down through the operating system. 2.
NOTE: Disconnect the battery cable carefully; pulling too hard can break the system board connector. 1. Disconnect the battery cable (1) from the system board. 2. Release the battery tabs and tape (2) holding the battery. NOTE: Be careful not to bend the battery as you lift it. 3. Lift up the battery (3) to release it. 4. Remove the battery (4). Reverse this procedure to install the battery.
5. Remove the mid-frame cover (see Mid-frame cover on page 14). 6. Disconnect the battery (see Battery on page 15). Remove the rear-facing webcamera: 1. Disconnect the rear-facing webcamera cable (1) from the system board. 2. Remove the rear-facing webcamera (2) from the display panel assembly. Reverse this procedure to install the rear-facing webcamera.
5. Remove the mid-frame cover (see Mid-frame cover on page 14). 6. Disconnect the battery (see Battery on page 15). Remove the front-facing webcamera: 1. Release the ZIF connector (1) to which the front-facing webcamera cable is attached. 2. Remove the front-facing webcamera (2) from the display panel assembly. Reverse this procedure to install the front-facing webcamera.
Antenna board Description Spare part number Antenna (includes WLAN antenna cable and transceiver) 796789-001 Before removing the antenna board, follow these steps: 1. Turn off the tablet. If you are unsure whether the tablet is off or in Hibernation, turn the tablet on, and then shut it down through the operating system. 2. Disconnect the power from the tablet by unplugging the power adapter cord from the tablet. 3. Disconnect all external devices from the tablet. 4.
Display cable Description Spare part number Display cable 796790-001 Before removing the display cable, follow these steps: 1. Turn off the tablet. If you are unsure whether the tablet is off or in Hibernation, turn the tablet on, and then shut it down through the operating system. 2. Disconnect the power from the tablet by unplugging the power adapter cord from the tablet. 3. Disconnect all external devices from the tablet. 4. Remove the back cover (see Back cover on page 13). 5.
4. Slide the display cable (5) to the right to remove it. Reverse this procedure to install the display cable. Speaker NOTE: The speaker is also spared with the system board. Description Spare part number Speaker Kit (includes speaker and cables) 796788-001 Speaker rubber protector 796792-001 Before removing the speaker, follow these steps: 1. Turn off the tablet.
Remove the speaker: 1. Remove the shield tape (1) that covers the speaker cables. 2. Make note of the location the speaker cables are soldered on the system board, and then unsolder the speaker cables (2) from the system board speaker connectors. NOTE: When installing the speaker, the red speaker cable should be soldered to the system board speaker “positive” terminal. The black speaker cable should be soldered to the system board speaker “negative” terminal. 3. Remove the speaker (3). 4.
Description Spare part number For use only in Latin America 796785-161 For use only in the North America 796785-001 Before removing the system board, follow these steps: 1. Turn off the tablet. If you are unsure whether the tablet is off or in Hibernation, turn the tablet on, and then shut it down through the operating system. 2. Disconnect the power from the tablet by unplugging the power adapter cord from the tablet. 3. Disconnect all external devices from the tablet. 4.
2. Release the system board ZIF connectors to which the following cables are connected, and then disconnect the following cables from the system board: (1) Button board (2) Touch controller (3) Display panel graphics 24 3. Remove the two Phillips PM1.3×1.6 screws (1) that secure the system board to the display panel assembly. 4. Remove the system board (2).
5. Slide off the metal audio-out (headphone)/audio-in (microphone) jack, and micro USB 2.0 port protection plate (3). Retain this plate to insert on the replacement system board. NOTE: The protection plate and the left side of the system board are also held in place by two screws that were previously removed when the mid-frame cover was removed. Reverse this procedure to install the system board.
Power button board Description Spare part number Power button board 796791-001 Before removing the power button board, follow these steps: 1. Turn off the tablet. If you are unsure whether the tablet is off or in Hibernation, turn the tablet on, and then shut it down through the operating system. 2. Disconnect the power from the tablet by unplugging the power adapter cord from the tablet. 3. Disconnect all external devices from the tablet. 4. Remove the back cover (see Back cover on page 13). 5.
Power button Description Spare part number Power button 796793-001 Before removing the power button, follow these steps: 1. Turn off the tablet. If you are unsure whether the tablet is off or in Hibernation, turn the tablet on, and then shut it down through the operating system. 2. Disconnect the power from the tablet by unplugging the power adapter cord from the tablet. 3. Disconnect all external devices from the tablet. 4. Remove the back cover (see Back cover on page 13). 5.
Volume control button Description Spare part number Volume control button 796794-001 Before removing the volume control button, follow these steps: 1. Turn off the tablet. If you are unsure whether the tablet is off or in Hibernation, turn the tablet on, and then shut it down through the operating system. 2. Disconnect the power from the tablet by unplugging the power adapter cord from the tablet. 3. Disconnect all external devices from the tablet. 4.
6 Specifications Metric U.S. Height 11.07 cm 4.36 in Width 19.27 cm 7.59 in Depth 0.99 cm 0.37 in Weight (lowest weight configuration) 0.36 kg 0.79 lb Dimensions (portrait orientation) Input power The tablet operates on DC power, which can be supplied by an AC or a DC power source. The AC power source must be rated at 100-240 V, 50/60 Hz, 0.3-1.0 A. NOTE: The tablet can operate on DC power using an industry-standard micro-B USB cable.
7 Using HP PC Hardware Diagnostics (UEFI) HP PC Hardware Diagnostics is a Unified Extensible Firmware Interface (UEFI) that allows you to run diagnostic tests to determine whether the tablet hardware is functioning properly. The tool runs outside the operating system so that it can isolate hardware failures from issues that are caused by the operating system or other software components. To start HP PC Hardware Diagnostics (UEFI): 1. Turn off the tablet. 2. Press and hold the Volume down button. 3.
8 Backup and recovery To protect your information, use Windows backup and restore utilities to back up individual files and folders, back up your entire hard drive, or create system restore points. In case of system failure, you can use the backup files to restore the contents of your tablet. 1. Swipe from the right edge of the touch screen to display the charms, tap Search, and then tap the search box. 2. In the search box, type restore, and then select from the list of displayed options.
5. While continuing to hold the Volume down button, press the power button to turn on the tablet. The Startup menu is displayed. After the startup menu is displayed, release the Volume down button. 6. Tap F9 Boot Options. 7. Select the external flash drive as the boot device. 8. Restart the tablet, and follow the on-screen instructions to continue.
9 Power adapter requirements The wide-range input feature of the tablet permits it to operate from any line voltage from 100 to 120 volts AC, or from 220 to 240 volts AC. The 2-conductor power adapter included with the tablet meets the requirements for use in the country or region where the equipment is purchased. Power adapters for use in other countries and regions must meet the requirements of the country or region where the tablet is used.
34 Country/region Accredited agency Norway NEMKO The People's Republic of China CCC Saudi Arabia SASO Singapore PSB South Africa SABS South Korea KTL Sweden SEMKO Switzerland SEV Taiwan BSMI Thailand TISI The United Kingdom ASTA The United States UL Chapter 9 Power adapter requirements
10 Recycling When a non-rechargeable or rechargeable battery has reached the end of its useful life, do not dispose of the battery in general household waste. Follow the local laws and regulations in your area for battery disposal. HP encourages customers to recycle used electronic hardware, HP original print cartridges, and rechargeable batteries. For more information about recycling programs, see the HP Web site at http://www.hp.com/ recycle.
Index A AC adapter, spare part numbers 5, 6 antenna board removal 19 spare part number 4, 8, 19 audio, product description 1 audio-in jack 2 audio-out jack 2 B back cover removal 13 spare part number 4, 8, 13 battery removal 15 spare part number 4, 8, 15 buttons power 2 volume control 2 C cables, service considerations 9 Card Reader slot, location 2 connectors, service considerations 9 D display cable removal 20 spare 20 spare part number 5 spare part numbers 8 display panel assembly, spare part number 5, 8
S Screw Kit, spare part number 6, 8 sensor, product description 1 service considerations cables 9 connectors 9 plastic parts 9 serviceability, product description 1 speaker location 2 removal 21 spare part number 4, 8, 21 Speaker Kit, spare part number 4, 8, 21 speaker rubber protector spare part numbers 4, 8 storage, product description 1 system board removal 22 spare part number 5, 8, 22 Windows button, location 2 wireless networking, product description 1 workstation guidelines 11 T tablet major compon