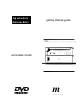
hp surestore dvd-rom drive getting started guide removable model m i n v e n t
Scsi, Scsi, D fl ii Scsi,Û n Scsi, D H 1 hp surestore tape array 5300
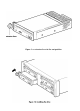
HP Surestore DVD-ROM rack-ready drives - overview HP Surestore DVD-ROM rack-ready drives are designed to be installed in a rack-mounted HP Surestore Tape Array 5300. Refer to the documentation supplied with your tape array for tape array installation instructions. Before you start page 3 Step 1: Install the drive page 7 Ensure the drive extractor lever is in the oy/'position. Slide the DVD-ROM drive into an empty bay of the tape array.
Copyright © 2001 by Hewlett-Packard Limited. June 2001 Part Number: C7499-90900 The information contained in this document is subject to change without notice. This document contains proprietary information which is protected by copyright. All rights are reserved. No part of this document may be photocopied, reproduced or translated to another language without the prior written consent of Hewlett-Packard Limited.
Before you start HP Surestore DVD-ROM rack-ready models HP Surestore DVD-ROM rack-ready drives are installed in an HP Surestore Tape Array 5300. They allow the user to install software from CD or DVD disks if the server itself does not have a CD or DVD-ROM drive. HP Surestore DVD-ROM rack-ready drives may be used in conjunction with other HP Surestore rack-ready devices.
latest version of this document can be downloaded from / / w w w . h p . c o m / s u p p o r t / tapearray. You will need to order the correct length and SCSI connector type cables and terminators to suit your particular configuration. Cable and terminators options are listed at the HP tape arraysupportwebsite: / / w w w . h p . c o m / s u p p o r t / t a p e a r r a y , and can be ordered from your local HP sales office.
Product specification HP's rack-ready DVD-ROMs have the following features and benefits: • Half-height array module for use with HP Surestore Tape Array 5300. • DVD and CD read functionality in a racked environment. • High data transfer rate (CAV 10x as DVD-ROM, CAV 40x as CD-ROM). • Enables software loading in a racked environment. • Supports offline swapping (drives may be swapped without powering down the tape array as long as there is no other activity on the bus). Physical dimensions 42 mm (1.65 in.
Figure 1 a: extractor lever in the out position
Step 1 : Install the drive HP Surestore DVD-ROM rack-ready drives are designed to be installed in a rack-mounted HP Surestore Tape Array 5300, which may also contain other HP Surestore DVD-ROM drives or tape backup devices. Refer to the documentation supplied with your tape array for tape array installation instructions. 1 Before installing a DVD-ROM drive, make sure that the extractor lever is in the fully open position (pulled out) as shown on figure la.
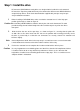
Figure 2: setting the SCSI ID
Step 2: Set the drive's SCSI ID Note SCSI IDs for drives in the tape array are set on the back panel of the array. HP Surestore DVDROM rack-ready drives can be assigned any unused\D between 1 and 6. Do not use SCSI ID 7, which is reserved for the SCSI controller, or SCSI ID 0, which is typically assigned to the boot disk. 1 Decide which SCSI ID to use. Set the appropriate switch, as shown in figure 2.
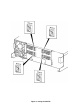
emergency disk loading Figure 3: DVD-ROM drive controls and indicators 10
Your HP Surestore DVD-ROM rack-ready drive There is one LED, an eject button and an emergency eject slot on the front panel of your DVDROM drive. See page 13 for more information about loading and unloading disks and page 17 for information about forcing ejection. Front panel LEDs There is one LED as illustrated in the diagram. (See figure 3.
Figure 4a: loading a disk Figure 4b: unloading a disk 12
Operating the DVD drive To load a CD or DVD 1 Insert a CD or DVD into the disk loading slot with the printed side facing up, as shown in figure 4a. 2 The Activity LED lights while the drive reads the CD or DVD to initialize. When the LED turns off, the CD or DVD is ready for use. To unload a CD or DVD 1 Wait for the DVD-ROM drive activity to stop. 2 Press the eject button, as shown in figure 4b. The CD or DVD will slide out. (This may take a few seconds). 3 Place the CD or DVD in its box or sleeve.
Figure 5b: removing the drive 14
Replacing the drive HP Surestore DVD-ROM rack-ready drives can be removed and replaced without powering down the tape array. However you should be aware of the following: • If all drives in the tape array are powered up when the system is turned on, the host will be aware of those drives. You can remove any of those drives and replace it with another drive as long as there is no activity on the bus.
Troubleshooting DVD-ROM drive not performing correctly If the DVD-ROM drive is not performing correctly, confirm the following: • Power switch on the HP Surestore Tape Array 5300 is ON • Power LED on the HP Surestore Tape Array 5300 is ON • DVD-ROM disk does not have smudges, scratches, abrasion or other damage • SCSI cables on the rear of the tape array are connected properly • SCSI ID is recognized by the system (the SCSI ID is unique) • SCSI bus is correctly terminated • Host and the drive have the same
Emergency ejection of a CD or DVD disk If a CD or DVD disk does not eject after pressing the eject button, follow this procedure to manually eject. Caution The emergency eject procedure must be done with the drive disconnected from the power supply. Failure to disconnect the drive from the power supply may pose a hazard to the media and the drive. UNIX operating systems will require the CD/DVD filesystem to be unmounted before the disk can be ejected. 1 Remove the drive as described on page 15.
Preparing for a service call If you need help, your dealer has the latest information regarding HP products and services and can provide support under HP's comprehensive menu of reseller services. If your dealer is not able to help, you can obtain support from HP directly.
Warranty This warranty gives you specific legal rights. You may also hove other rights which vary according to where you are located. Hewlett-Packard warrants its Surestore drives against defects in materials and workmanship for a period of three years, either from the date of delivery or, where the purchase price includes installation by Hewlett-Packard, from the date of installation.
Limited warranty statement for USA, Canada, Australia and New Zealand HP warrants to you, the end-user customer, that HP hardware, accessories and supplies will be free from defects in materials and workmanship after the date of purchase, for the period specified above. If HP receives notice of such defects during the warranty period, HP will, at its option, either repair or replace products which prove to be defective. Replacement products may be either new or like-new.
i n v e n t http://www.hp.