
HP DesignJet Z2600 Z5600 PostScript Printer - User guide


NOTE: Do not try to preview a job with more than 64 pages, which may cause software problems.
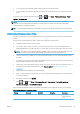
To reach the preview page, click the magnifying glass icon, which appears in the Preview column on the job
queue page. The preview page shows the following job details along with a thumbnail preview of the job:
●
File name: The le name of the job.
●
Loaded paper: The type of paper loaded in the printer.
●
Job dimensions: The dimensions of the job.
To see a larger preview of the job, click either the job thumbnail or the magnifying glass icon, which appears on
the right-hand side of the printer image.
NOTE: Browsers without the Adobe Flash plug-in show the job image as yellow shaded. Browsers that have the
Adobe Flash plug-in version 7 and above show an enhanced preview of the job image inside the paper loaded in
the printer.
Select when to print a job in the queue
NOTE: The When To Start Printing options cannot be used with PostScript jobs.
You can select at what point you want to print a le you have in the queue. Select the Setup tab, then Printer
settings > Start printing.
There are three options you can select:
●
When After Processing is selected, the printer waits until the whole page has been processed and then it
starts to print. This is the slowest setting but ensures the best print quality in large or complex prints.
●
When Immediately is selected, the printer prints the page as it is processed. This is the quickest setting, but
the printer may stop halfway through a print to process data. This setting is not recommended for complex
images with dense color.
●
When Optimized is selected (this is the default setting), the printer calculates the best time to begin printing
the page. It is usually the best compromise between the After Processing and Immediately settings.
Prioritize a job in the queue
You can select any job in the queue and make it the next one to be printed. After selecting the job, click Reprint.
If nesting is turned on, the prioritized job may still be nested with others. If you really want this job to be printed
next, and not nested with others, rst turn nesting o and then move it to the front of the queue as described
above.
Delete a job from the queue
Under normal circumstances, there is no need to delete a job from the queue after printing it, as it will just fall o
the end of the queue as more les are sent. However, if you have sent a le in error, and want to avoid printing it,
you can simply select the job and then select Delete.
In the same way, you can delete a job that has not been printed yet.
If the job is currently being printed (its status is printing), you can select Cancel and then Delete.
Reprint or copy a job in the queue
To reprint or make extra copies of any job in the queue, select the job in the Embedded Web Server and click the
Reprint icon, then specify the number of copies you want. The job will be moved to the top of the queue. To make
more than one print of a non-printed job in the queue from the front panel, select the job and choose Copies,
then specify the number of copies required. This overrides any value set by your software.
70 Chapter 9 Job queue management ENWW