t200 Digital Camcorder Quick Start Guide
For more details about the camcorder operation and troubleshooting, please read the User Manual located on the CDROM disc included with your camcorder or visit http://www.hp.com/support.
English 1. Getting Started Open the battery cover Follow u to push in and up the battery cover. Follow v to lift the cover. 1 Load the rechargeable Li-ion battery 2 Insert the battery according to the correct polarity marks (+ or -). Close the battery cover firmly. Recommended memory capacity of SD card (Not Included): 1GB or above. Li-ion battery Insert the SD card (Optional) into the slot. To remove the SD card, press it down and take it out.
English 2. Record & Play 1 LCD Touch Panel 5 4 2 6 3 1 7 1. Open LCD panel to power on 5. To zoom in or out • Flip out the LCD panel. If the LCD is already flipped open and the camcorder is shutoff hold [ Power Button • Use [T] /[W] . ]. • If no operation is performed in 3 minutes, the camera will turn itself off automatically to conserve battery power. 6. To review videos/photos • Press or touch (on-screen icon) 2. To start or stop recording • Press 7.
English 3. Plug & Share Viewing Videos and Photos on PC Install the bundled software application, ArcSoft MediaImpression ( see installation instruction below), To view the videos correctly on a PC or laptop. connect the computer and the camcorder using the supplied mini USB2.0 cable as shown. The camcorder controls will not be active. Videos and photos can be found on your computer at “My Computer\Removable Disk\DCIM\100MEDIA” (This assumes that a SD/SDHC card is inserted.
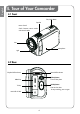
English 4. Tour of Your Camcorder 4.1 Front Tele/Wide Button Speaker Macro Switch Switch between Macro Mode and Normal Mode. Lens Microphone Light 4.2 Rear Playback LED Indicator Record LED Indicator [Photo] Button Press to take photo. HDMI Port [Video] Button TV Port Press to take video. To stop recording, press it again. Mini USB 2.
4.3 Side Power Button [Playback] Button Switch to Playback Mode. For quick review, press it after recording. Pause Button Press to pause the recording. To continue the recording, press it again. 4.4 Bottom Tripod Socket SD card Cover 5 English 4.
English 5. Troubleshooting 1. If the LCD preview is not clear while shooting, how can the focus be adjusted? Try to switch between Macro and Normal Mode. 2. The files on the memory card do not display smoothly when the LCD shows the “!” marking. The “!” means the SD card is low speed or contains incompatible content. The way to resolve this condition is to format SD card using the camera instead of a PC (Please refer to the detailed Format instruction in Section 5 of the user manual located on the disc).
P/N: 7525C00247A