Multimedia User Guide
© Copyright 2009 Hewlett-Packard Development Company, L.P. Windows is a registered trademark of Microsoft Corporation. The information contained herein is subject to change without notice. The only warranties for HP products and services are set forth in the express warranty statements accompanying such products and services. Nothing herein should be construed as constituting an additional warranty. HP shall not be liable for technical or editorial errors or omissions contained herein.
Table of contents 1 Multimedia features Identifying the multimedia components ................................................................................................ 2 Using the multimedia buttons ............................................................................................................... 3 Adjusting the volume ............................................................................................................................
The optical disc tray does not open .................................................................................................... 21 The computer does not detect the optical drive ................................................................................. 22 A disc does not play ........................................................................................................................... 22 A disc does not play automatically .........................................................
1 Multimedia features Your computer includes multimedia features that allow you to listen to music, watch movies, and view pictures.
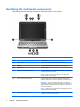
Identifying the multimedia components The following illustration and table describe the multimedia features of the computer. Component Description (1) Internal microphones (2) Record sound. (2) Webcam light Turns on when video software accesses the webcam. (3) Webcam Records audio and video and captures still photographs. (4) Speakers (2) Produce sound. (5) Audio-out (headphone) S/PDIF jack Provides enhanced audio performance, including surround sound and other high-end audio output.
Using the multimedia buttons Using the Media Launch button (1), you can watch movies, listen to music, and view pictures. Using the rotate button (2), you can change the orientation of the image on the screen. Pressing the Media Launch button launches the TouchSmart program. Repeatedly pressing the rotate button rotates the screen image counter-clockwise through 4 orientations: landscape primary, portrait primary, landscape secondary, and portrait secondary.
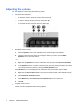
Adjusting the volume You can adjust the volume using the following controls: ● ● Computer volume buttons: ◦ To decrease volume, press the volume down button (1). ◦ To mute or restore volume, press the mute button (2). ◦ To increase volume, press the volume up button (3). Windows® volume control: a. Click the Speakers icon in the notification area, at the far right of the taskbar. b. Increase or decrease the volume by moving the slider up or down. Click the Mute Speakers icon to mute the volume.
2 Multimedia software Your computer includes preinstalled multimedia software that allows you to play music, watch movies, and view and edit pictures. The following sections provide details about HP TouchSmart and other preinstalled multimedia software. Using HP TouchSmart software HP TouchSmart turns your computer into a mobile entertainment center. With TouchSmart, you can enjoy music and DVD movies. You can also view Internet TV and manage and edit your photo collections.
Using other preinstalled multimedia software To locate other preinstalled multimedia software: ▲ Select Start > All Programs, and then open the multimedia program you want to use. For example, if you want to use Windows Media Player to play an audio CD, click Windows Media Player. NOTE: Some programs may be located in subfolders. Installing multimedia software from a disc To install any multimedia software from a CD or DVD, follow these steps: 1. Insert the disc into the optical drive. 2.
3 Audio Your computer enables you to use a variety of audio features: ● Play music using your computer speakers and/or connected external speakers ● Record sound using the internal microphone or connect an external microphone ● Download music from the Internet ● Create multimedia presentations using audio and images ● Transmit sound and images with instant messaging programs ● Stream radio programs (select models only) or receive FM radio signals ● Create or “burn” audio CDs 7
Connecting external audio devices WARNING! To reduce the risk of personal injury, adjust the volume before putting on headphones, ear buds, or a headset. For additional safety information, refer to the Regulatory, Safety and Environmental Notices. To connect external devices such as external speakers, headphones, or a microphone, refer to the information provided with the device.
4 Video Your computer enables you to use a variety of video features: ● Watch movies ● Play games over the Internet ● Edit pictures and video and create presentations ● Connect external video devices ● Watch TV, including high-definition TV (select models only) Connecting an external monitor or projector The external monitor port connects an external display device such as an external monitor or a projector to the computer.
5 Optical drive Your computer includes an optical drive that allows you to read data discs, play music, and watch movies. If your computer includes a Blu-ray Disc drive, also know as a BD drive, you can also watch high-definition video from disc. Identify the kind of device installed in your computer to see its capabilities. Identifying the installed optical drive ▲ Select Start > Computer. You will see a list of all the devices installed on your computer, including your optical drive.
Using optical discs An optical drive, such as a DVD-ROM drive, supports optical discs (CDs, DVDs, and BDs). These discs store information, such as music, photos, and movies. DVDs and BDs have a higher storage capacity than CDs. Your optical drive can read standard CD and DVD discs. If your optical drive is a BD drive, it can also read BDs. NOTE: Some of the optical drives listed may not be supported by your computer. The listed drives are not necessarily all of the supported optical drives.
Selecting the right disc An optical drive supports optical discs (CDs, DVDs, and BDs). CDs, used to store digital data, are also used for commercial audio recordings and are convenient for your personal storage needs. DVDs and BDs are used primarily for movies, software, and data backup purposes. DVDs and BDs are the same size as CDs but have a much higher storage capacity. NOTE: The optical drive on your computer may not support all the types of optical discs discussed in this section.
LightScribe DVD+R discs Use LightScribe DVD+R discs for sharing and storing data, home videos, and photos. These discs are read-compatible with most DVD-ROM drives and DVD video players. With a LightScribe-enabled drive and LightScribe software, you can write data to the disc and then add a designer label to the outside of the disc. Blu-ray Disc (BD) BD is a high-density optical disc format for the storage of digital information, including high-definition video.
Playing an optical disc 1. Turn on the computer. 2. Press the release button (1) on the optical drive bezel to release the disc tray. 3. Pull out the tray (2). 4. Hold the disc by the edges to avoid touching the flat surfaces and position the disc label-side up over the tray spindle. NOTE: If the tray is not fully accessible, tilt the disc carefully to position it over the spindle. 5. Gently press the disc (3) down onto the tray spindle until the disc snaps into place. 6. Close the disc tray. 7.
Watching a movie Your optical drive allows you to watch movies from a disc. You can also watch high-definition movies from a disc if your computer includes an optional Blu-ray Disc ROM Drive. 1. Turn on the computer. 2. Press the release button (1) on the optical drive bezel to release the disc tray. 3. Pull out the tray (2). 4. Hold the disc by the edges and position the disc label-side up over the tray spindle.
Changing DVD region settings Most DVDs that contain copyrighted files also contain region codes. The region codes help protect copyrights internationally. You can play a DVD containing a region code only if the region code on the DVD matches the region setting on your DVD drive. CAUTION: The region settings on your DVD drive can be changed only 5 times. The region setting you select the fifth time becomes the permanent region setting on the DVD drive.
Creating (burning) a CD or DVD If the computer includes an optical drive that supports CD-RW, DVD-RW, or DVD+RW discs, you can burn data, video, and audio files, including MP3 and WAV music files, using software such as CyberLink Power2Go. Observe the following guidelines when burning a CD or DVD: ● Before burning a disc, save and close any open files and close all programs. ● A CD-R or DVD-R is usually best for burning audio files because after the information is copied, it cannot be changed.
Removing an optical disc 1. Press the release button (1) on the drive bezel to release the disc tray, and then gently pull out the tray (2) until it stops. 2. Remove the disc (3) from the tray by gently pressing down on the spindle while lifting the outer edges of the disc. Hold the disc by the edges to avoid touching the flat surfaces. NOTE: If the tray is not fully accessible, tilt the disc carefully as you remove it. 3. 18 Close the disc tray and place the disc in a protective case.
6 Webcam Your computer includes an integrated webcam, located at the top of the display. The webcam allows you to capture and share video. To use the webcam, double-tap the HP TouchSmart icon on the desktop, and then do one of the following: ● Tap the video module icon (1) on the TouchSmart home page. Then tap the Webcam button at the bottom of the following screen. NOTE: In the video module, you can start the webcam, create a video, and upload your video to YouTube.
For optimum performance, observe the following guidelines while using the webcam: 20 ● If you are having trouble viewing or sending multimedia files to someone on another LAN or outside your network firewall, temporarily disable the firewall, perform the task you want to perform, and then reenable the firewall. To permanently resolve the problem, reconfigure the firewall as necessary, and adjust the policies and settings.
7 Troubleshooting The following sections describe several common issues and resolutions. The optical disc tray does not open 1. Insert the end of a paper clip (1) into the release access in the front bezel of the drive. 2. Press in gently on the paper clip until the disc tray is released, and then pull out the tray (2) until it stops. 3. Remove the disc (3) from the tray by gently pressing down on the spindle while lifting the outer edges of the disc.
The computer does not detect the optical drive If the computer does not detect the optical drive, use Device Manager to troubleshoot the device and then update, uninstall, or disable the device driver: 1. Remove any discs from the optical drive. 2. Click Start > Control Panel > System and Security. Then in the System area, click Device Manager. 3. In the Device Manager window, click the arrow next to DVD/CD-ROM drives to expand the list to show all of the installed drives.
– or – ◦ ● The playback window in the multimedia program may close. To return to playing the disc, click the Play button in your multimedia program to restart the disc. In rare cases, you may need to exit the program and then restart it. Increase system resources: ◦ Turn off external devices such as printers and scanners. This practice frees up valuable system resources and results in better playback performance. ◦ Change desktop color properties.
A DVD movie is not visible on an external display 1. If both the computer display and an external display are turned on, press fn+f4 one or more times to switch between the 2 displays. 2. Configure the monitor settings to make the external display primary: a. Right-click on a blank area of the computer desktop, and then select Screen resolution. b. Specify a primary display and a secondary display.
A device driver must be reinstalled To reinstall a device driver, follow these steps: 1. Remove any discs from the optical drive. 2. Select Start > Control Panel > System and Security. Then in the System area, click Device Manager. 3. In the Device Manager window, click the arrow next to the type of driver you want to uninstall and then reinstall (for example, DVD/CD-ROMs, Modems, and so on). 4. Right-click the device listing and click Uninstall.
Index A audio devices, connecting external 8 audio features 7 audio functions, checking 8 audio-in (microphone) jack 2 audio-out (headphone) jacks 2 audio-out (headphone) S/PDIF jack, identifying 2 AutoPlay 14 external audio devices, connecting 8 external monitor port 9 P ports, external monitor 9 projector, connecting 9 H headphone (audio-out) jacks 2 headphone (audio-out) S/PDIF jack 2 headphones 2 HP drivers 25 R region codes, DVD 16 rotate button 3 B Blu-ray Disc 13 buttons Media Launch 3 rotate 3